Making something with your own hands can be really satisfying. One time, I wanted to dress up for a party and realized I didn't have a sash. Instead of buying one, I decided to make a sash myself. It was my first attempt, but I gathered all the materials: ribbon, fabric, and sewing supplies. The project turned out easier than I thought, and the result was amazing.

If you're excited to make a DIY sash, I'm here to help guide you. Cutting the fabric to my desired length, sewing the edges, and adding some decorative elements were the key steps. It was a fun and creative process. Now, you too can take these steps to make your own beautiful sash. These instructions are here to help you get started.
Materials You'll Need
Before we start, let's gather the materials you'll need. Each item plays a crucial role in crafting the perfect sash.
Materials:
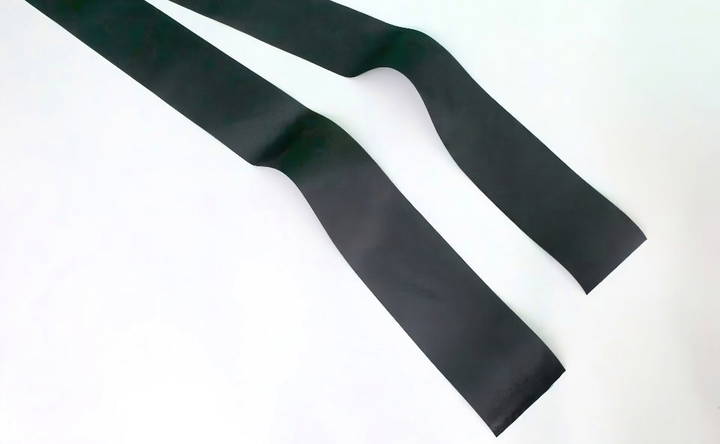
- Wide Ribbon or Fabric: This will be the base of your sash. I found a gorgeous wide ribbon thrown out on the curb, proving that you don't need something fancy to get started.
- Instant Hem Tape, Double-Sided Tape, or Stapler: These will be used to join the ends of the ribbon. Easy and quick fixes are what we are aiming for unless you prefer sewing.
- Markers, Paint, or White Out Pen: These are for writing the text on your sash. I used a white-out pen because my fabric was black, which provided great contrast.
- Puffy Fabric Paint: Optional for adding texture to your text.
- Glue and Embellishments (Rhinestones, Feathers, Flowers, etc.): To add that extra touch of glamor.
Step by Step Instructions
Learn how to make a sash with our easy, step-by-step guide. From cutting ribbon to adding text and embellishments, make a custom sash in minutes.
Step 1: Choose Your Ribbon and Cut It to Length
First, select a wide ribbon or any suitable fabric you like. The width of the ribbon can greatly impact the final appearance, so choose wisely.
- Tip: Ensure the fabric is durable enough to hold up all the embellishments you plan to add.
Wrap the ribbon around your shoulder like a sash and cut it to the appropriate length. Make sure it sits nicely without being too tight or too loose.
Step 2: Join the Ends
Once your ribbon is cut to length, it's time to join the ends. There are multiple ways to do this:
- If you're in a hurry, double-sided tape or instant hem tape works wonders.
- For a more permanent solution, use a stapler.
- If you have some time and sewing skills, you can always sew the ends together.
I personally opted for a stapler because it was quick and efficient.
Step 3: Add Your Text
Now, it's time to personalize your sash. Choose a saying or a title to write on your sash. This could be anything: "Prom Queen," "Pageant Winner," or even something humorous.
- Since my material was black, I chose a white-out pen for high contrast.
- For other colors, you can use markers or paint.
Tip: Take your time drawing out the letters. It's better to go slow and steady to avoid any mistakes.

Step 4: Let's Get Creative: Embellishments
This is the part where you can really let your creativity shine.
Check your craft drawers for glue and any embellishments you might have lying around. Here are some ideas:
- Rhinestones: A few rhinestones can add a touch of sophistication.
- Feathers and Flowers: These can make a fun and stylish look.
- Trim and Snippets: Use these to frame your text or add extra details.
I found that a dab of glue and a sprinkle of rhinestones transformed my sash into something truly fabulous.
Personalization Tips for Making a Sash
Making a sash that's both unique and personal doesn't have to be complicated. Here are some tips to help you add a personal touch to your sash, making it a cherished item for any occasion:
- Choose the Right Fabric: Select a fabric that resonates with the event. For instance, satin or silk can add a touch of elegance for formal events, while cotton might be better for casual occasions.
- Color Matters: Pick colors that complement the theme of the event. If it's a bridal shower, soft pastels or white could be perfect. For a birthday, go bold with the celebrant's favorite color.
- Add a Message: Use fabric paint or iron-on letters to add a name, date, or special message. This is a great way to commemorate the event and make the sash memorable.
- Decorative Edges: Consider adding lace, tassels, or fringe along the edges of the sash for a decorative flair. This small detail can make a big impact.
- Embellishments: Decorate with beads, sequins, or rhinestones to add sparkle and personality. You can make patterns or spell out words to reflect the theme of the event.
- Adjustable Closure: Make your sash adjustable with Velcro or snaps, so it can fit anyone comfortably and be reused for future events.
- Keep it Comfortable: Ensure the sash sits comfortably on the shoulder. It should be wide enough to stay in place, but not so wide that it's cumbersome.
- Practice Sustainability: If possible, use recycled materials or fabrics that are eco-friendly to make a sash with a lower environmental impact.
Craft a unique sash by focusing on detailed personal touches that highlight the wearer's individuality or the celebration's spirit.

Advanced Techniques for Sash Making
When you're ready to take your sash making to the next level, these advanced techniques will help you make a masterpiece that stands out. Here's how to elevate your sash with some sophisticated methods:
- Sprang Weaving: Sprang is an ancient method of weaving that makes a naturally elastic fabric. It's perfect for sashes because it provides a comfortable fit without the need for elastic materials. To try sprang weaving, you'll need a simple frame and some patience, as it involves interlinking warp threads without a weft.
- Quilt Sashing: For a quilted look, consider adding sash strips between fabric squares. This technique not only adds visual interest but also structure to your sash. Use contrasting colors for the sash strips to make the design pop, and remember to press your seams for a crisp finish.
- Ribbon Embellishment: Using plastic ribbon can add a unique texture and shine to your sash. You can make patterns, weave the ribbon through the fabric, or use it to form letters and numbers for a special message. Secure the ribbon with fabric glue or stitch it in place for a durable hold.
- Beading and Sequins: Incorporate beads or sequins for a touch of glamour. You can sew them individually or in strings. Make intricate patterns or edge the sash for a subtle sparkle. Be sure to use a strong thread and knot it securely to prevent any loss of beads.
- Embroidery: Hand or machine embroidery can personalize your sash with names, dates, or decorative motifs. Choose thread colors that contrast with your fabric for visibility and use stabilizers to keep the fabric taut while you work.
- Fabric Painting: For those with a steady hand, fabric painting allows for endless creativity. Use stencils or freehand designs to add flowers, symbols, or even calligraphy to your sash.
- Layering Fabrics: Layer different fabrics to make depth and texture. Sheer fabrics like tulle or lace over a solid base can give a sophisticated look. Experiment with layering patterns or colors for a unique effect.
Use these advanced techniques to turn your sash into a stunning accessory that shows off your skills. Practice on scrap fabric first.
Troubleshooting Common Issues in Sash Making
When crafting a sash, you might encounter a few hiccups along the way. Here's a helpful guide to troubleshoot common issues, ensuring your sash-making process is as smooth as possible:
Fabric Fraying
- Solution: To prevent fraying, use a zigzag stitch or a serger on the edges of your fabric. If you don't have a serger, applying a fray check liquid can also help secure the threads.
Uneven Width
- Solution: Consistency is key. Use a ruler or measuring tape to mark your fabric before cutting. Cutting mats with grid lines can be particularly helpful for maintaining straight, even lines.
Wrinkles or Bubbles
- Solution: Iron your fabric before you start, and pin it in place to avoid movement as you sew. If wrinkles appear after sewing, gently steam and press the fabric to smooth it out.
Dull or Skipped Stitches
- Solution: This could be a sign that your needle is blunt. Replace it with a new one suitable for the weight of your fabric. Also, ensure your thread tension is correctly adjusted for your fabric type.
Difficulty in Attaching Embellishments
- Solution: Use a thimble to protect your fingers when hand-sewing beads or sequins. For heavier embellishments, consider reinforcing the area with interfacing or a backing fabric.
Sash Slipping Off the Shoulder
- Solution: To keep the sash in place, sew small snaps or hooks at the shoulder of the garment where the sash will sit. Alternatively, a hidden safety pin can also do the trick.
Color Fading or Bleeding
- Solution: Always pre-wash your fabric in cold water to reduce the risk of color bleeding. For colorfastness, add a cup of vinegar to the wash during the first rinse cycle.
Sash Too Stiff or Too Floppy
- Solution: The choice of fabric can greatly affect the drape of your sash. For a stiffer sash, opt for heavier fabrics or add interfacing. For a softer drape, choose lighter materials like chiffon or silk.
By anticipating these common issues and knowing how to solve them, you'll be well on your way to making a beautiful, professional-looking sash.
FAQs About How to Make a Sash
Discover FAQs about 'how to make a sash' with expert tips on materials, steps, and techniques for making a perfect sash.
A: Follow these steps:
Use a measuring tape to measure from your right hip, over the shoulder, to the left hip.
Add a few inches to this measurement for overlap and comfort.
Cut the fabric to this length and about 4 inches wide.
If using interfacing, cut it to the same size as the fabric and iron it on for stability.
A: Personalization options include:
Ironing on letters to spell out a title or name.
Painting or writing with fabric paint or markers.
Adding decorative trim along the edges.
Gluing on sequins, beads, or other embellishments for extra sparkle.
A: To secure your sash:
Use a safety pin or a decorative brooch to pin the sash at the hip.
Sew a small piece of Velcro on the ends where they overlap.
Ensure the sash is snug but comfortable, so it doesn’t slip down.
A: Selecting the right fabric is crucial for the look and feel of your sash. Consider these tips:
Satin is a popular choice for its smooth texture and elegant sheen, perfect for formal events.
Cotton can be used for a more casual and comfortable sash.
Ribbon can be a quick alternative; a wide, thick ribbon doesn’t require sewing and can be easily decorated.
Choose a color that stands out and matches the theme of the event.
A: Yes, it's possible to make a no-sew sash. Here's how:
Choose a fabric that doesn't fray easily, like felt or fleece.
Cut the fabric to the desired width and length.
Use fabric glue or double-sided tape to secure any trims or decorations.
For letters, opt for iron-on transfers or fabric markers for personalization.
Final Thoughts
Making a DIY beauty queen sash doesn't have to be complicated or expensive. With a bit of creativity and some household items, you can make a sash that not only looks amazing but also holds sentimental value.
Additional Tips
- Budget-Friendly Shopping: Looks for sales or use coupons. I got my white-out pen for free with a coupon!
- Experiment with Colors: Don't stick to traditional colors; mix it up and see what works best for you.
- Practice Makes Perfect: If you make a mistake, don't be afraid to start over. The more you practice, the better your crafts will become.
I hope this guide was as helpful for you as it was fun for me to make. Enjoy your new beauty queen sash, and make sure to flaunt it with pride at your next prom or pageant!


