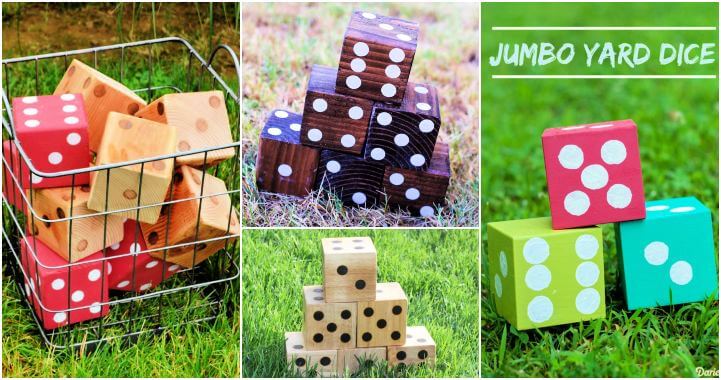
Embarking on a creative project like crafting DIY wooden dice at home can be an enriching experience, especially when you have the right guidance. This guide is designed to walk you through each step, from selecting the perfect materials to putting the finishing touches on your personalized dice. With easy-to-follow instructions and tips for customization, you'll find everything you need to bring your wooden dice to life.
In the making journey ahead, we'll cover essential topics such as the materials and tools needed, step-by-step instructions for crafting your dice, ways to make them uniquely yours through variations and customization, and crucial safety tips to keep in mind.
By the end of this guide, you'll have a clear understanding of how to make beautiful, custom dice that you can be proud of. As we dive into the details, get ready to unlock your creative potential and add a personal touch to your board games and decor.
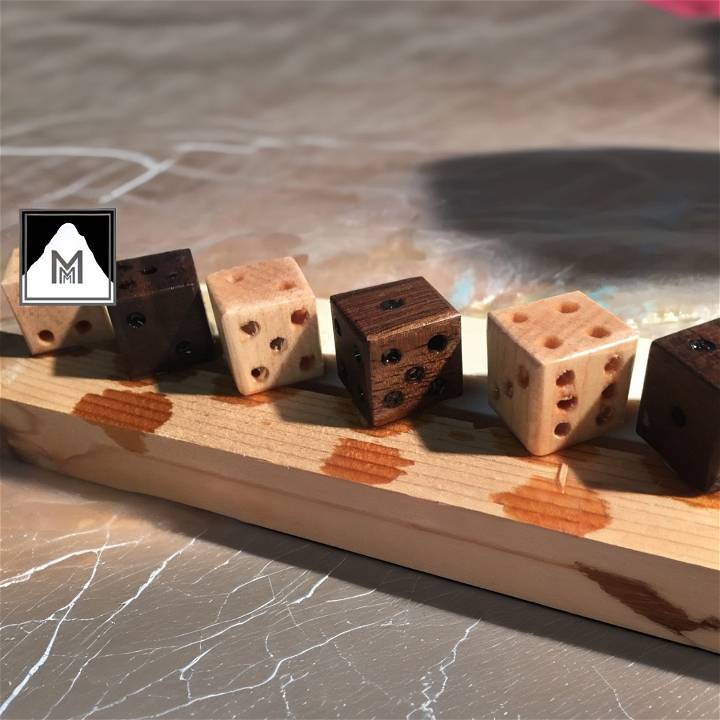
Materials and Tools Needed
- Walnut and maple wood (for contrast)
- Table saw
- Crosscut sled
- Scrap oak (for the dice case)
- Glue
- Nails
- Drill press (with drill bits)
- Belt sander
- Polyurethane
Step by Step Instructions:
Learn how to make wooden dice at home with this easy DIY tutorial below:
Step 1: Preparing the Wood
Take your pieces of walnut and maple wood. The idea is to use the contrasting colors to make an aesthetic appeal. Cut them into strips using a table saw, ensuring each piece has the same width and thickness. This consistency is key for making the dice look uniform.
Step 2: Cutting the Cubes
Now, set up your crosscut sled on the table saw. Measure the thickness of your strips to determine the size of your dice. Adjust the stop block on your sled to match this measurement. Then, cut the strips into cubes, making sure each face is as square as possible.
Step 3: Making the Dice Case
Using some scrap oak, cut pieces just slightly larger than your dice. This will serve as the case. Glue and nail a bottom to form the case—this will keep your dice secure and add a touch of craftsmanship to your project.
Step 4: Drilling the Dots
With your drill press, carefully drill holes on each side of the dice to represent the numbers. If you're without a drill press chuck key like in the video, you can try to steady your hand and drill the holes freehand. Remember, any slight imperfections add character to your handmade dice.
Step 5: Sanding and Finishing
Take your dice to the belt sander to smooth out each face and soften the edges. This not only makes the dice more pleasant to handle but also prepares the surface for the final step. Apply several coats of polyurethane to both the dice and the case, letting them dry thoroughly. This gives the wood a protective finish and enhances its natural beauty.
Video Tutorial
For a step-by-step video tutorial on making wooden dice, watch this helpful YouTube video.
It pairs well with this written guide, offering a visual complement to the techniques we've discussed. Watching the process can demystify any complex steps and provide you with a clearer understanding of how to achieve the best results.
Making wooden dice is more than the final product- it's about the happiness of making something yourself. These unique dice can spark conversations at game nights or be a heartfelt gift. Embrace imperfections and appreciate the process.
Variations and Customization of Wooden Dice
Crafting wooden dice allows for endless creativity. Choose wood, and add personal touches for a unique look. Customize for uniqueness.
Choosing Different Wood Types
- Softwoods vs. Hardwoods: Softwoods like pine are easier to carve and work with, making them ideal for beginners. Hardwoods like oak or walnut offer a more durable dice, with a premium feel.
- Grain and Color: Consider the wood's grain and color. Woods like cherry or mahogany can add rich tones, while maple or birch provide a lighter, more subtle appearance.
Applying Stains and Paints
- Stains: Wood stains enhance the natural beauty of the wood's grain. From light to dark shades, you can choose a stain that complements your style or game room.
- Paints: If you prefer a more vibrant or specific color scheme, acrylic paints are your best bet. They allow for a broader range of colors and can be sealed for durability.
Customizing Sizes and Shapes
- Sizes: Not all games require standard-sized dice. Experiment with making larger or miniature dice, adjusting the size based on the game's needs or for decorative purposes.
- Polyhedrons: For more complex games, consider crafting polyhedral dice. This involves more intricate work but allows for a variety of shapes like dodecahedrons (12 sides) or icosahedrons (20 sides).
Personalizing with Engravings and Inlays
- Engravings: Personalize each dice by engraving initials, symbols, or numbers with a laser cutter or a hand tool. This is perfect for gifts or making a themed game set.
- Carvings and Inlays: For a more tactile experience, try carving patterns or inlaying materials like metal, stone, or contrasting wood. This adds not only visual appeal but also a unique touch to the feel of the dice.
Highlighting Your Custom Dice
Don't hesitate to try new things when making custom wooden dice. Let your style and game preferences shine through in your choices.
Troubleshooting and Common Issues
When embarking on the project of making your own wooden dice, you might encounter a few hurdles. Here's how to tackle some of the common issues:
Uneven Cuts:
- Solution: Ensure your saw blade is sharp and your measurements are precise. Use a mitre box for more accurate cuts. Practice a few cuts on scrap wood first to get the hang of it.
Wood Splitting:
- Preventative Tip: Choose a hardwood like maple or cherry, which is less likely to split compared to softwoods. Drill pilot holes for the dots to prevent splitting when drilling.
Difficulty Drilling the Holes:
- Solution: Use a drill press for uniform depth and straight holes. If you don't have a drill press, a handheld drill with a depth stop can work. Go slow and steady to ensure clean holes.
Safety: Your Top Priority
When diving into the exciting world of DIY projects, especially when working with wood and crafting something as fun as wooden dice, prioritizing safety is crucial. It's not just about the end product; it's also about ensuring you get through the process without injuries. Here, we'll walk through essential safety gear and specific tips to keep you safe at every step.
Essential Safety Gear
- Eye Protection: Always wear safety goggles to protect your eyes from sawdust, flying chips, and splinters.
- Gloves: Use durable gloves to safeguard your hands from splinters and cuts, especially when handling rough wood or using hand tools.
- Dust Mask: Wood dust can be harmful if inhaled. A dust mask or respirator is essential to keep those fine particles out of your lungs, particularly during sanding.
Safety Tips for Each Step
1. Measuring and Marking
- Keep Your Workspace Organized: A clutter-free workspace minimizes the risk of accidental slips or cuts.
- Use the Right Tools: Always use sharp, well-maintained tools for marking, ensuring clean and visible lines without applying excessive force.
2. Cutting the Wood
- Secure the Wood: Make sure the wood block is securely clamped down to prevent it from moving while you cut.
- Power Tool Safety: When using power tools like a saw, always follow the manufacturer's safety instructions. Keep your hands clear of the blade and use push sticks if necessary.
3. Shaping and Sanding
- Hand Tool Caution: When using chisels or knives, always cut away from your body to prevent injury.
- Dust Safety: Sanding makes a lot of dust. Besides wearing a dust mask, ensure your workspace is well-ventilated.
4. Finishing Touches
- Chemical Safety: If you're using sealants or paints, wear gloves and work in a well-ventilated area to avoid inhaling fumes.
By following safety measures and using tools correctly, you can enjoy making wooden dice while staying protected. Remember, ensuring safety can make DIY enjoyable and safe.
FAQs on DIY Wooden Dice
Learn all about DIY Wooden Dice with our comprehensive FAQs guide. Find answers to all your questions on making your own unique wooden dice today!
What is the ideal type of wood to use?
Hardwoods are best for making dice as they are durable and less prone to chipping or splitting. Maple, cherry, and walnut are great options.
What safety precautions should I take?
Always wear safety goggles when cutting or drilling wood. Keep your fingers away from the path of the saw blade or drill bit. Work in a well-ventilated area and wear a dust mask to avoid inhaling sawdust.
Are there alternative methods for marking the dice faces?
Yes, if you find drilling to be challenging, you can use a wood burner or paint to mark the dots on the dice faces. This can also add a unique aesthetic to your dice.
How can I ensure my dice are balanced?
For the dice to be balanced, ensure all sides are equally sized and the holes for the dots are evenly spaced and of the same depth. Testing balance can be as simple as rolling the dice multiple times to see if there's a pattern in the outcome.
Can I seal or finish the wooden dice?
Absolutely, and it's recommended. A clear, non-toxic sealant or beeswax can protect the wood and enhance its natural beauty. Make sure the finish is completely dry before using the dice.
By addressing common issues and questions, you'll make successful wooden dice. Patience and precision are key.
Conclusion:
In conclusion, mastering the craft of making easy DIY wooden dice at home can be a rewarding endeavor. From selecting the perfect piece of wood to applying the final finishes, each step offers a chance to add a personal touch to your dice. Whether it involves choosing different wood types, experimenting with stains and paints, or customizing sizes and shapes, the possibilities are endless.
Remember, safety should always be your top priority, so never skip on wearing the right gear and following precautionary measures. If you run into trouble, the troubleshooting section can offer guidance. Embarking on this creative journey not only allows you to make unique gaming accessories but also provides the satisfaction of having made something truly your own. Get started today and bring your custom wooden dice to life!


