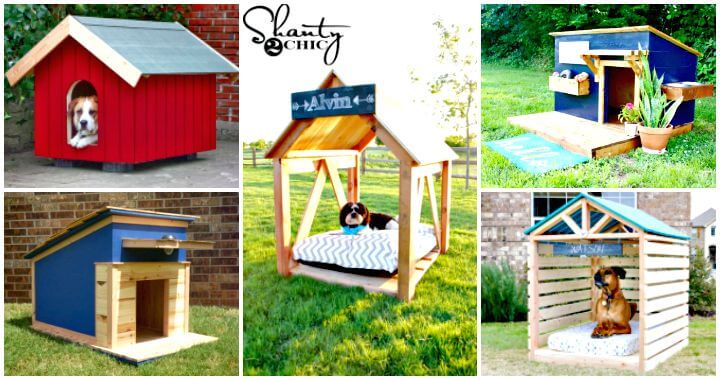
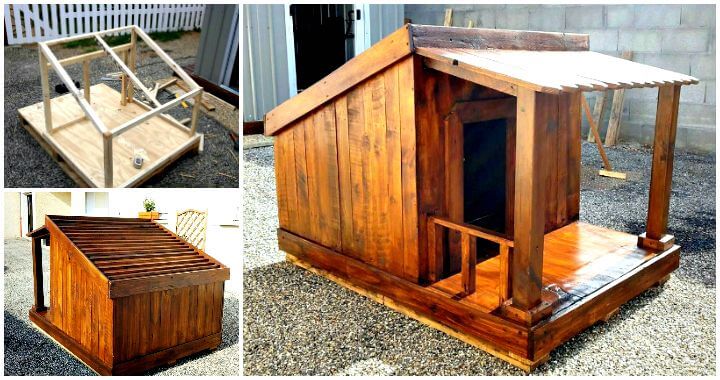
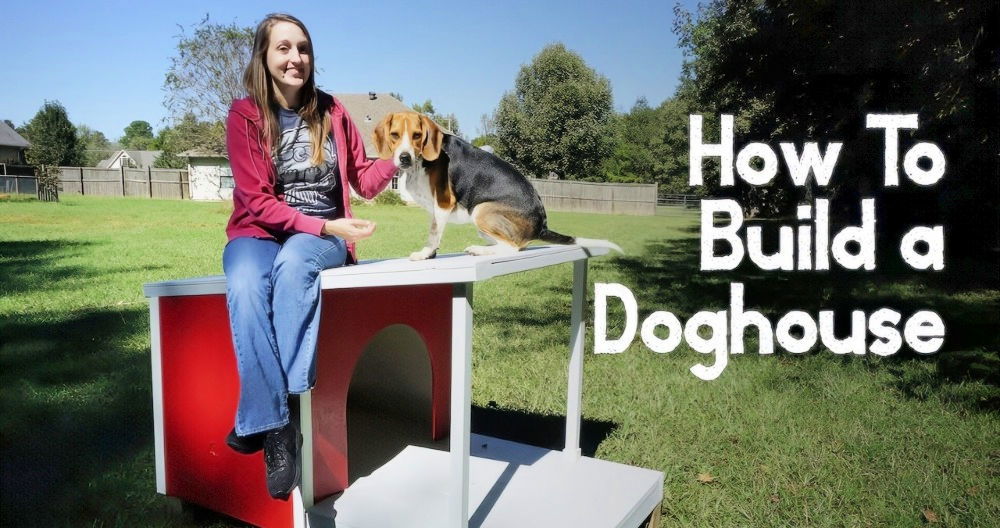
DIY pallet dog house is a great option for those who want to create an appealing and cozy space for their pets to unwind. Constructing a pallet dog house doesn't require advanced crafting or woodworking skills; you only need a simple, well-explained blueprint and cost-effective materials like recycled pallet wood and plywood. With the proper instructions, even novices can easily grasp the art of utilizing pallets to build an aesthetically pleasing and practical DIY dog house that guarantees your furry friend's warmth and security regardless of the weather.
Building this pallet dog house is an easy, cost-effective way to ensure your four-legged friend has the best home possible. Start by finding free pallets made of sturdy materials like pine which are the best for constructing a pallet wood dog house. The next step is to plan out the size you’d like your pup's new home to be and find a detailed pallet dog house plan below that includes clear instructions on what kind of tools and materials you need.
Here is a list of materials, tools, approximate size, and cost for building a DIY pallet dog house:
Materials:
- Pallet wood (free or obtained at a low cost)
- Plywood sheet for base and roof overlay
- Wooden cross beams
- Fiberglass insulation (optional for insulation)
- Caulk (for sealing gaps)
- Thick blankets (for additional insulation)
- Stain or paint for weather protection and aesthetics
- Nails or screws
- Cardboard (for template if needed)
- Wooden slats for veranda and roof shingles
- Hinges and latch for the door (if desired)
Tools:
- Saw (circular saw or hand saw)
- Measuring tape
- Angled rule
- Hammer or screwdriver
- Paintbrush or roller
- Safety goggles and gloves
- Pencil and paper (for planning)
- Sandpaper (for smoothing)
- Insulation cutter (if using fiberglass insulation)
- Clamps (for securing pieces during assembly)
Approximate Size:
The size of your pallet dog house can vary depending on your dog's size and your preference. A typical medium-sized dog house may have dimensions around 36 inches in width, 42 inches in length, and 36 inches in height.
Cost:
The cost of building a pallet dog house can be quite affordable, mainly depending on the quality of materials you choose and whether you can obtain pallet wood for free or at a low cost. Here's an approximate cost breakdown:
- Pallet wood (free or low cost)
- Plywood sheet: $10 - $20
- Wooden cross beams: $5 - $10
- Fiberglass insulation (optional): $10 - $20
- Caulk: $5 - $10
- Stain or paint: $10 - $20
- Nails or screws: $5 - $10
- Hinges and latch (if desired): $5 - $10
- Other miscellaneous supplies: $10 - $20
Total estimated cost: $55 - $115 (This cost can vary based on location, quality of materials, and additional features.)
Remember that this is a rough estimate, and the actual cost may vary depending on factors such as your location, the availability of materials, and your choice of design. Additionally, the overall cost can be reduced if you already have some of the tools and materials on hand.
Once you have gathered your supplies, your pallet wood dog house will quickly come together. Building an outdoor pallet dog house ensures that your pet gets adequate shelter, is protected from nature's elements, and remains safe from potential predators. It's time to build a pallet dog house - it's fast and simple, and before you know it, you'll have crafted your very own impressive dog house made from pallets!
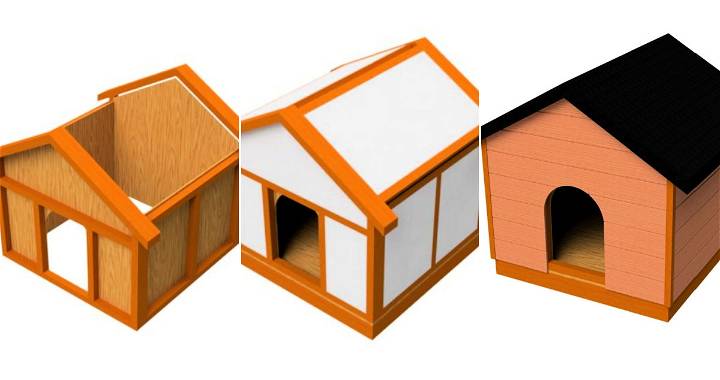
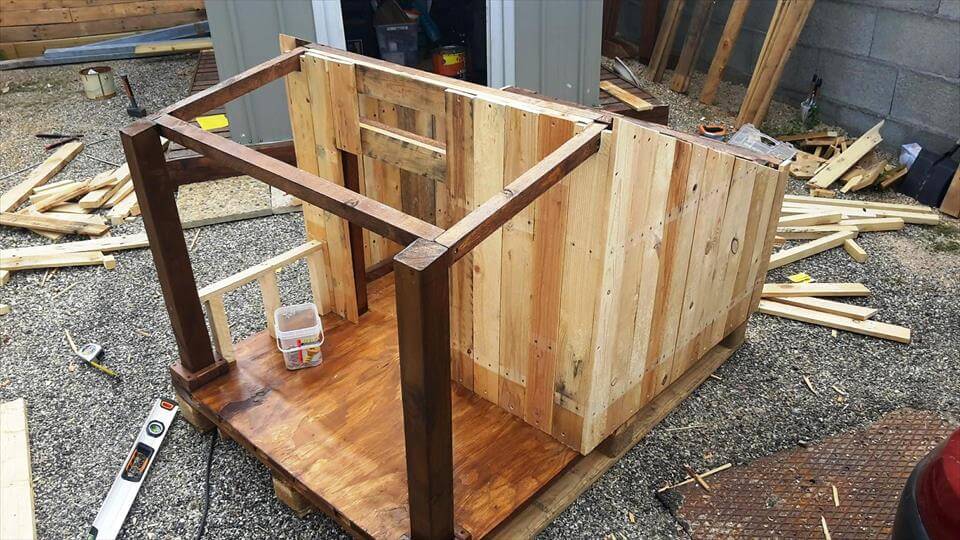
Pallet Wood Dog House Plan Guide
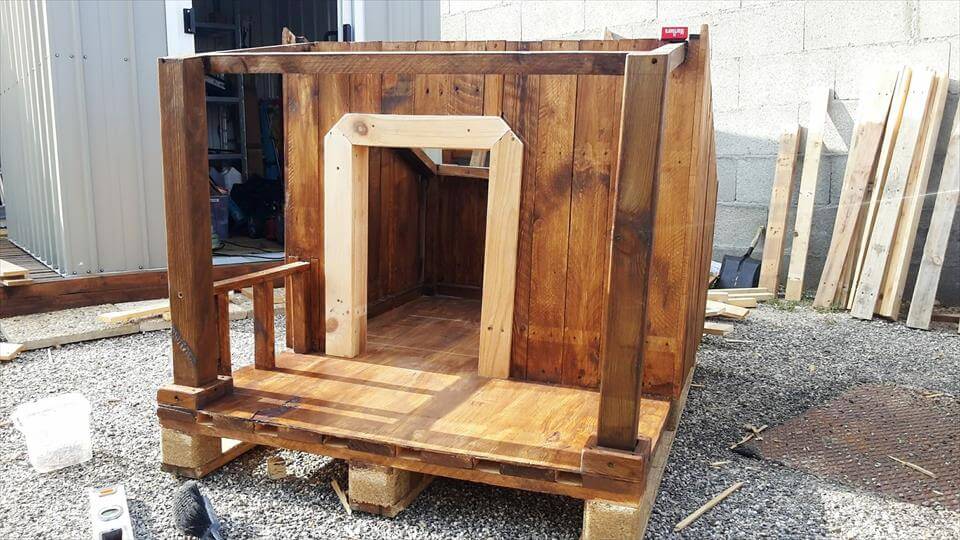
Start building this dog house by making the base first, selecting an uncut solid pallet as a base, and making it look smoother with a plywood overlay!
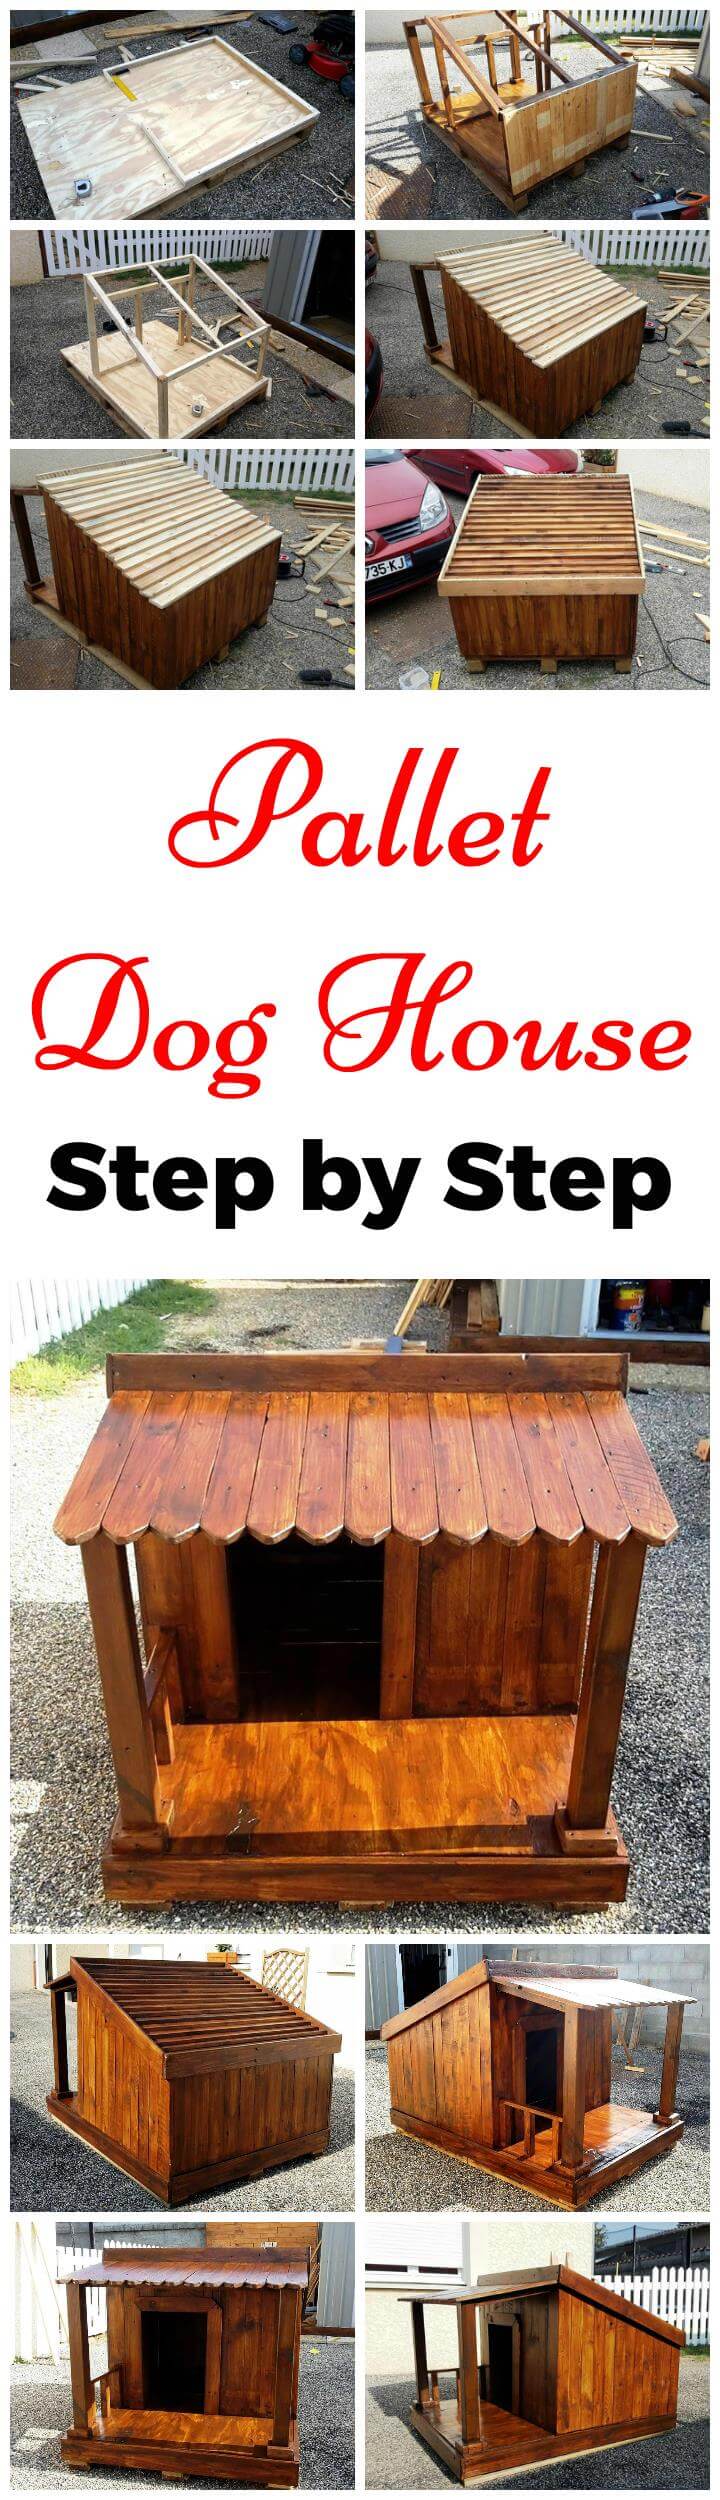
Keeping the size and dimensions of the dog house in mind and building the basic skeleton using slats of pallets would contain solid pillars and cross beams! Finish the frame by filling solid using more pallet wood, and don’t forget to apply the stain coats for better visual and weather protection! If you want more dog house designs, you can also try these free dog house plans that include step by step instructions, guides, and pdf plans.
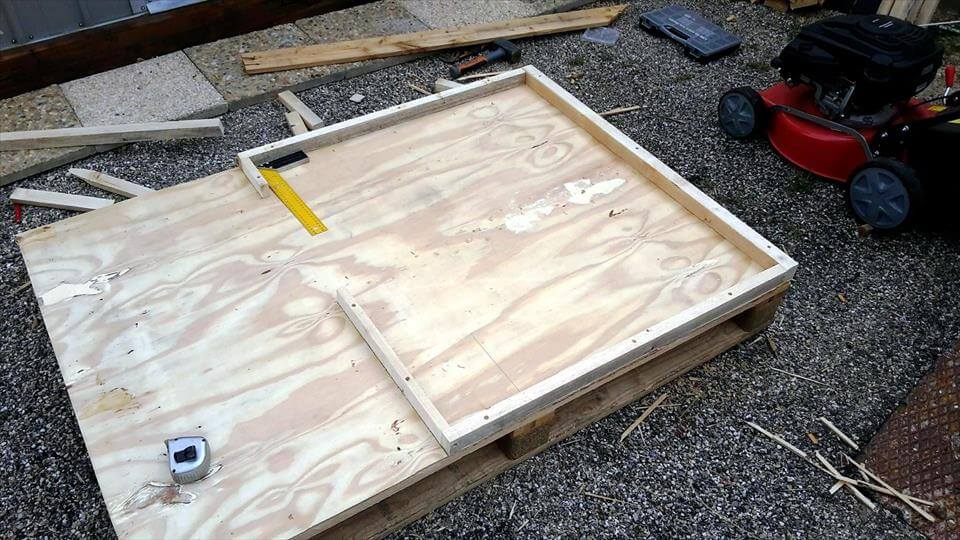
Take a complete pallet board and combine it with a plywood sheet overlay for extra smoothness! The size of the plywood sheet must be equal to the size of the selected pallet board!
Now leave the space for the front veranda and put the raised wooden boundary around the rest of the base, as you can see! Keep the measuring tape and angled rule in hand to add precision to your work!
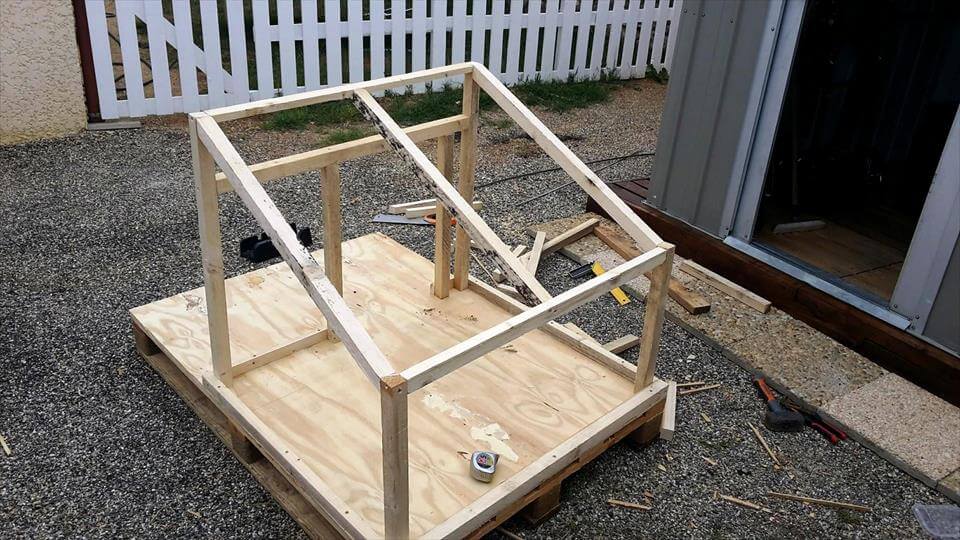
Decide whether you want to have a tilted roof or a raised balanced roof! All you need is to shorten the length of back pillars to the desired extent! On the other hand, raise the back pillars equal to the front ones to gain a balanced flat roof! The tilted roof would be recommended as it has additional benefits like it would not allow retaining rainwater!
After you decide on the roof's design, connect the back pillars to the front ones using durable wooden cross beams! Use an extra one in the mid to ensure the sturdiness of the roof!
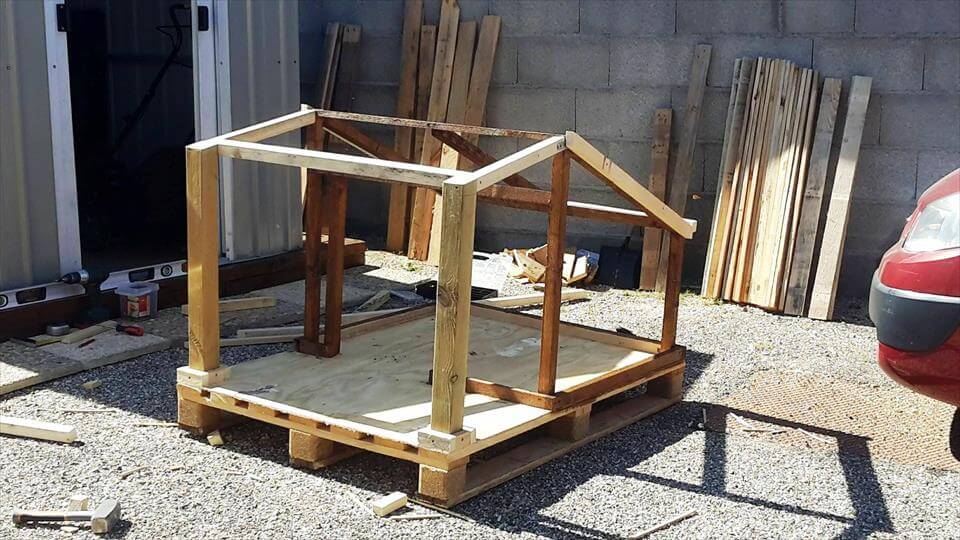
After ensuring the doghouse frame's stability, install next to the veranda pillars and join them to roof pillars using wooden cross beams! Rummage around to gain thicker wooden lengths from home to use as front veranda pillars as it requires more stability!
Here doing little things will matter a lot. Small square-shaped supports underside the pillars bring a stylish sense to the entire design!
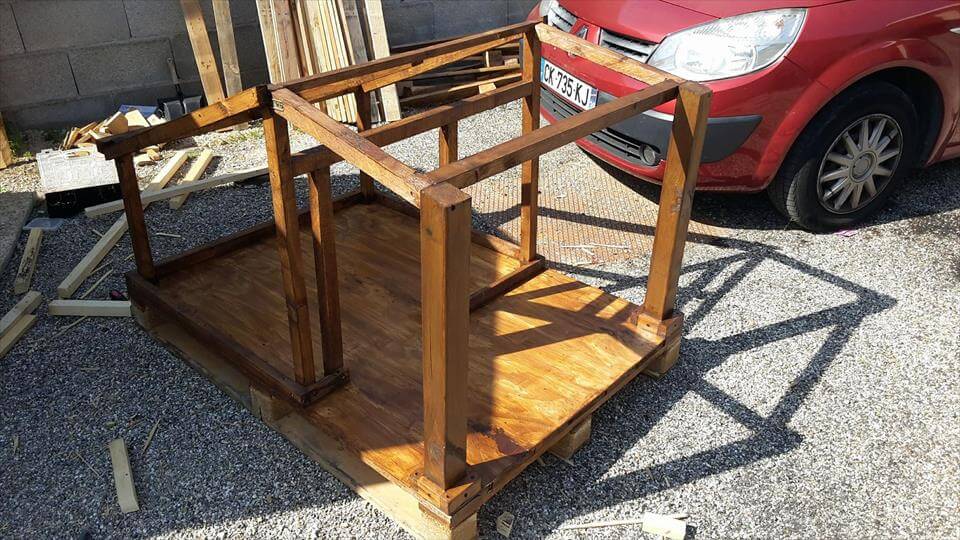
Make sure that you have all the attachments correctly! Go for a little inspection and start staining the dog house frame after your satisfaction with the joints!
Double up the thickness of the side and back cross beams by providing layering one more wooden length! These extra wooden supports should have a little extra size to cover the corners perfectly!
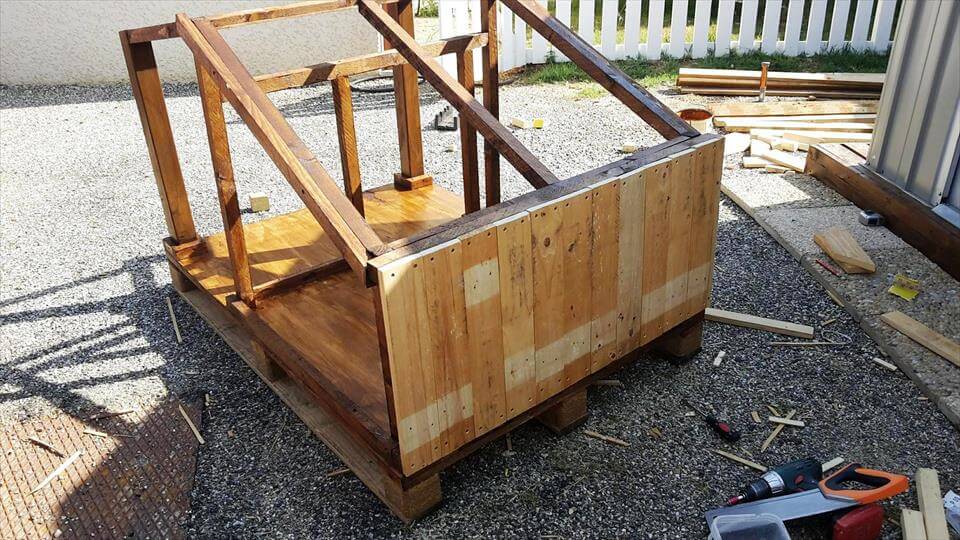
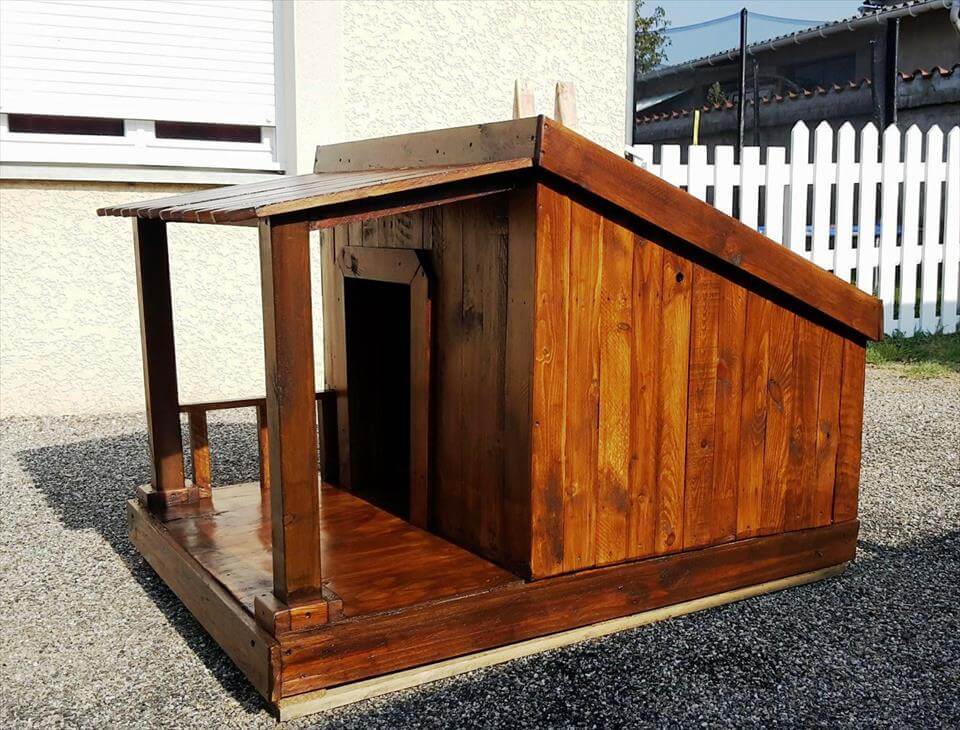
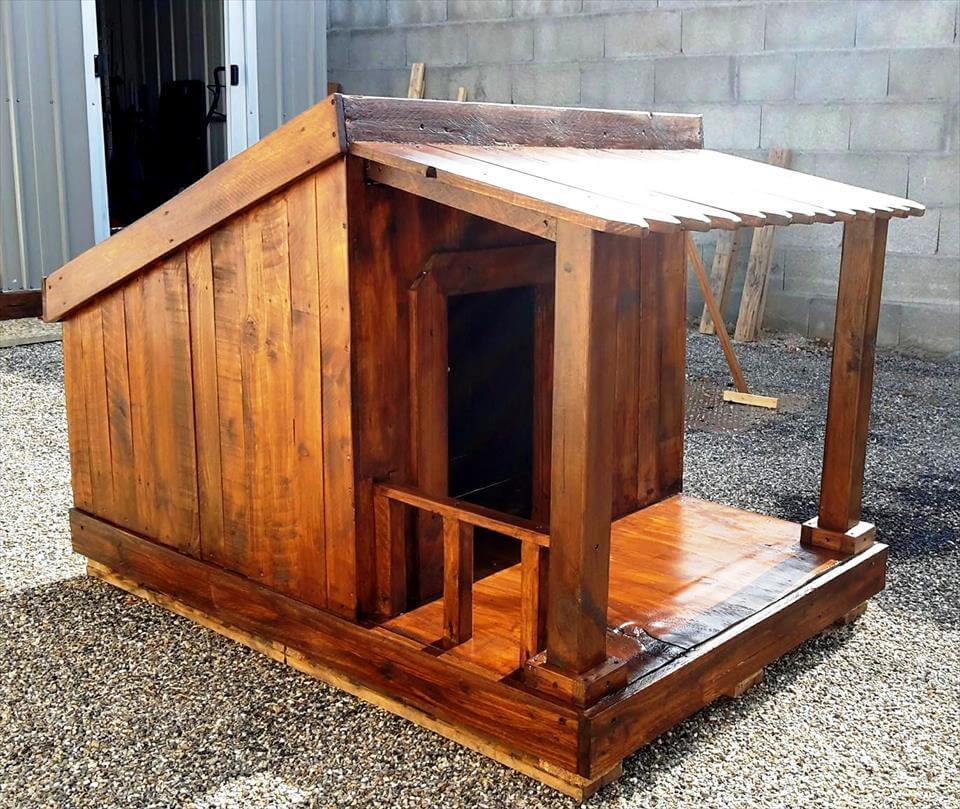
After adding extra braces and cross supports, start filling the sides and overall frame with straight removed pallet planks!
Starting from the lower backside, fill up the entire frame solid except the front veranda! Decide the size of the front entrance and leave that measured space unfilled!
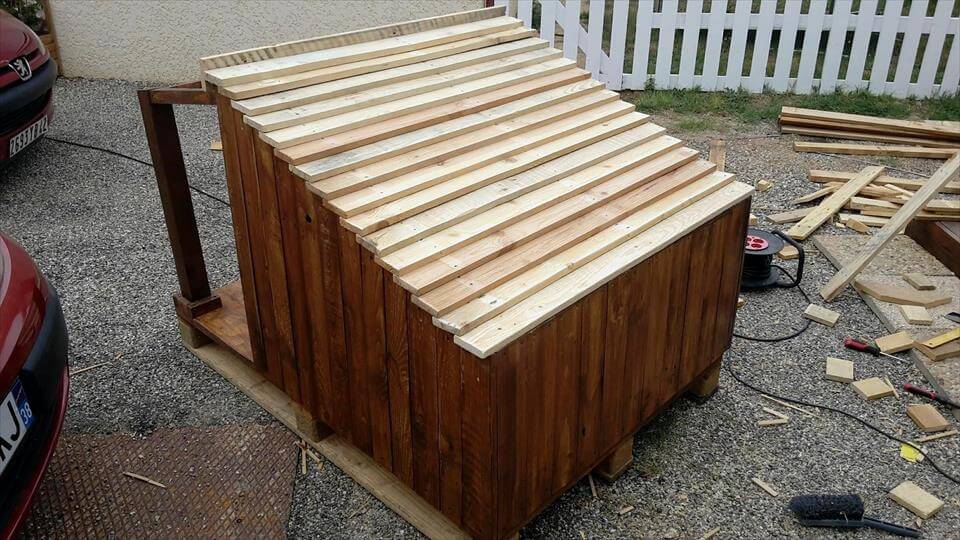
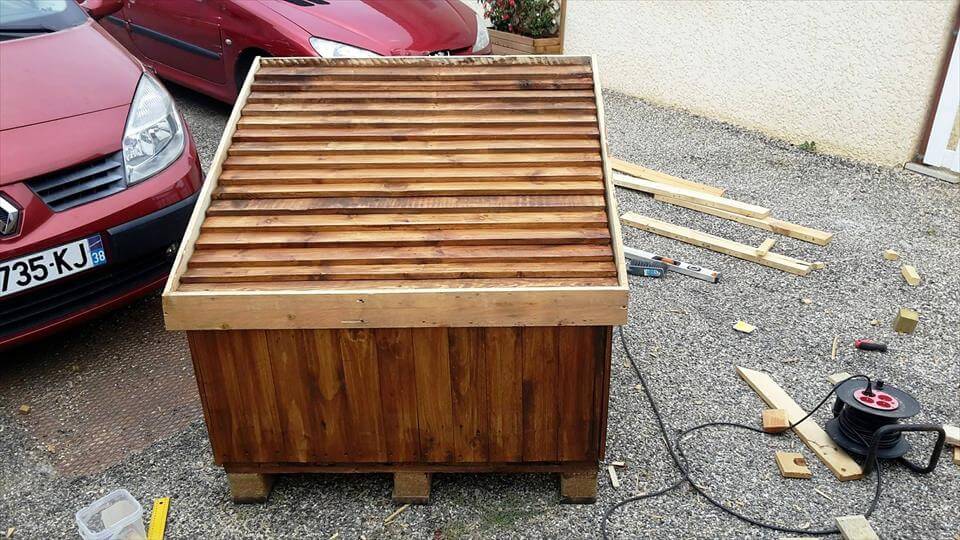
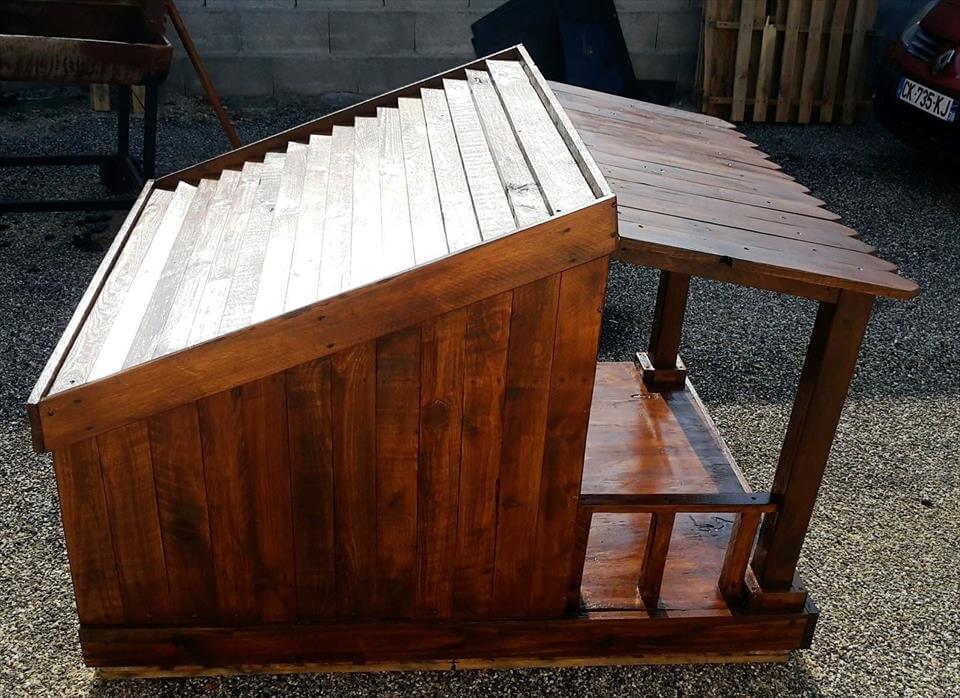
Time for the shingled roof! Start from the low backside, start arranging the pallet slats flat just like the stair steps! Finish it up when you reach the peak!
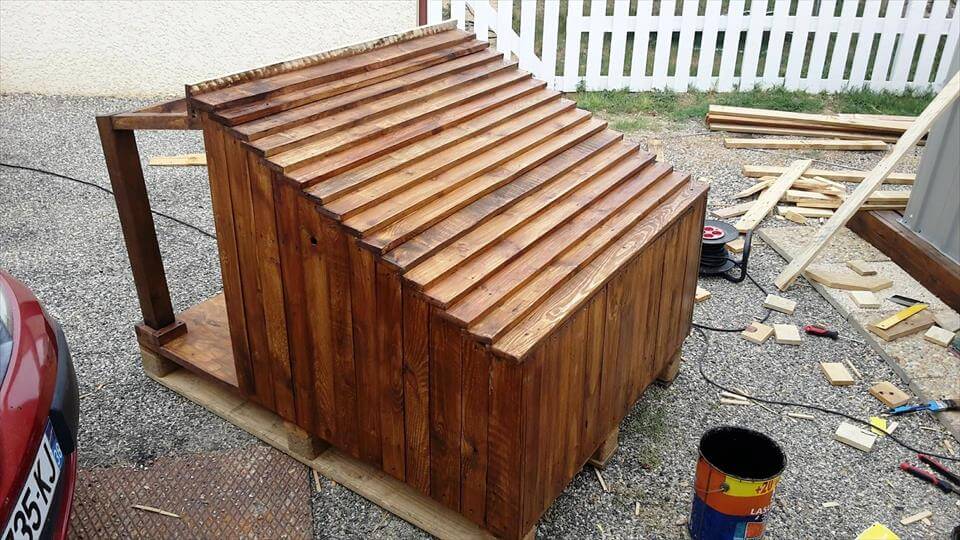
Again pick the stain bucket and tools and start staining the shingled roof! Apply coats equal to the number of coats you have applied already to the rest of the design!
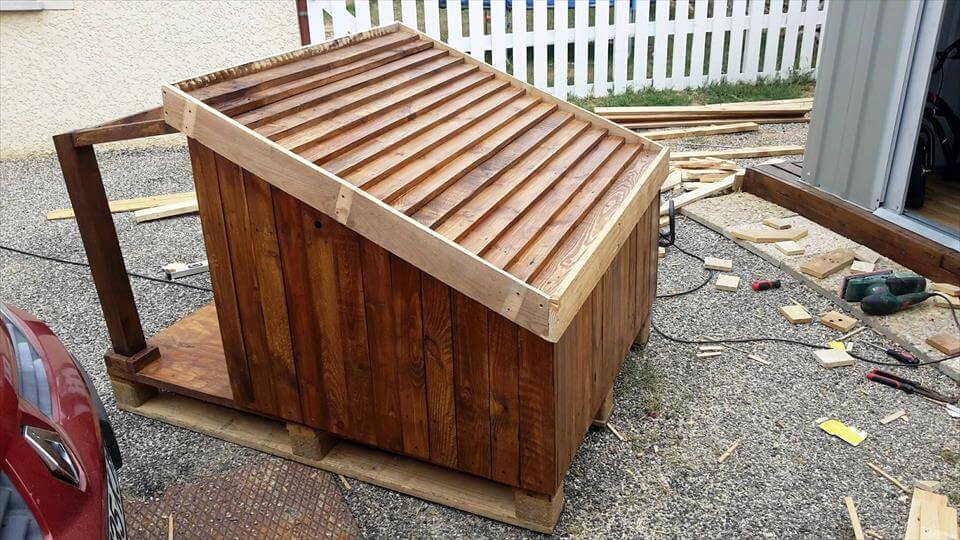
The next step would be to go for side trimming of the shingled roof!! Pick more pallet slats and resize them to fit right to each side of the tilted roof!
Trim down the access of edges and try your best to gain neatness!!

Install the entrance frame and also the one side fence wall of the veranda!! Both would be easy to plan using dismantled pallet slats!
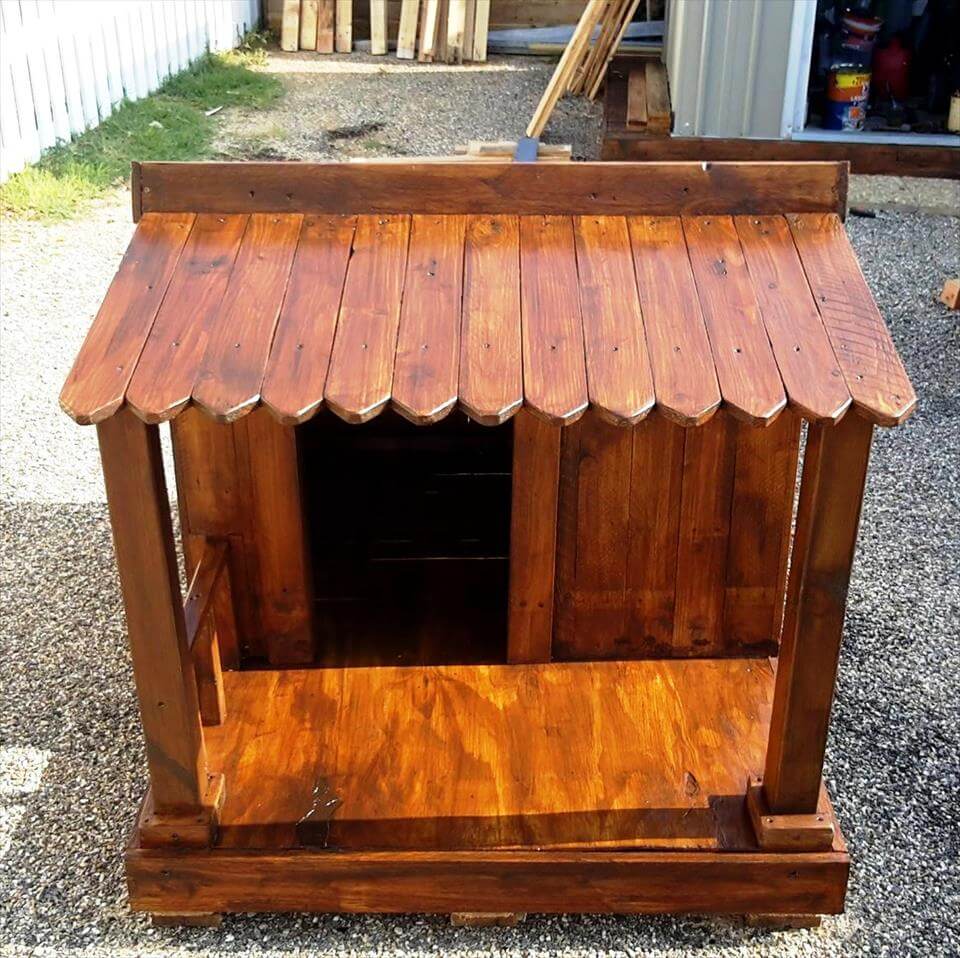
Build the veranda roof or shelter by putting flat slats of pallets one by one after getting them resized! Keep the front edges of the veranda roof in V-shape just like a wooden fence! This would bring prominence and an artistic vibe to the entire design!
Stain well also on the roof of the veranda and gift it to your dog!
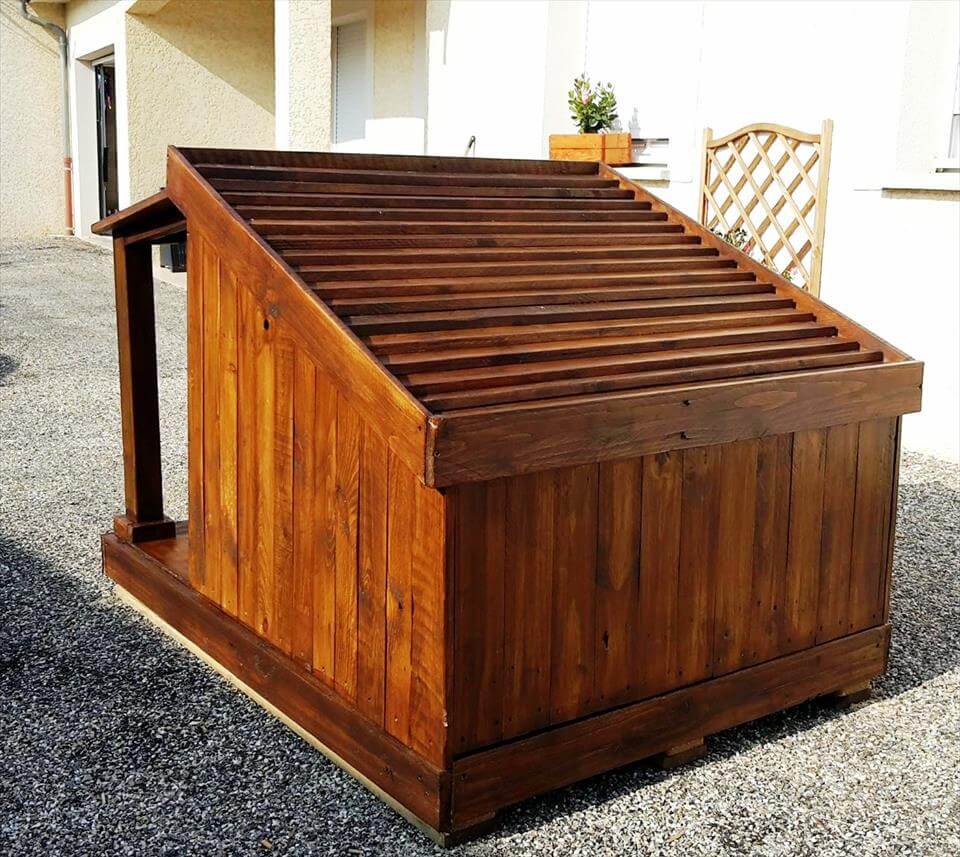
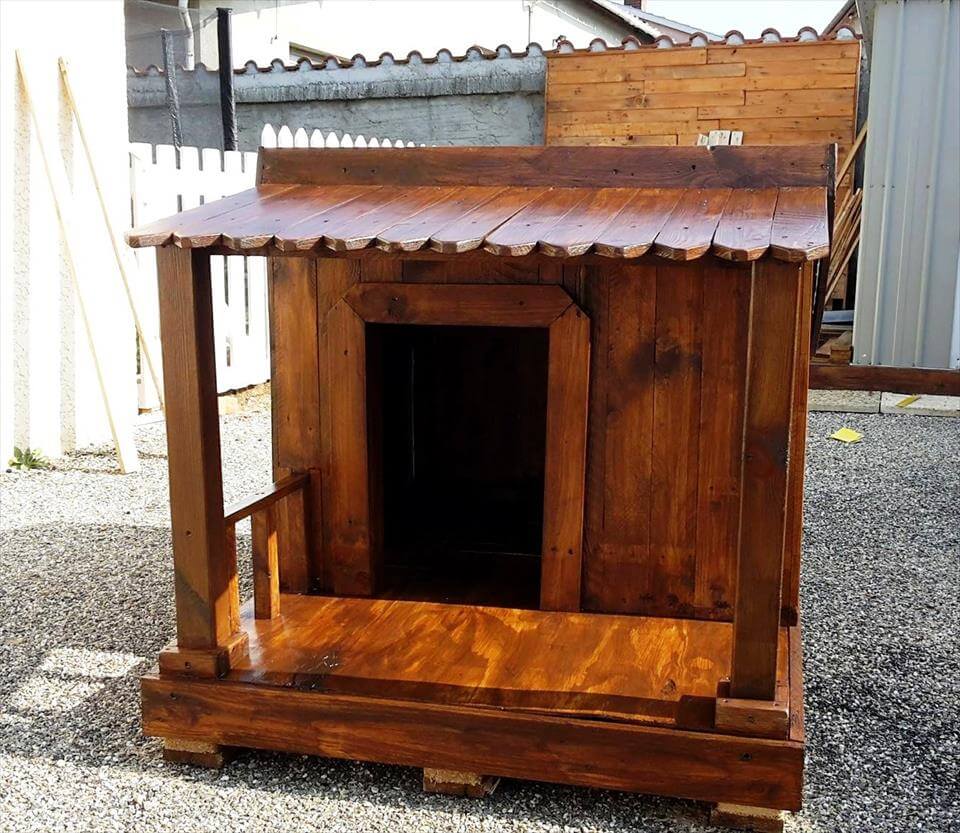
A perfect dog kennel or pet house one can build with your own hands!!
The good news is that you will get it with a zero investment! It is all a wallet-friendly pallet project!!
Don't forget to seal the wooden surfaces after staining for necessary shine, crystal clearance, and long-lasting weather and water protection!
Certainly! I'll continue the article with a new section that provides further guidance and tips on customizing and finishing the dog house for added comfort and functionality.
Customizing Your Pallet Dog House
Once you have the basic structure of your pallet dog house complete, you can add some custom features to make it even more comfortable and functional for your pet. Here's how to go about it:
Adding Insulation
To ensure your dog stays warm during colder months, consider adding insulation to the walls and roof of the dog house.
- Measure and cut fiberglass insulation to fit between the pallet slats.
- Cover the insulation with a thin plywood layer or any breathable, water-resistant barrier to protect your dog from direct contact.
- Seal any cracks or gaps with caulk to prevent drafts.
Creating a Comfortable Interior
A dog house isn't just about shelter; it's also about comfort.
- Lay down a thick, water-resistant pad or cushion that fits snugly inside the dog house.
- Add removable, washable bedding such as blankets or towels for additional warmth.
- Consider a raised floor to keep your dog off the cold ground.
Adding a Door Flap
Protect your dog from the elements by installing a door flap.
- Measure the entrance of the dog house.
- Cut a piece of heavy-duty vinyl or rubber matting to fit the doorway, leaving a few inches extra on each side.
- Attach the flap above the doorway using heavy-duty staples or screws and washers.
Ventilation
Good air circulation is crucial to avoid condensation and to keep the dog house comfortable in warmer weather.
- Drill several small holes near the roofline of the back wall for ventilation.
- Optionally, add a small, battery-operated fan to one of the walls to help circulate air.
Paint and Decor
A coat of paint can add personality to your dog house and additional weather protection.
- Choose pet-safe, non-toxic exterior paint.
- Apply a primer coat if necessary, followed by at least two coats of paint, allowing it to dry thoroughly between coats.
- Add decorative touches like your dog's name, paw prints, or patterns to make it unique.
Regular Maintenance
Maintaining the dog house will ensure it lasts longer and stays comfortable for your pet.
- Inspect the dog house regularly for signs of wear or damage.
- Tighten any loose screws and replace damaged parts promptly.
- Clean the interior regularly and wash the bedding to keep it hygienic.
Additional Considerations
Dog House Placement
Choose a spot in your yard that is elevated to avoid water pooling and provides some shade during the hottest part of the day.
Size Matters
Ensure that the dog house is the right size for your pet – big enough to stand up, turn around, and lay down comfortably, but not so large that it loses heat too quickly.
Weatherproofing
Seal the wood with a waterproofing sealant to extend the life of the dog house, and consider adding a slanted roof design to prevent water accumulation.
Building a pallet dog house is not just a budget-friendly project but also an opportunity to provide a safe haven for your beloved pet. By following these steps and adding personal touches, you create a functional shelter and a cozy retreat that reflects your dog's personality and craftsmanship. Remember, the key to a successful DIY pallet dog house is to plan, be patient, and have fun with the process!
Frequently Asked Questions:
How many pallets does it take to build a dog house?
The number of pallets required to build a dog house will depend on the size and style desired. Generally, it takes anywhere from six to eight standard pallets for an average-sized doghouse. Specialized doghouses may require more or fewer pallets depending on their design. Consider the dimensions and type of wood needed for your project before starting.
What type of pallet wood should I use for a dog house?
The best pallet wood type for a dog house is treated timber or cedar. Treated timber will be more durable and resist rot, while cedar naturally prevents insect infestations. Both are good options depending on your location and budget. Be sure to check the quality of the pallets before purchasing them or getting them free.
How do you insulate a pallet dog house?
Insulating a pallet dog house is relatively simple. Start by adding fiberglass insulation between the walls and floor of the house to help keep it warm. Next, caulk any gaps or openings around the edges to prevent drafts. Finally, add some thick blankets over the walls and floor inside the house for extra warmth. Your pup will thank you for it!
What is the cheapest way to insulate a dog house?
Insulating a dog house is relatively inexpensive and easy. Consider using foam boards, bubble wrap or old blankets to line the interior walls and floor of the dog house. You can even use straw or hay as additional insulation—make sure it stays dry! Additionally, adding a thick blanket over the door will help keep your pup warm in colder temperatures.
Do insulated dog houses keep dogs warm?
Yes, insulated dog houses keep dogs warm in cold climates. These houses are typically made from waterproof materials and have a layer of insulation to help retain heat. They also come with draft-proof doors to prevent wind from entering the house and removing warmth. Properly sized and ventilated insulated dog houses can make sure your pup stays comfortable all year round.
How to find free pallets?
Finding free pallets is possible with a bit of research and networking. Start by checking local hardware stores, big-box retailers, lumber yards, and warehouses. Ask around in your neighborhood to see if anyone has any available. Online forums and facebook groups may also be useful for finding free pallets. Be sure to inspect each pallet before using them.
Related DIY Projects to Try
- Pallet Projects: Looking for an easy and budget-friendly way to spruce up your home or garden? These DIY pallet wood projects for beginners are the perfect solution as easy to make and cheap. Get creative and turn old wooden pallets into something special with these inspiring DIY projects!
- DIY Projects: Add this charming ever dog house to your list of weekend DIY projects and clone it for your pet friend!
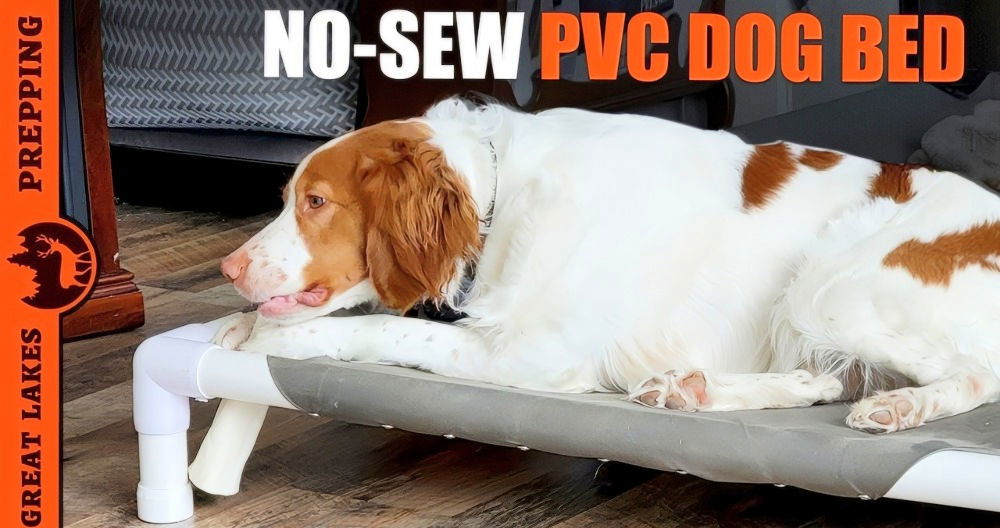
- Homemade Dog Bed: Check out our PVC dog bed selection to craft a cheap, custom, handmade, and cozy bed for your dogs.
- DIY Dog Bowl Stand: Whether you're looking for a more stylish way to serve your dog or want to reduce the chances of a spilled bowl, these DIY dog bowl stand ideas will make your pet's mealtime more enjoyable.
- Cardboard House: Learn how to make a cardboard house with these awesome diy cardboard playhouse ideas, instructions, pictures and videos from Homemade Cardboard.
- Wood Projects: Have you ever wondered how to make your home more appealing, affordable and functional? With these easy and affordable DIY wood projects, anyone can make to create the perfect space.
- Small Woodworking Projects: Whether you're looking to make a rustic coffee table or want to build a unique headboard, this small woodworking projects guide will show you how.
- Scrap Wood Projects: Scrap wood is a great way to recycle materials and learn new skills at the same time. Whether you need a project for your next letterbox, or just want to make something with your kids, these simple scrap wood projects will teach you everything you need to know.
- Pallet Dog Bed: You can make your very own dog bed for under $10. Check out these DIY pallet dog bed ideas for inspiration and find a list of supplies, instructions and photos for 20 different pallet dog beds.
Conclusion:
If you're looking for a fun weekend project to keep your furry friend happy, try building a pallet dog house. This step-by-step guide provides everything you need to get started, including a list of tools and supplies and detailed instructions with illustrations. After following these simple steps, you'll have a beautiful pallet wood dog house that will envy all the neighborhood pups. So what are you waiting for? Get started today!
Related DIY Ideas to Try: