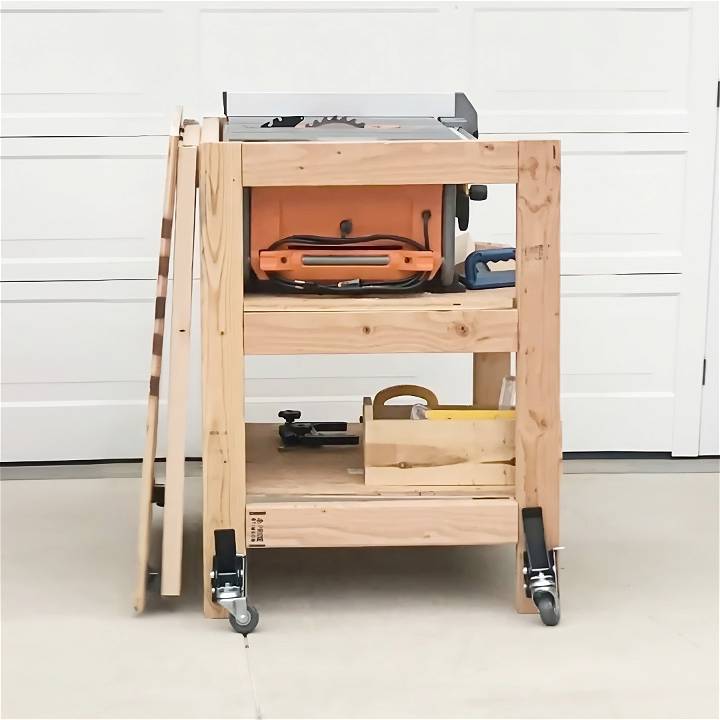
When my passion for woodworking began to evolve from a hobby into something more serious, I realized the limitations of my workspace—or lack thereof. Working out of my driveway, the need for a compact, yet efficient, workspace became glaringly obvious. The idea of a portable table saw stand with a folding outfeed table struck me as a revelation. It was not just about a stand; it was about making my workspace adaptable, efficient, and most importantly, manageable.
Materials and Their Purposes
- 2x4s for the frame: They are sturdy and cheap, making them the perfect choice for a strong foundation.
- Plywood for the shelf and outfeed table: Plywood is strong, yet lightweight, perfect for a portable table.
- Casters: To make the stand mobile. I opted for drop-down casters for stability when stationary.
- Heavy-duty hinges: These are critical for the folding mechanism of the outfeed table.
- Folding leg brackets and 2x2s for legs: These make the outfeed table foldable and easy to store.
- Furniture levelers: To account for uneven floors, ensuring a perfectly flat outfeed table.
Step-by-Step Guide to My Portable, Compact Workshop Dream
Building the Frame
I started with cutting the 2x4s according to the printable plans I found. It's essential to follow the measurements to ensure stability and compatibility with your table saw. Building the sides first and then attaching the aprons buildd the basic structure of the stand. Adding the casters at this point made it easier to maneuver, as flipping the frame later would be cumbersome.
Adding the Shelf
Initially, I hadn't planned on a shelf; however, the need for additional storage quickly became apparent. Attaching the shelf after the frame might not have been the best sequence of steps. Ideally, integrating it into the frame's construction from the get-go would have been more efficient. This shelf now serves as a convenient spot for my tools and accessories, keeping them accessible yet out of the way.
The Outfeed Table
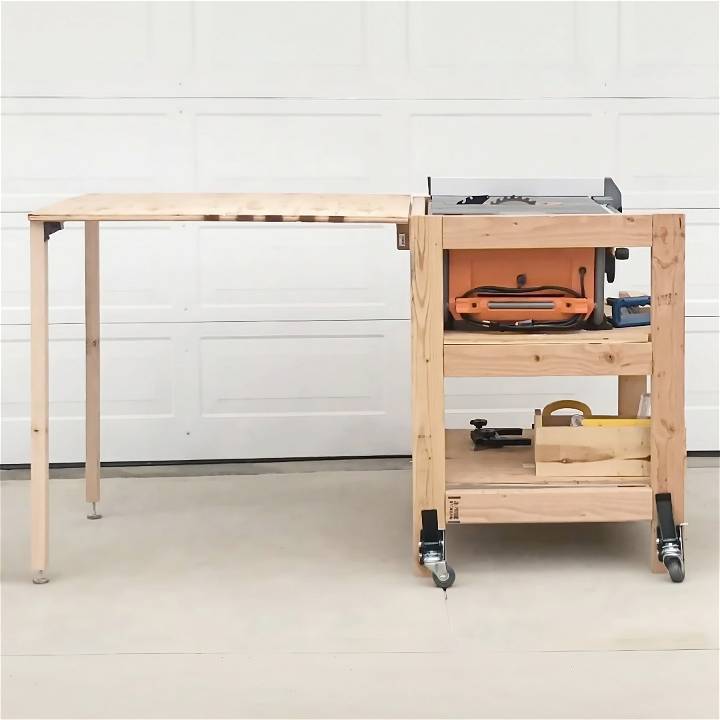
The outfeed table was, by far, the most challenging yet rewarding part of the project. Ensuring the brace was positioned so that when the outfeed table was deployed, it was perfectly level with the table saw, was critical. The heavy-duty hinges attached underneath provided the necessary support and flexibility. The use of folding leg brackets with 2x2 legs allowed for the outfeed table to be compactly folded away when not in use. Adding furniture levelers to the legs was a simple yet effective solution for the uneven driveway surface.
Challenges and Solutions
The project wasn't without its hiccups. Adapting the initial set of plans to fit my specific needs and the evolving nature of the project taught me the importance of flexibility and patience in DIY projects. The most significant adjustment was recalibrating the height of the outfeed table to ensure it was perfectly level with the table saw, a critical factor for smooth operation.
- Always double-check measurements: Especially when it comes to the outfeed table's level with the table saw.
- Be flexible: Your needs might evolve as the project progresses.
- Invest in quality materials: Especially for moving parts like casters and hinges.
Building this DIY table saw stand with a foldable outfeed table was more than just a project. It was a rewarding learning experience, resulting in a compact workspace and enhanced woodworking skills.
Maintenance and Upkeep
Maintaining your DIY table saw stand is crucial to ensure it remains a reliable and safe workstation for all your projects. Here's a guide to help you keep your stand in top condition:
Regular Cleaning
Keep it Clean: Sawdust can accumulate quickly on your stand, which can affect its performance and durability. After each use, take a few minutes to wipe down the surfaces and vacuum any sawdust from the stand and the surrounding area.
Inspecting for Wear and Tear
Check for Damage: Regularly inspect your stand for any signs of wear or damage. Look for loose bolts, cracks, or splintering wood. Tighten any loose parts and repair minor damages promptly to prevent them from worsening.
Lubrication
Stay Lubricated: If your stand has any moving parts, such as wheels or folding mechanisms, ensure they are well-lubricated. Use a silicone-based lubricant for metal parts to keep them moving smoothly without attracting more dust.
Protective Coatings
Apply Protective Coatings: To protect the wood from moisture and wear, apply a sealant or varnish annually. This will also make it easier to clean and maintain the stand's appearance.
Troubleshooting Common Issues
Solve Common Problems: If you encounter issues like wobbling or instability, check if the stand is on an even surface and adjust the feet accordingly. For more persistent problems, consult online forums or local woodworking groups for advice.
Seasonal Adjustments
Adjust for Seasons: Wood can expand or contract with changes in humidity and temperature. Make seasonal adjustments to your stand if you notice changes in the wood or the stand's stability.
Storage
Proper Storage: When not in use, store your stand in a dry, covered area to protect it from the elements. If space is limited, consider a stand design that allows for easy disassembly for compact storage.
By following these maintenance tips, you'll extend the life of your table saw stand and ensure it remains a dependable part of your workshop.
Advanced Techniques
Enhancing your DIY table saw stand with advanced techniques can significantly improve its functionality and versatility. Here's a detailed section on incorporating expert tips and innovative uses:
Expert Tips for Precision
Achieve Greater Accuracy: To ensure precise cuts every time, consider adding a fine-tuning mechanism to your saw stand. This could be as simple as adjustable screws for the fence or a customizable miter gauge slot that allows for minute adjustments.
Innovative Uses
Expand Your Horizons: Think beyond traditional wood cutting. Your table saw stand can be modified to serve as a multipurpose workstation. For example, by attaching additional supports, you can safely cut larger materials or even use it as a makeshift planer stand.
Jigs and Fixtures
Custom Jigs for Efficiency: Build jigs that cater to the specific cuts you frequently make. Whether it's a cross-cut sled for perfect 90-degree cuts or a tapering jig for angled cuts, these custom additions can save time and enhance safety.
Dust Collection System
Minimize Dust: A well-designed dust collection system is vital for maintaining a clean workspace and protecting your health. You can build a custom dust hood for your saw or integrate a shop-vac connection to keep the air and your stand clean.
Noise Reduction
Quiet Operation: Operating a table saw can be noisy. To reduce sound, add sound-dampening materials like rubber mats or foam padding around the base of your stand. This will make for a more pleasant working environment.
Lighting and Visibility
Improve Visibility: Good lighting is essential for safety and precision. Install LED strip lights under the saw's guard or around the stand to ensure clear visibility of your workpiece and cut line at all times.
Storage Solutions
Smart Storage: Utilize the space under your table saw stand by adding drawers or shelves for storing tools and accessories. This keeps everything within reach and your workspace organized.
By adding advanced techniques to your DIY table saw stand, you'll enhance functionality and safety for woodworking.
FAQs About DIY Table Saw Stands
Your go-to resource for FAQs about DIY table saw stands – expert tips, step-by-step guides, and everything you need to know.
Do I need a special stand for my table saw?
Yes, having a dedicated stand for your table saw can improve stability and safety. It also allows for better mobility and storage options in your workspace.
Can I use a circular saw to make a table saw stand?
Absolutely. A circular saw can be used to cut the materials needed for your stand. Just ensure you have a straight edge or guide to help maintain accuracy.
What materials are best for building a table saw stand?
Plywood is a popular choice due to its durability and ease of use. For a more robust stand, consider using hardwood or metal framing for added strength.
How can I ensure my table saw stand is stable?
Make sure the base is wide enough to prevent tipping and use sturdy materials. Adding a lower shelf can also help distribute weight evenly.
What safety features should I include in my table saw stand?
Safety features could include a kill switch within easy reach, a place to store the push stick, and a blade guard. Always prioritize features that will make your sawing experience safer.
Conclusion:
Wrapping up, building a DIY table saw stand can enhance your woodworking experience by providing stability and convenience. By following these simple steps, you can build a customized stand that suits your needs perfectly. Happy crafting!


