To start making a DIY lemonade stand, I first thought about what I needed. I decided on some wood, nails, paint, and a big sign to catch people's eye. I had never built something like this before, but I was excited to try. I planned out my steps, making sure I had all my materials ready.
The building process was simpler than I expected. I cut the wood to size, nailed everything together, and painted it a bright, sunny yellow. I made a big, colorful sign that said "Fresh Lemonade" to put on the front. After setting up my stand, I felt proud of what I had build. It was a fun project that didn't need a lot of fancy tools or skills.

I hope my experience encourages you to start your own DIY lemonade stand. With some basic materials and a bit of effort, you can make something wonderful and maybe even learn a few new skills along the way. If I can do it, so can you!
Gathering Your Materials
Before diving in, let's talk about what you'll need and why:
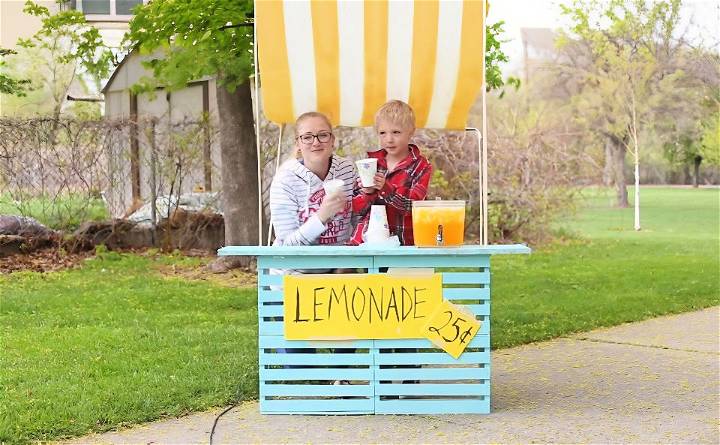
- Four wooden crates (9 5/8" x 18" x 12 1/2"): These are the backbone of your stand, providing structure and storage space for your supplies.
- One-inch wire nails: To fasten the crates together firmly. A hammer will be your tool of choice here.
- Plywood board: This will serve as the countertop where you'll set your lemonade pitcher and cups.
- Heavy-duty canvas (about a yard): For the awning, protecting you from the sun and giving the stand a cheerful look.
- Curtain rods: These will support your canvas awning.
- Liquid stitch: An alternative to sewing, this will help you attach the awning to the rods.
- Spray paint: To add colors and stripes to your canvas, making it aesthetically pleasing.
- Dowels and drill: For installing the awning securely to the stand.
Step by Step Instructions
Learn how to build a DIY lemonade stand with easy step-by-step instructions. Perfect for your next summer business venture!
Step One: Assembling the Crates
I began by laying the crates on their sides and aligning them perfectly. Using the wire nails, I hammered them together. This step required a bit of patience and accuracy to ensure the crates were securely fastened without the nails poking through the other side.
Step Two: Attaching the Countertop
After the base structure was ready, I placed the plywood board on top, allowing it to overhang slightly on each side for a more finished look. I nailed it down carefully, ensuring it was even and secure. This would be where the magic of lemonade making happened.
Step Three: Making the Awning
The heavy-duty canvas was next. I cut it according to the size I needed, then folded it over the curtain rods. Using liquid stitch, I glued along the seam to build a durable hold. It was easier than sewing and held up surprisingly well.
After the glue set, I spray-painted yellow stripes onto the white canvas to give it that classic lemonade stand look. This part was fun but also a bit messy, so doing it outdoors is advisable.
Step Four: Installing the Awning
The trickiest part was getting the awning up. I measured and marked where the dowels would go, ensuring they would be evenly placed and provide balanced support for the canvas. Drilling holes at these marks, I then inserted the dowels attached to the curtain rods through these holes.
Painting and Personalizing
With the stand constructed, it was time for a personal touch. I chose a bright blue for the wooden parts to make our stand pop. The painting process was therapeutic, transforming our humble structure into a beacon for thirsty passersby.
Reflections and Tips
Building this lemonade stand was more than just a DIY project; it was an invaluable learning experience. Not only did it teach me about construction and design, but it also instilled in me the importance of perseverance and creativity. A few tips for anyone embarking on this journey:
- Patience is key: Some steps may require multiple attempts to get right.
- Customize: Feel free to add your personal flair to the design. This could be through the choice of paint, the design of the awning, or even the signage.
- Safety first: Always be cautious when using tools, and if you're not comfortable, seek adult supervision or assistance.
- Enjoy the process: The memories you build while building this stand are just as sweet as the lemonade you'll sell.
Customization Ideas for Your Lemonade Stand
Making a lemonade stand that stands out can be both fun and rewarding. Here are some ideas to help you customize your stand and make it truly unique:
- Choose a Theme Select a theme that reflects your personality or interests. It could be anything from a tropical oasis to a superhero hideout. A themed stand will attract attention and make your business memorable.
- Color It Up Paint your stand in bright, cheerful colors. Yellow is a classic choice for lemonade stands, but don't be afraid to mix in other colors like pink, green, or blue. Use non-toxic, water-based paints for safety and easy cleanup.
- Decorate with DIY Crafts Add a personal touch with handmade decorations. You can build paper banners, signs, and tablecloths. Involve friends and family in the crafting process for a fun activity.
- Use Recycled Materials Be eco-friendly by using recycled materials for your stand. Old wooden pallets, cardboard boxes, and fabric scraps can be transformed into a stylish and sustainable setup.
- Interactive Elements Incorporate elements that engage your customers. A chalkboard where visitors can write messages, a photo booth with props, or a game corner with simple activities can enhance the customer experience.
- Comfortable Seating If space allows, provide a small seating area with chairs or benches. This encourages customers to stay longer and enjoy their lemonade.
- Lighting for Evening Sales If you plan to sell lemonade in the evening, add some lights to your stand. String lights or battery-operated lanterns can build a warm and inviting atmosphere.
- Music to Set the Mood Playing some background music can build a pleasant ambiance. Choose upbeat and family-friendly tunes to keep the vibe positive.
The key to a successful lemonade stand is providing a unique experience. Customize your stand to build a destination people will want to visit. Keep it simple and safe, and have fun!
Marketing and Promotion for Your Lemonade Stand
Effective marketing can make a big difference in the success of your lemonade stand. Here's how you can spread the word and attract more customers:
- Start with a Catchy Name: Give your lemonade stand a catchy name that's easy to remember. This will help people talk about your stand and recommend it to others.
- Make Eye-Catching Signs: Make signs that are bright and readable from a distance. Use large letters and vibrant colors to draw attention. Place these signs in high-traffic areas to guide customers to your stand.
- Use Social Media: If you're old enough to use social media, or with the help of an adult, build a page for your stand on platforms like Facebook or Instagram. Share pictures of your stand, your lemonade, and happy customers. Use hashtags to reach a wider audience.
- Word of Mouth: Encourage your friends and family to tell others about your stand. Word of mouth is a powerful tool, especially in local communities.
- Offer Discounts and Deals: Make special offers, like a ‘buy one, get one half off' deal, to entice people to visit. You can also offer a small discount to customers who bring their own cups, which is also good for the environment.
- Partner with Local Businesses: Ask local businesses if you can set up your stand nearby. In return, you can offer to hand out their flyers or coupons to your customers.
- Host a Grand Opening: Plan a grand opening event with games, music, and of course, lemonade. This can build excitement and draw in a crowd.
- Collect Feedback: Ask your customers what they like about your lemonade and what you can do better. This shows that you value their opinion and are committed to providing the best experience.
Keep your marketing simple, friendly, and focused on what makes your lemonade stand special.
FAQs About DIY Lemonade Stands
Get all your questions answered about DIY Lemonade Stands - from how to build them to maximizing profits. Find out everything you need to know now!
How can I make my lemonade stand stand out?
Personalize your stand with bright colors, unique signs, and decorations that reflect your personality. Offering a variety of lemonade flavors and using eco-friendly cups can also attract more customers.
What are some good lemonade recipes?
A classic lemonade recipe includes freshly squeezed lemon juice, water, and sugar. For a twist, add in flavors like strawberry, mint, or ginger. Always taste and adjust the sweetness to your preference.
Do I need a permit to run a lemonade stand?
Permit requirements vary by location. In many places, lemonade stands run by minors for a short period do not require permits. However, it's always best to check with your local government.
How should I price my lemonade?
Consider the cost of your ingredients and how much time you've spent making the lemonade. A common practice is to set a price that allows you to make a small profit while still offering a fair price to your customers.
How can I keep my lemonade cold and fresh?
Use a large insulated container with plenty of ice to keep your lemonade cold. You can also freeze some lemonade in ice cube trays to use as ice cubes that won't dilute your drink as they melt.
Conclusion:
Building a DIY lemonade stand from scratch was a rewarding experience that taught me the value of trying new things. It's amazing what you can achieve with a simple idea and some initiative. So, why not give it a shot and see what you can build?


