Getting started with making a leather knife sheath can be a rewarding experience. When I first tried it, I was amazed by how simple materials could turn into something useful and durable. With just some leather, a knife, and a few basic tools, I was able to make a sheath that not only protected my knife but also looked great. The process was surprisingly straightforward and enjoyable.
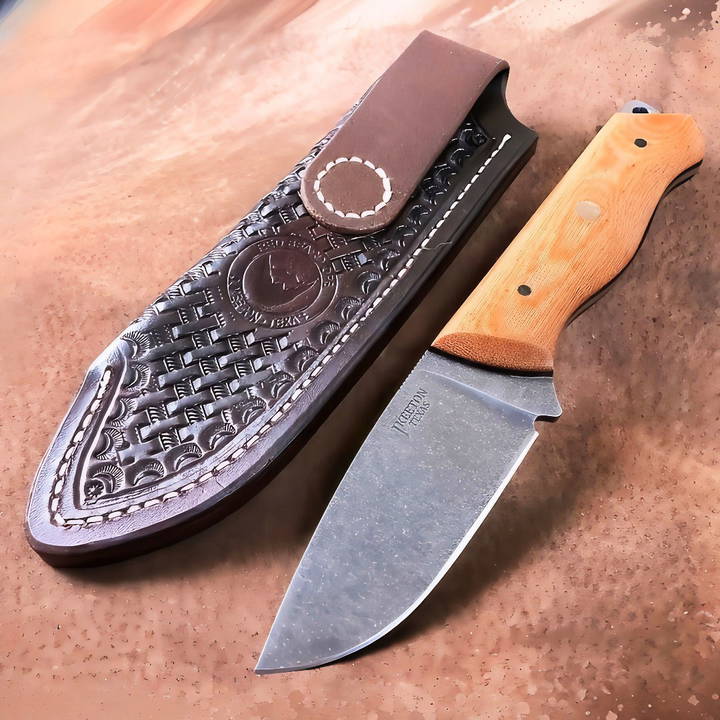
Once you gather your materials, the next step is to follow easy steps to cut, stitch, and finish your sheath. It's a hands-on project where patience and attention to detail really pay off. I found it helpful to take my time, ensuring that each step was done right. This guide will help you learn how to make a leather knife sheath with ease, and you'll be surprised at what you can make.
I've shared these steps because I know they'll help you make a knife sheath that's both practical and personalized. Let's get started!
Materials You Will Need
- Paper and Pencil: For drafting your template.
- Awl or Needle: For marking dots.
- Punch: To make smooth, rounded edges.
- Box Cutter or Utility Knife: For rough cuts in leather.
- Leather Hide: Preferably 7-8 ounce leather, pre-dyed if you prefer.
- Edge Beveler: For beveling the edges of your sheath.
- Sandpaper (220 and 600 grit): For finishing edges.
- Saddle Soap or Quick Slick: For edge slicking.
- Burnisher/tool or Dremel Burnisher: To finish and polish the edges.
- Contact Cement (Barge): For gluing the pieces together.
- Needles and Thread (John James Saddlers needles recommended): For saddle stitching.
- Skiving Knife: For thinning the leather.
- Groover, Pricking Irons: For marking the stitch line.
- Stapler or Arbor Press: For pressing stamps.
- Heating tool (Heat Gun or Hair Dryer): For drying dye and oil.
- Leather Dye and Neatsfoot Oil: For finishing.
Step by Step Instructions
Learn how to make a leather knife sheath step by step. From template creation to leather stitching, follow our DIY guide for a perfect sheath craft!
Step 1: Make a Template
Make the perfect template with our comprehensive guide on template layout. Easy steps for a flawless design. Get started now!
Template Layout:
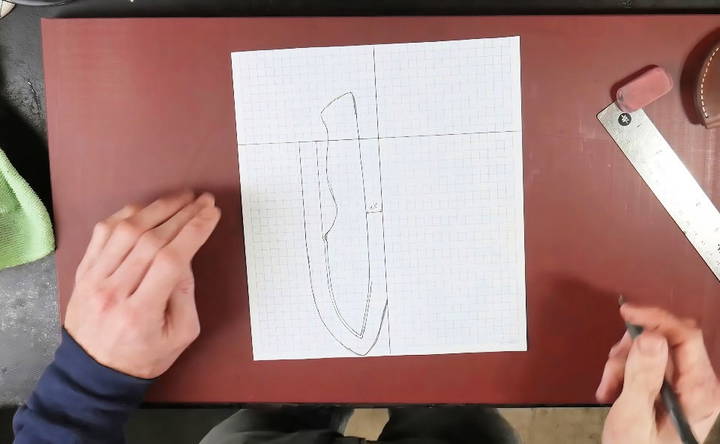
- Trace Your Knife: Place your knife on a piece of paper and trace it, approximately 0.5 to 0.625 inches away from its centerline to accommodate the handle thickness.
- Measure Draw Distance: Measure about 2 to 2.5 finger lengths from the back end of the knife to determine your draw distance and denote the top of the sheath.
Step 2: Trace and Cut the Template
Learn how to trace and cut the template efficiently with our step-by-step guide. Perfect for DIY projects and crafts. Boost your skills today!
Tracing the Template:
- Vertical Line: Drop a vertical line to the blade's widest part, around 3/32 to 2/32 inches away.
- Butterfly Design: Trace the same distance all around the blade, including up its spine if you opt for a butterfly design.
- Add Welt: Draw a 0.5-inch welt pattern.
- Mirror Image: Fold the template in half and trace the other side using a light source like a smartphone or lightbox to achieve symmetry.
Cut the Template:
- Cut Large Leather Blocks: Using a box cutter, cut rough blocks from your hide.
- Transfer Template: Use an awl to poke dots through your paper template onto the flesh side of the leather.
Step 3: Cut and Skive Leather Pieces
Get expert tips on cutting and skiving leather pieces. Learn how to cut leather accurately and skive the welt for perfect crafting results.
Cut the Leather:
- Punch Radius: Punch out the radii.
- Use Head Knife: Use a head knife to cut out the sheath.
Skive the Welt:
- Thin the Leather: Skive down the welt to about 50% of its thickness where it folds using a skiving knife.
Step 4: Bevel and Finish Edges
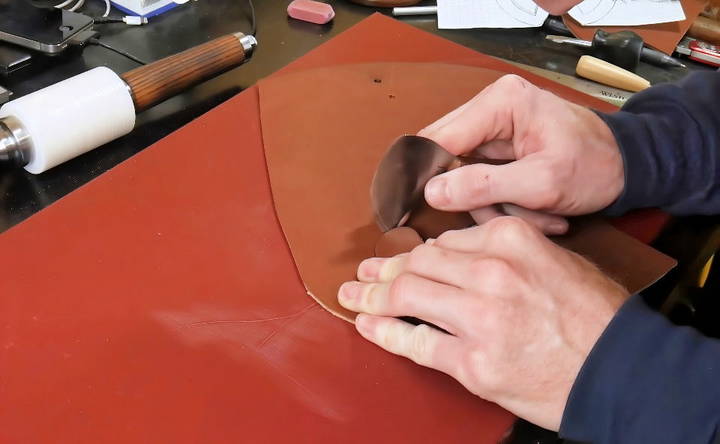
- Edge Beveling: Bevel the top edges and belt loop with a #2 edge beveler.
- Sand and Slick Edges: Apply saddle soap or Quick Slick, start with 220 grit sandpaper, and proceed to 600 grit. Use burnishers to polish the edges.
Step 5: Case and Stamp Leather
Explore the art of custom leather crafting with stamp the mark. Personalize your creations with high-quality stamps and cases. Perfect for DIY enthusiasts!
Stamp the Mark:
- Case Leather: Mix 1 part Pro Carve with 10 parts water to case the leather. Note: I used a 9:1 mix.
- Stamp Maker's Mark: Use an arbor press to press a stamp like the one from Ghost Graphics into the back of the leather.
- Determine Belt Loop Placement: Align it on the handle to mark its position.
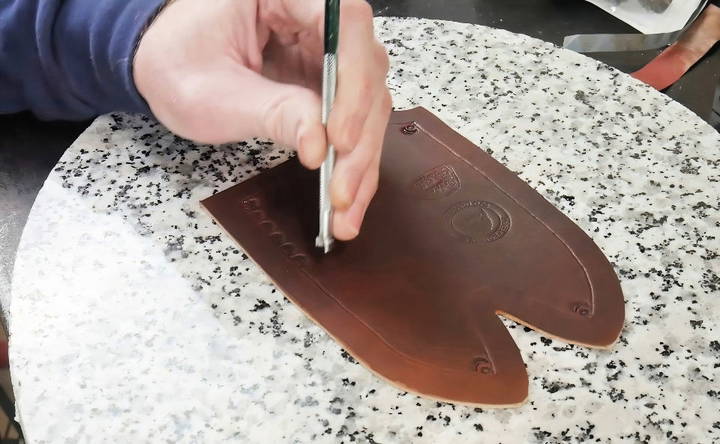
Step 6: Tooling the Leather
- Mark Tooling Area: Use calipers to mark the edge tooling distance, usually double the stitch line's distance.
- Seed and Camouflage Stamp: Using a seed stamp and a camouflage stamp around the border.
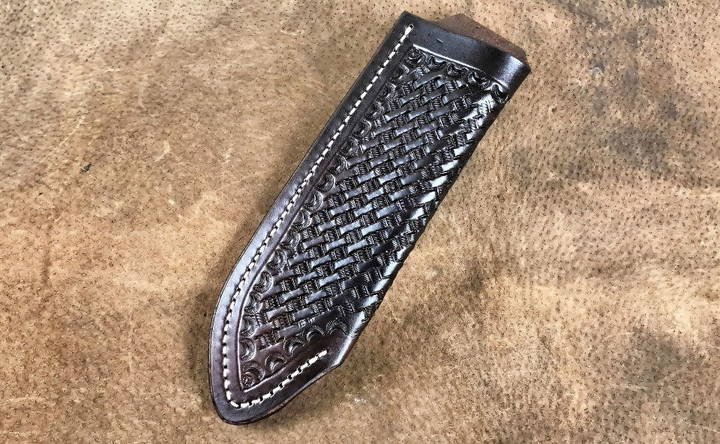
- Basket Weave: Mark a diagonal line and use a high-quality basket weave stamp to fill the area.
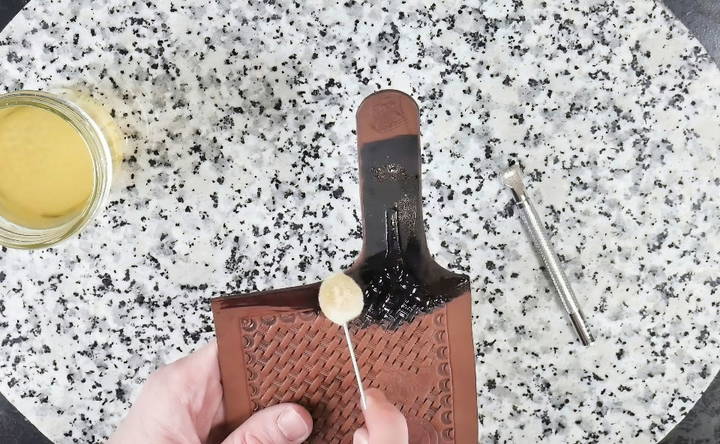
Step 7: Apply Oil and Assemble
Learn step-by-step instructions for applying oil and gluing wood parts. Perfect your woodworking projects with our expert tips!
Oiling:
- Apply Neatsfoot Oil: Apply to hard-to-reach areas before assembly. Use a heat gun to help absorb the oil.
Gluing:
- Contact Cement: Apply two coats of Barge contact cement where the pieces will join.
- Attach Welt: Place the welt down and align both sides with tacky cement.
Step 8: Stitching
Master the art of stitching a belt loop and sheath with our step-by-step guide. Perfect for crafting durable, high-quality leather accessories.
Stitch the Belt Loop:
- Mark Stitch Line: Using a pricking iron or needle to mark the stitch holes.
- Saddle Stitch: Utilize John James Saddlers needles to perform a locking saddle stitch.
- Backstitch and Burn: Make one or two backstitches, cut and burn thread tips.
Stitch the Sheath:
- Groove Stitch Line: Use a groover to make a stitching groove.
- Drill Holes: Using a drill press, push holes to maintain alignment.
- Complete Saddle Stitch: Stitch the welt and the sheath together, backstitch, and burn thread ends.
Step 9: Final Touches
- Edge Finishing: Apply more saddle soap, sand using 600 grit, burnish using tools, and dye the edges.
- Final Finish: Apply a final layer of finish, like Bagcoat, to the sheath.
Customization Ideas
Customizing your DIY knife sheath can make it unique and personal. Here are some easy and creative ideas to help you get started:
Design Variations
- Stitching Patterns: Experiment with different stitching patterns. You can use a simple straight stitch or try more decorative options like cross-stitch or zigzag. This adds a unique touch to your sheath.
- Dye Colors: Use leather dye to color your sheath. You can choose from a wide range of colors. Try using multiple colors for a gradient effect or make patterns with stencils.
- Decorative Elements: Add decorative elements like beads, rivets, or conchos. These can be attached to the sheath to give it a more personalized look.
Personalization
- Initials or Names: Stamp or carve your initials or name into the leather. This makes the sheath truly yours. You can use leather stamps or a carving knife for this.
- Unique Designs: Make unique designs by carving or burning patterns into the leather. You can use tools like a swivel knife or a wood burner. This allows you to add intricate details and make your sheath stand out.
Functional Customizations
- Belt Loops and Clips: Add belt loops or clips to your sheath. This makes it easier to carry. You can sew or rivet these onto the back of the sheath.
- Pockets and Pouches: Attach small pockets or pouches to the sheath. These can hold sharpening stones, fire starters, or other small tools. This adds functionality to your sheath.
Material Choices
- Different Leathers: Use different types of leather for various parts of the sheath. For example, you can use a softer leather for the inside and a tougher one for the outside. This can improve both the look and durability of the sheath.
- Alternative Materials: Consider using materials other than leather. Kydex, for example, is a durable plastic that can be molded to fit your knife. It offers a modern look and is very durable.
Tips for Success
- Plan Your Design: Before you start, sketch out your design. This helps you visualize the final product and plan the steps needed to achieve it.
- Take Your Time: Customizing your sheath can be a detailed process. Take your time to ensure each step is done correctly. This will result in a higher quality and more satisfying finished product.
- Practice: If you're new to customization, practice on scrap pieces of leather first. This helps you get a feel for the tools and techniques before working on your final piece.
By incorporating these customization ideas, you can make a knife sheath that is not only functional but also a reflection of your personal style.
Advanced Techniques
For those looking to take their knife sheath crafting to the next level, here are some advanced techniques. These methods will help you make a more professional and durable sheath.
Leatherworking Skills
- Edge Beveling: Beveling the edges of your leather gives a smooth, rounded finish. Use an edge beveler tool to trim the sharp edges. This not only looks better but also prevents the edges from fraying.
- Burnishing: Burnishing the edges of your leather sheath makes them smooth and shiny. Use a burnishing tool or a piece of bone. Apply a bit of water or beeswax to the edges and rub until smooth.
- Tooling and Carving: Tooling involves making patterns on the leather surface. Use a swivel knife to carve designs and stamping tools to add texture. This technique allows for intricate and personalized designs.
Alternative Materials
- Kydex Sheaths: Kydex is a thermoplastic material that can be molded to fit your knife. Heat the Kydex until it becomes pliable, then press it around your knife to form a custom fit. Kydex sheaths are durable, waterproof, and offer a modern look.
- Wooden Sheaths: Crafting a sheath from wood can give a rustic and sturdy feel. Choose a hardwood like oak or walnut. Carve out the shape of your knife and glue the pieces together. Sand and finish the wood for a smooth surface.
Advanced Stitching Techniques
- Saddle Stitching: This is a strong and durable stitching method. Use two needles and waxed thread. Pass each needle through the same hole from opposite sides, making a tight and secure stitch.
- Double Loop Lacing: This decorative lacing technique adds strength and beauty. Use a long piece of lace and weave it through the holes in a looping pattern. This technique is great for adding a unique touch to the edges of your sheath.
Reinforcements and Linings
- Reinforced Tips: Add a metal or leather reinforcement to the tip of your sheath. This protects the tip from wear and tear. You can use rivets or stitching to attach the reinforcement.
- Lining the Sheath: Adding a lining to your sheath can protect your knife and improve the sheath's durability. Use a soft material like suede or felt. Glue the lining to the inside of the sheath before stitching it together.
Finishing Touches
- Dyeing and Finishing: Use leather dye to color your sheath. Apply the dye evenly with a sponge or brush. After dyeing, apply a leather finish to protect the surface and give it a polished look.
- Adding Hardware: Attach hardware like snaps, rivets, or buckles. These can add functionality and style. Use a hole punch and setter tools to secure the hardware in place.
Tips for Success
- Practice Makes Perfect: Advanced techniques require practice. Start with small projects to hone your skills before tackling a full sheath.
- Quality Materials: Invest in high-quality materials and tools. They make a significant difference in the final product.
- Attention to Detail: Pay close attention to each step. Precision and patience are key to achieving professional results.
By incorporating these advanced techniques, you can make a knife sheath that is not only functional but also a work of art.
Common Mistakes and How to Avoid Them
Making a DIY knife sheath can be a rewarding project, but it's easy to make mistakes along the way. Here are some common errors and tips on how to avoid them.
Incorrect Measurements
- Mistake: Not measuring your knife accurately can result in a sheath that is too tight or too loose.
- Solution: Always double-check your measurements. Measure the length, width, and thickness of your knife. Add a little extra space for the stitching and the thickness of the leather.
Poor Material Choice
- Mistake: Using the wrong type of leather or low-quality materials can affect the durability and appearance of your sheath.
- Solution: Choose high-quality leather that is suitable for sheaths, such as vegetable-tanned leather. This type of leather is durable and easy to work with.
Uneven Stitching
- Mistake: Uneven or loose stitching can make your sheath look unprofessional and may not hold together well.
- Solution: Use a stitching chisel or pricking iron to mark even holes before stitching. This ensures consistent spacing. Practice your stitching technique on scrap leather to improve your skills.
Skipping Edge Finishing
- Mistake: Neglecting to finish the edges of your sheath can leave them rough and prone to fraying.
- Solution: Use an edge beveler to round off the edges. Then, burnish the edges with a burnishing tool or a piece of bone. Apply a bit of water or beeswax to get a smooth finish.
Inadequate Tool Maintenance
- Mistake: Using dull or poorly maintained tools can make your work harder and result in poor-quality cuts and stitching.
- Solution: Keep your tools sharp and clean. Regularly sharpen your knives and replace any worn-out tools. This makes your work easier and more precise.
Ignoring Safety Precautions
- Mistake: Not taking proper safety measures can lead to accidents and injuries.
- Solution: Always use protective gear like gloves and goggles. Work in a well-lit area and keep your workspace organized to avoid accidents.
Rushing the Process
- Mistake: Trying to complete the project too quickly can lead to mistakes and a lower-quality sheath.
- Solution: Take your time with each step. Carefully plan your design and follow the steps methodically. Patience will result in a better-finished product.
Improper Dyeing Techniques
- Mistake: Applying dye unevenly or not allowing it to dry properly can result in a blotchy finish.
- Solution: Apply dye in thin, even layers using a sponge or brush. Allow each layer to dry completely before applying the next. This ensures a smooth and even color.
Overlooking Reinforcements
- Mistake: Not reinforcing stress points can cause your sheath to wear out quickly.
- Solution: Reinforce areas like the tip and the belt loop with extra stitching or rivets. This adds strength and durability to your sheath.
Lack of Planning
- Mistake: Starting the project without a clear plan can lead to mistakes and wasted materials.
- Solution: Sketch out your design and plan each step before you start. This helps you visualize the final product and ensures you have all the necessary materials and tools.
By being aware of these common mistakes and following these tips, you can make a high-quality, durable knife sheath.
FAQs About DIY Knife Sheaths
Discover expert answers to FAQs about DIY knife sheaths. Learn tips, materials, and techniques for making your custom knife sheath.
To ensure safety and durability:
Use quality materials: High-quality leather and strong, waxed thread are essential.
Proper stitching: Ensure consistent and tight stitching to prevent the sheath from falling apart.
Edge finishing: Smooth and seal the edges to prevent fraying and enhance durability.
Yes, safety is important when working with sharp tools and leather:
Wear cut-resistant gloves: Protect your hands from accidental cuts.
Use safety goggles: Shield your eyes from debris when cutting or grinding.
Work in a well-ventilated area: Especially when using dyes and adhesives.
Customizing your knife sheath can make it unique and more functional:
Tooling and Stamping: Use leather stamps and tools to make patterns or designs on the leather.
Dyeing: Apply different colors of leather dye to achieve your desired look.
Personalization: Add initials, names, or symbols to make it personal.
Additional Features: Consider adding pockets for sharpening stones or other accessories.
Avoid these common mistakes to ensure a successful project:
Incorrect Measurements: Always double-check your measurements to ensure a proper fit.
Poor Stitching: Inconsistent or loose stitching can compromise the sheath's durability.
Skipping Edge Finishing: Unfinished edges can fray and wear out quickly.
Using Low-Quality Materials: Inferior leather or thread can lead to a less durable sheath.
Yes, you can make a knife sheath without stitching by using alternative methods:
Rivets: Use rivets to secure the leather pieces together.
Leather Glue: High-quality leather glue can hold the pieces together without stitching.
Combination: Combine rivets and glue for added strength and durability.
Conclusion
With patience and attention to detail, you can make a durable and custom-fitting DIY leather knife sheath. This process allows you to blend utility with artistic flair, making each sheath unique and functional. Don't forget to share your results and any questions you might have. Your feedback helps improve these guides and grows our crafting community!


