Building beautiful and functional DIY landscape lighting can enhance the look of your outdoor spaces. Whether it's your garden, pathway, or patio, proper lighting can highlight features and improve safety. With a bit of guidance and the right materials, you can transform any area into a warm and inviting setting. This guide will help you understand simple methods to achieve great results with DIY outdoor lighting.
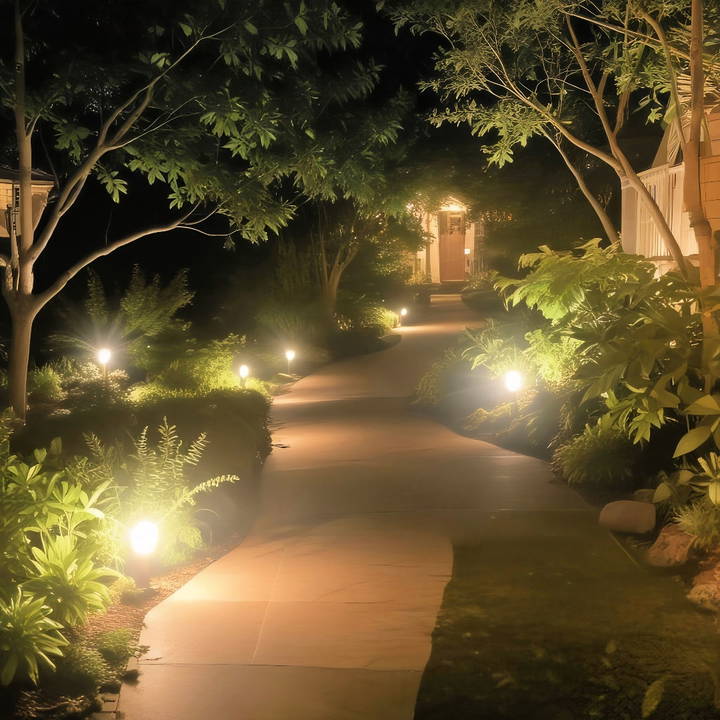
With a straightforward approach, you can select the right fixtures and placements to brighten up your outdoor areas effectively. Each section will provide insights into choosing the best styles and techniques. Let's explore how to brighten your outdoor space creatively!
Understanding Landscape Lighting
Landscape lighting is a key component of outdoor design that serves both functional and aesthetic purposes. It's not just about making your garden or yard look attractive at night; it's also about safety, security, and enhancing the usability of your outdoor space after dark.
The Purpose of Landscape Lighting
The primary goal of landscape lighting is to illuminate your outdoor space for various reasons:
- Safety: Well-lit pathways, steps, and uneven surfaces can prevent falls and injuries.
- Security: Lights can deter potential intruders by eliminating dark areas where they could hide.
- Aesthetics: Proper lighting can highlight the features of your garden, such as trees, flower beds, or architectural elements.
- Usability: With adequate lighting, you can enjoy your outdoor areas even after the sun has set.
Types of Landscape Lighting
There are several types of lights that you can use in your landscape:
- Path lights: These are small posts with built-in lights that illuminate walkways and garden paths.
- Spotlights: Used to focus light on a specific feature, such as a tree or sculpture.
- Floodlights: These provide broad lighting for larger areas, like driveways or backyards.
- Deck lights: Installed on or around your deck or patio, these lights enhance safety and ambiance.
- Step lights: These are built into steps or beside them to ensure safe footing.
- Underwater lights: Designed for use in ponds or fountains, they add a magical touch to water features.
Choosing the Right Lights
When selecting lights for your landscape, consider the following:
- Brightness: The brightness of a light is measured in lumens. Choose a brightness level that suits the area you are lighting.
- Color Temperature: Measured in Kelvin, color temperature affects the mood of the space. Warm lights (2000K-3000K) build a cozy atmosphere, while cool lights (4000K-6000K) are energizing and crisp.
- Durability: Outdoor lights should be weather-resistant and durable. Look for lights rated for outdoor use and made from materials like stainless steel or aluminum.
- Energy Efficiency: LED lights are a popular choice for their long lifespan and low energy consumption.
Installation Basics
Installing landscape lighting doesn't have to be complicated. Here are some simple steps to get you started:
- Plan Your Layout: Decide where you want your lights to go. Consider the main features of your garden and the areas that need more visibility.
- Choose Your Power Source: You can opt for solar-powered lights, which are easy to install and eco-friendly, or wired lights, which may require professional installation but offer more consistent lighting.
- Install Your Lights: Follow the manufacturer's instructions carefully. For wired lights, it's often best to hire a professional electrician to ensure safety and proper installation.
Maintenance Tips
To keep your landscape lighting in top condition, follow these maintenance tips:
- Clean the Lights Regularly: Dirt and debris can dim your lights. Clean the lenses with a soft cloth and soapy water.
- Check the Bulbs: Replace any burnt-out bulbs promptly to maintain consistent lighting.
- Inspect the Wiring: For wired systems, check for any signs of wear or damage to the cables.
Know the basics of landscape lighting to build a beautiful and safe outdoor space anytime. Plan carefully, choose the right products, and maintain your lighting for lasting value.
Getting Started: The Planning Phase
Before anything else, I needed a plan. Not being an overly technical person, my plan wasn't intricate. I sketched out my yard, noting where I wanted lights to highlight certain trees and walkways. I knew I wanted to start small, with just a few lights, and then expand as I gained confidence. For this project, I chose to install two uplights to accentuate my backyard's majestic oaks and a path light for the walkway.
Materials Needed
- Landscape Lighting Fixtures: I chose LED lights for their efficiency and durability. In particular, I picked RGB uplights for the trees and a classic path light.
- Transformer: Essential for converting home power to low voltage usable by the lights.
- 12 Gauge Wire: Based on advice from customer service, suitable for the short distance and few lights I was starting with.
- Wire Connectors (Hub): To connect lights to the main wire without worrying about polarity.
- Shovel: For trenching where the wires would lay.
Each material was chosen for its role in ensuring that the lights worked efficiently and safely. The transformer, for instance, is crucial because it steps down the house's power to a level that's safe for outdoor lighting.
Step by Step Instructions
Discover easy step-by-step instructions for DIY landscape lighting, from installing the transformer to adjusting lights for a perfect outdoor ambiance.
Step 1: Installing the Transformer
One of the simpler tasks was installing the transformer. It involved drilling into a wall and securing the transformer in place. Understanding that it basically converts 120-volt home power to 12 volts made me less nervous about the electrical aspect. I made sure not to plug it in until everything else was set up.
Step 2: Trenching
Honestly, this was the least enjoyable part. Digging trenches is hard work but necessary to protect the wires from being exposed. I carefully marked where my utilities were before starting to avoid any mishaps. The trenches were shallow, no more than a few inches deep, just enough to bury the 12-gauge wire.
Step 3: Laying Out the Wire
Rolling out the wire along the trenches was straightforward. I left some slack at each fixture location to allow room for adjustments once I saw how the lights illuminated the area at night.
Step 4: Connecting the Fixtures
Using wire connectors made this process less intimidating than I expected. I simply had to place the wires into the hub and secure them. No worrying about which wire went where alleviated my fear of electrical work. Each light fixture got connected back to the main wire running to the transformer.
Step 5: Testing
Before burying anything, I tested the setup. This was the moment of truth. I plugged in the transformer, flipped the switch, and…it worked! Seeing my backyard come to life with the lights was incredibly rewarding.
Step 6: Burying Wires and Adjusting Lights
With everything tested and working, I buried the wires and placed the fixtures in their final positions. I did some minor adjustments to the angle of the lights to get the desired effect on the trees and walkway.
The Final Touch
At night, with the landscape lighting fully operational, my backyard was transformed. The lights added a new dimension to the space, making it warm and inviting. I even experimented with changing the RGB lights' colors, which was fun for occasions like Christmas.
What I Learned
This project taught me that with proper planning and a bit of courage, taking on something outside your comfort zone is achievable. The process, from planning to execution, was a learning curve but utterly worth it. My advice? Don't shy away from customer service; their guidance was invaluable to me.
Energy Efficiency and Sustainability
When it comes to landscape lighting, energy efficiency, and sustainability are more than just buzzwords; they're essential considerations for any modern lighting project. By choosing energy-efficient options, you not only save on your electricity bill but also contribute to a healthier environment.
Why Energy Efficiency Matters
Energy-efficient lighting uses less power to produce the same amount of light as traditional lighting, which means it consumes fewer resources and generates less greenhouse gas emissions. LED lights are a prime example, offering significant energy savings and a longer lifespan compared to conventional bulbs.
The Role of Sustainability
Sustainable lighting goes beyond energy efficiency. It involves using materials and practices that have a minimal negative impact on the environment. This includes selecting lights that are made from recyclable materials and designing lighting systems that reduce light pollution, thus preserving our night skies.
Tips for Energy-Efficient and Sustainable Lighting
- Choose LED Lights: LEDs are not only energy-efficient but also have a longer life, reducing the need for frequent replacements.
- Opt for Solar Power: Solar-powered lights harness the sun's energy, offering a renewable and cost-effective lighting solution.
- Implement Lighting Controls: Use timers, dimmers, and motion sensors to ensure lights are only on when needed, further conserving energy.
Smart Lighting Integration
Integrating smart technology into your landscape lighting brings convenience and efficiency to a whole new level. With smart lighting, you can control your outdoor lights remotely, set schedules, and even integrate them with other smart home systems.
Benefits of Smart Lighting
- Remote Control: Manage your lights from anywhere using a smartphone app or voice commands.
- Customizable Schedules: Program your lights to turn on and off at specific times, enhancing security and saving energy.
- Integration with Home Automation: Connect your landscape lighting with your home's automation system for seamless control.
How to Integrate Smart Lighting
- Choose Compatible Fixtures: Ensure your lighting fixtures can connect to your home's Wi-Fi or automation system.
- Use Smart Bulbs: Replace traditional bulbs with smart bulbs that can be controlled remotely.
- Install Sensors: Motion sensors can trigger lights to turn on when activity is detected, providing security and saving energy.
Prioritize energy efficiency, sustainability, and smart integration to design a beautiful, functional, and eco-friendly landscape lighting system. Your choices today will lead to a greener future.

Troubleshooting Landscape Lighting
When your landscape lighting isn't working as it should, it can be frustrating. But don't worry; many common issues have simple fixes that you can fix yourself. Here's a guide to help you troubleshoot and get your lights shining bright again.
Lights Not Turning On
If your lights aren't turning on, start by checking the power source. Make sure your transformer is plugged in and turned on. If it's connected to a timer or photocell, ensure those are set correctly. Sometimes, resetting your transformer can solve the issue.
Partial Lighting Outages
When a section of your lights goes out, it could be a sign of a short circuit. Look for signs of damage to the wires, such as cuts or fraying. Ensure all connections are secure and not corroded. If you've had recent yard work done, check for accidental wire damage.
Flickering Lights
Flickering can be caused by loose connections or incompatible bulbs. Tighten all connections and replace any damaged or incompatible bulbs. Also, check that the wattage of your bulbs doesn't exceed the capacity of your transformer.
Dim Lights
Dim lights might indicate a voltage drop, especially if the lights are far from the transformer. Use a multimeter to check the voltage at different points. If there's a significant drop, you may need to shorten the cable run or use a cable with a larger diameter to reduce resistance.
Timer and Sensor Issues
If your lights aren't following the programmed schedule, it might be the timer or sensor. Reset and reprogram the timer. Clean any dirt or debris off photocells and ensure they're not obstructed.
Corroded or Dirty Fixtures
Corrosion or dirt on the fixtures or bulbs can cause poor performance. Clean the fixtures and bulbs with a soft cloth and soapy water. Check for and replace any corroded parts.
LED Issues
LED lights are durable, but they can still encounter problems. If an LED isn't working, ensure it's properly connected and receiving power. Sometimes, replacing the LED driver—the component that regulates power to the LED—can fix the issue.
Always turn off power before fixing lights. If unsure or issues persist, call a professional. With patience, you can fix common lighting issues.
FAQs About DIY Landscape Lighting
Discover answers to common questions about DIY landscape lighting. Find tips, tricks, and guidance on enhancing your outdoor spaces effectively.
To install DIY landscape lighting, follow these steps:
Plan Your Design: Sketch a map of your garden and decide where you want your lights.
Choose Your Lights: Pick different types of lights like path lights, spotlights, and floodlights based on your needs.
Install a Transformer: This device will reduce your home's 120-volt current to a safer 12 volts for outdoor use.
Lay the Cables: Run cables from the transformer to each light. Avoid burying them too deep or in areas where they might be damaged.
Connect the Lights: Attach your lights to the cables using connectors and make sure they are securely in place.
Test Your System: Before burying the cables, test the lights to ensure they work properly.
Selecting the right lights depends on the effect you want to achieve:
Path Lights: For walkways and garden paths to provide visibility and safety.
Spotlights: To highlight specific features like trees or architectural details.
Floodlights: For broad illumination of large areas.
In-Ground Lights: To uplight trees or walls. Consider LED options for energy efficiency and longer life span.
Yes, with some basic electrical knowledge and careful planning, you can install landscape lighting yourself. It involves planning the layout, choosing the right fixtures, installing a transformer, laying out the cables, and connecting the lights. Always follow manufacturer instructions and local electrical codes.
Safety is paramount when working with electricity:
Turn Off Power: Always turn off the power at the main breaker before starting any installation.
Use Proper Tools: Employ tools specifically designed for electrical work.
Follow Codes: Adhere to local building and electrical codes.
Waterproof Connections: Ensure all connections are waterproof to prevent short circuits.
Handle with Care: Be cautious when digging to avoid underground utilities.
Maintaining your landscape lighting involves:
Regular Cleaning: Keep fixtures free of debris and clean lenses for clear lighting.
Check Connections: Inspect connections periodically for corrosion or damage.
Replace Bulbs: Change bulbs as needed, preferably with LED options for better longevity.
Adjust Fixtures: Realign any fixtures that have shifted over time.
Inspect the Transformer: Ensure the transformer is functioning correctly and not overloaded.
Concluding Thoughts
In conclusion, this DIY landscape lighting is an exciting way to enhance your outdoor spaces. By using simple techniques and creative ideas, you can beautifully illuminate your garden or patio. Start your lighting project today and transform your yard into a stunning evening retreat!


