Making a homemade DIY dog cone can be a thoughtful way to ensure your pet's safety and comfort during recovery or to prevent self-inflicted injuries. Knowing how to make a cone for a dog requires understanding the importance of the cone in promoting healing, offering protection, and ensuring the well-being of your furry friend.
This guide will walk you through the reasons why using a dog cone is crucial for your pet's health, from post-surgery care to preventing self-inflicted injuries. Additionally, it provides a detailed size guide and step-by-step instructions on how to craft a comfortable and effective cone.
If you're keen to learn more about safeguarding your pet's health with a DIY solution, the next section is ready to guide you through making the perfect cone for your dog.
Why Use a Dog Cone?
Dog cones, also known as Elizabethan collars or E-collars, are commonly used in the pet world. But why exactly do our furry friends need them? Let's delve into this topic.
Protecting Your Pet
The primary reason to use a dog cone is to protect your pet. Dogs are naturally inclined to lick or chew areas that are irritated or injured. While this might provide temporary relief, it can lead to further complications such as infections or delayed healing. A dog cone acts as a physical barrier, preventing your pet from reaching the affected area.
Post-Surgery Care
After a surgical procedure, your pet might feel discomfort or itchiness as the wound heals. In these cases, a dog cone is essential to prevent your pet from scratching or licking the surgical site, which could lead to the reopening of the wound or even a potential infection.
Preventing Self-Inflicted Injuries
In some cases, dogs may develop a habit of excessive licking, chewing, or scratching, leading to self-inflicted injuries. This behavior could be due to various reasons such as allergies, parasites, or even stress. Using a dog cone can help break this cycle and allow the affected area to heal.
Safety First
While a dog cone might seem uncomfortable, it's a small price to pay for your pet's safety and well-being. Remember, it's always best to consult with a veterinarian before deciding to use a DIY dog cone, especially in post-operative situations or when dealing with serious wounds.
A dog cone is key for pet health, protecting and aiding in recovery with comfort as top priority.
Size Guide for a DIY Dog Cone
Ensuring the right fit for your dog's cone is crucial. An ill-fitting cone can cause discomfort and fail to serve its purpose. Here's a simple guide to help you measure your dog for a DIY cone.
Measuring Your Dog
1. Length: The cone should extend beyond the dog's nose to effectively prevent them from reaching their body. To measure this, start from where the collar sits and extend to the tip of the nose.
2. Neck Circumference: Measure around the thickest part of your dog's neck using a flexible tape measure. This ensures the cone fits snugly but comfortably.
3. Cone Opening: The opening of the cone should be wide enough to fit around your dog's neck without causing discomfort. Add an inch or two to the neck circumference measurement to allow for movement.
Adjusting the Cone
Once you've made the cone, it's important to check the fit. The cone should be snug, but not too tight. You should be able to fit two fingers between the cone and your dog's neck. If the cone is too loose, it may slip off; if it's too tight, it could cause discomfort or even choke your dog.
Regular Checks
Regularly check the fit of the cone, especially if your dog is still growing or if they're wearing the cone for an extended period. Adjust as necessary to ensure continued comfort and effectiveness.
Every dog is unique, and what works for one might not work for another. Always prioritize your pet's comfort and safety when making and fitting a DIY dog cone.
Step by Step Instructions
Learn how to make a homemade DIY dog cone for your pet. Follow our step-by-step guide to make a comfortable and affordable cone for your dog.
Step 1: Gather the Materials
You will need:
- A pool noodle
- Twine or strong string
- A measuring tape
- Scissors (or a serrated knife for cutting the pool noodles)
Step 2: Measure Your Dog's Neck
Use the measuring tape to find the circumference of your dog's neck. Add a few extra inches to this measurement to ensure you have enough twine to tie the cone around their neck comfortably.
Step 3: Cut the Twine
Cut the twine to the length you measured, remembering to allow those extra inches for tying.
Step 4: Prepare the Pool Noodle
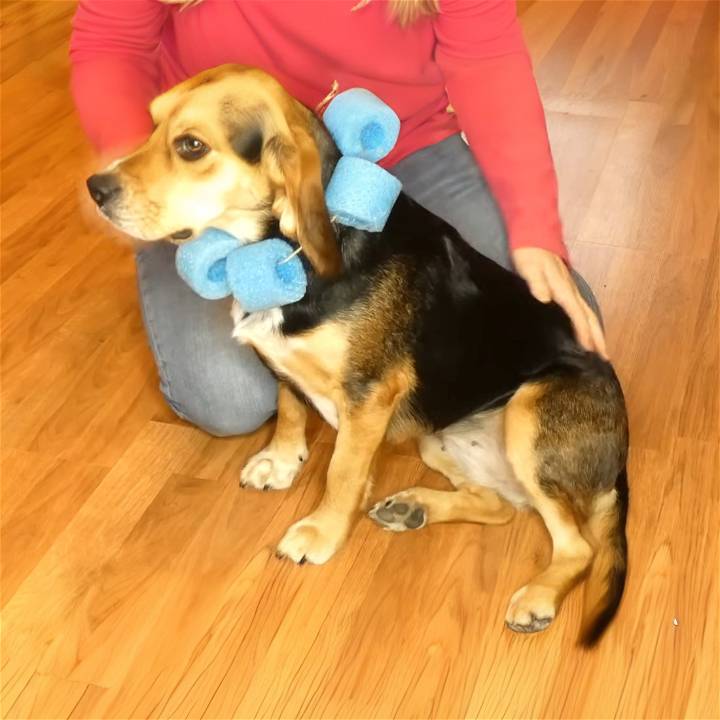
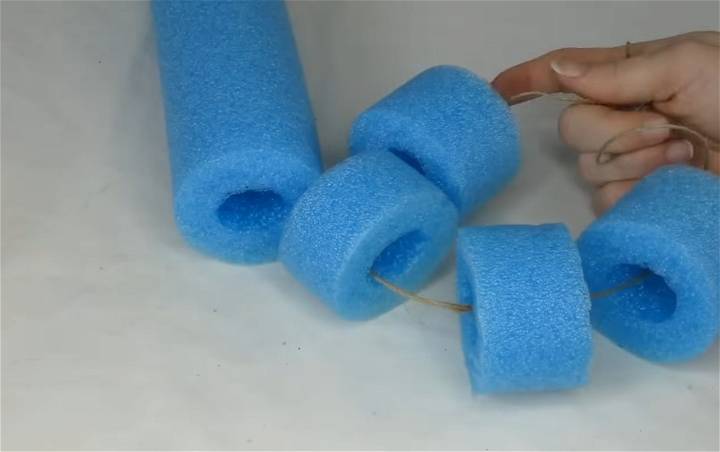
Take your pool noodles and start cutting them into small sections. These pieces will act like beads on the twine, making the structure of the cone. Using a serrated knife can make this step easier but ensure safety by cutting away from your body. Each section should be roughly 1-2 inches thick, depending on the size of your dog and the flexibility you'd like the cone to have.
Step 5: String the Noodle Pieces onto the Twine
Thread each pool noodle piece onto the twine, similar to stringing beads on a necklace. Ensure you fill the twine enough so that when tied around your dog's neck, there are minimal gaps, but also so that the cone will be flexible.
Step 6: Tie the Cone Around Your Dog's Neck
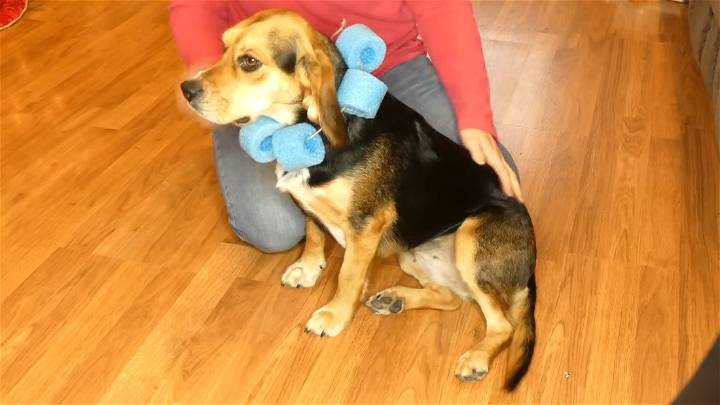
Once you've added enough pool noodle pieces, it's time to fit the cone on your dog. Carefully tie the twine around your dog's neck, ensuring it's snug but not too tight. The goal is to prevent your dog from being able to turn its head to lick or bite at injuries but not to restrict breathing or cause discomfort.
Step 7: Adjust as Needed
After tying the cone on your dog, make any necessary adjustments. The pool noodle pieces should evenly cover the required area, and the twine should be secure but comfortable. You might need to add or remove noodle sections to achieve the perfect fit.
Maintaining Your Dog's Comfort
Check regularly that the cone does not cause any irritation and that it remains functional. Adjust the tightness and the noodle pieces as needed over time. This homemade cone is meant to be a more comfortable alternative to the traditional plastic cones, but it's crucial to ensure it serves its purpose without causing your dog discomfort.
Video Tutorial
For a visual guide on making this DIY dog cone, watch this step-by-step video tutorial.
It pairs well with this written guide, offering a hands-on view of the process discussed, making it easier to follow along and make a comfortable, custom-fit cone for your dog.
Making a DIY dog cone is simple and affordable. Craft a comfy alternative to the traditional cone with twine and a pool noodle for your dog's comfort.
Veterinarian Advice on Using a DIY Dog Cone
While a DIY dog cone can be a practical solution, it's essential to remember that professional advice is invaluable. Here's why you should always consult with a veterinarian.
Expert Guidance
Veterinarians are trained professionals who understand your pet's health needs. They can provide expert guidance on whether a DIY dog cone is suitable for your pet's specific situation.
Tailored Advice
Every dog is unique, and what works for one might not work for another. A vet can give tailored advice based on your pet's breed, size, age, and overall health condition.
Post-Operative Care
If your dog has undergone surgery, a vet can provide specific instructions on wound care, including whether a cone is necessary and how long it should be worn.
Monitoring Progress
A vet can monitor your pet's progress and make adjustments to their treatment plan if necessary. This includes deciding when it's safe to stop using the dog cone.
Emergency Situations
In emergency situations, always consult a vet. DIY solutions should never replace professional medical advice and treatment.
While a DIY dog cone can be a helpful tool, it's not a substitute for professional veterinary care. Always consult with a vet to ensure your pet gets the best care possible.
Alternatives to Dog Cones
While dog cones are effective, they might not be the best fit for every pet. Some dogs may find them uncomfortable or distressing. Luckily, there are several alternatives to traditional dog cones that can also prevent your pet from aggravating a wound or injury.
Inflatable Collars
Inflatable collars are a popular alternative to traditional dog cones. They are worn around the neck and inflated to prevent the dog from reaching their body. These collars are typically more comfortable and less obstructive than traditional cones.
Recovery Suits
Recovery suits are another option. These are full-body suits that cover the wound or surgical site. They provide a barrier to licking and scratching while also keeping the area clean. These suits can be especially useful for wounds on the body where a cone might not be effective.
Protective Bandages
For minor wounds or hot spots, protective bandages can be used. These are designed to cover the wound and provide a barrier against licking and scratching. They can be a good option for small areas but may not be suitable for larger wounds or surgical sites.
Antiseptic Sprays
Antiseptic sprays with a bitter taste can also be used to deter a dog from licking a wound. These sprays not only help to keep the wound clean, but their unpleasant taste discourages dogs from licking.
While these alternatives can be effective, it's important to monitor your pet closely to ensure they're not causing further harm to the wound. Always consult with a vet before deciding on the best method of protection for your pet.
Safety Tips for Using a DIY Dog Cone
When using a DIY dog cone, it's crucial to prioritize your pet's safety. Here are some tips to ensure the cone is safe and comfortable for your dog.
Proper Fit
1. Comfort: The cone should be comfortable for your dog. It should not restrict their breathing or eating. If your dog seems distressed or uncomfortable, adjust the cone or consult with a vet.
2. Size: The cone should extend beyond your dog's nose but not hinder their vision or movement. If the cone is too long, your dog may struggle to move around or eat and drink.
Regular Checks
3. Check Regularly: Regularly check the cone's fit and condition. If the cone becomes damaged or if your dog's condition changes, adjustments may be needed.
Material Safety
4. Safe Materials: Use materials that are safe for pets. Avoid sharp edges or small parts that could harm your dog or become a choking hazard.
Supervision
5. Supervision: Especially in the beginning, keep a close eye on your dog while they're wearing the cone. Some dogs may try to remove the cone or could get it caught on furniture or other objects.
Consult a Vet
6. Vet Consultation: Always consult with a vet before using a DIY dog cone, especially if your dog has a serious injury or has recently had surgery. They can provide advice tailored to your pet's specific needs.
The goal of a dog cone is to help your pet heal without causing additional stress or discomfort. Always prioritize your pet's well-being, and don't hesitate to seek professional advice if you're unsure.
Care and Maintenance of a DIY Dog Cone
Keeping your DIY dog cone clean and in good condition is essential for your pet's comfort and health. Here are some tips on how to care for and maintain your DIY dog cone.
Cleaning the Cone
1. Regular Cleaning: Regularly clean the cone to keep it free from dirt and bacteria. Use a mild, pet-safe detergent and warm water. Rinse thoroughly to ensure no soap residue is left, as this could irritate your dog's skin.
2. Drying: After washing, allow the cone to air dry completely before putting it back on your dog. A damp cone can cause discomfort and may lead to skin issues.
Inspecting the Cone
3. Regular Checks: Regularly inspect the cone for any signs of wear and tear. If the cone is damaged, it may not function properly and could potentially harm your pet.
4. Comfort Check: Check regularly to ensure the cone is still comfortable for your dog. Look for any signs of rubbing or irritation on your dog's neck. If you notice any issues, adjust the cone as necessary or consider making a new one.
Replacing the Cone
5. Replacement: If the cone becomes too worn or damaged, replace it with a new one. A DIY dog cone is not meant to last forever, and regular replacement ensures it remains effective and safe for your pet.
The well-being of your pet is paramount. Regular care and maintenance of the DIY dog cone contribute significantly to your pet's comfort and safety.
FAQs About DIY Dog Cone
Here are some frequently asked questions about DIY dog cones that may help you understand the topic better.
What is a DIY Dog Cone?
A DIY dog cone, also known as an Elizabethan collar or E-collar is a protective device that can be made at home to prevent your dog from licking or scratching their wounds or surgical sites.
How Do I Make a DIY Dog Cone?
You can make a DIY dog cone using materials like foam, fabric, and velcro. The process involves measuring your dog, cutting the material to the right size, and securing it with velcro.
How Long Should My Dog Wear the Cone?
The duration your dog should wear the cone depends on their specific situation, such as the nature of their wound or the type of surgery they've had. It's best to consult with a vet for advice tailored to your pet.
Can a DIY Dog Cone Replace a Vet-Recommended Cone?
While a DIY dog cone can be a practical solution, it should not replace a cone recommended by a vet. Always consult with a vet before deciding to use a DIY dog cone.
Is a DIY Dog Cone Safe?
A DIY dog cone can be safe if made and used correctly. It should be the right size for your dog and made from safe, pet-friendly materials. Regular checks are necessary to ensure the cone remains in good condition and is not causing discomfort to your pet.
How Do I Know if the Cone is the Right Size?
The cone should extend beyond your dog's nose but not hinder their vision or movement. You should be able to fit two fingers between the cone and your dog's neck.
Can My Dog Eat and Drink with the Cone On?
Yes, your dog should be able to eat and drink with the cone on. If they're having trouble, you may need to adjust the cone or use a more shallow food and water dish.
My Dog Hates the Cone. What Can I Do?
If your dog is uncomfortable or distressed by the cone, consider alternatives like inflatable collars or recovery suits. Always consult with a vet to find the best solution for your pet.
How Often Should I Clean the Cone?
Clean the cone regularly to keep it free from dirt and bacteria. Use a mild, pet-safe detergent and warm water, and let it air dry completely before putting it back on your dog.
What Should I Do if the Cone Gets Damaged?
If the cone gets damaged, it may not function properly and could potentially harm your pet. In this case, you should replace it with a new one. Always have a backup plan in case the DIY solution fails.
While a DIY dog cone can be a helpful tool, it's not a substitute for professional veterinary care. Always consult with a vet to ensure your pet gets the best care possible.
Conclusion:
In conclusion, making a homemade DIY dog cone is not only a cost-effective solution but also a loving way to ensure your pet's safety and comfort during their healing process. The steps outlined in this guide, from measuring your dog to selecting the right materials and assembling the cone, have been designed to help pet owners navigate the procedure with ease.
Remember, regular checks and adjustments are crucial to ensure the perfect fit and maximum comfort for your furry friend. For those seeking alternatives, exploring options like inflatable collars or recovery suits could also provide gentle support and protection. Always prioritize your pet's well-being and consult with a veterinarian to ensure the DIY dog cone is suitable for your pet's specific needs and conditions. Your dedication to their health signifies the incredible bond and care you offer as a responsible pet owner.


