Making a homemade VR headset can be a fun project. I remember gathering all the materials, feeling excited but a bit nervous. I followed simple instructions and started building the pieces. Step by step, my confidence grew. As everything came together, my DIY VR headset began to take shape, and I couldn't wait to test it out.
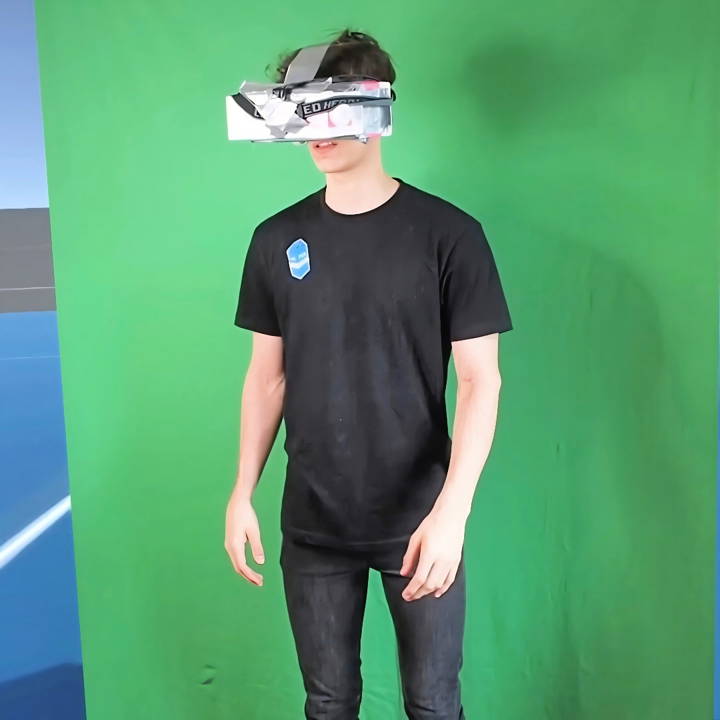
Seeing my VR headset actually work was a thrilling experience. The sense of achievement was immense, and the virtual world looked impressive. This project was not only engaging but also informative. Making a VR headset yourself isn't just rewarding; it's also a great way to learn about technology.
I'm sharing this to help you get started on making your own VR headset. You'll find each step incredibly satisfying.
What is VR?
At its core, VR is a simulated experience. Using a headset, you can look around a virtual space as if you were really there. You can also interact with the environment using controllers that track your hand movements.
How does it work?
VR headsets use two small lenses to display images to each eye, making a 3D effect. Sensors track the movement of your head and hands, so when you look up, down, or around, the view changes accordingly. This tracking makes the virtual world feel stable and real.
The Evolution of VR
VR started as a concept in science fiction, but it has been around in some form since the 1960s. The technology has evolved significantly, with today's VR offering high-resolution displays and sophisticated tracking.
Uses of VR
VR isn't just for gaming. It's used in education to simulate historical events, in medicine for training surgeons, and in architecture for visualizing buildings before they're built. It's a tool that spans across various fields, providing valuable experiences that are otherwise impossible or impractical.
Why is VR important?
VR has the potential to change how we learn, entertain ourselves, and connect with others. It can take you places you've never been, help you learn new skills, and even provide therapeutic experiences.
Gathering the Materials: A Quest in Itself
The mission began with assembling the necessary items:
- An empty milk carton (or two, for those unforeseen mishaps)
- Scissors to cut through my ambitions (and the carton)
- A marker to outline my vision
- Duct tape for… well, everything
- And my smartphone, the window to another reality
Each material was chosen not just for its availability but for the DIY spirit it embodied. The milk carton became the skeleton of my creation, sturdy yet workable. The scissors and marker were my tools of precision, and duct tape held my dreams (and headset) together.
Step by Step Instructions
Make your own DIY VR headset with our comprehensive guide. Follow the step-by-step instructions from shaping the vision to game development.
Step 1: Shaping the Vision
The first step was as thrilling as it was dairy: converting the milk carton into a vessel for my VR dreams. I marked and cut out a slot for my smartphone, ensuring a snug fit. This process was unexpectedly smooth, mirroring the promise of a straightforward journey.
Step 2: Reinventing the Wheel
After making the basic structure, it was time for reinforcement. Duct tape became my ally, providing the stability needed for my phone's safekeeping. This step was all about precision; each strip of tape had to be perfectly placed to maintain balance and prevent any technology casualties.
Step 3: Personalization and Comfort
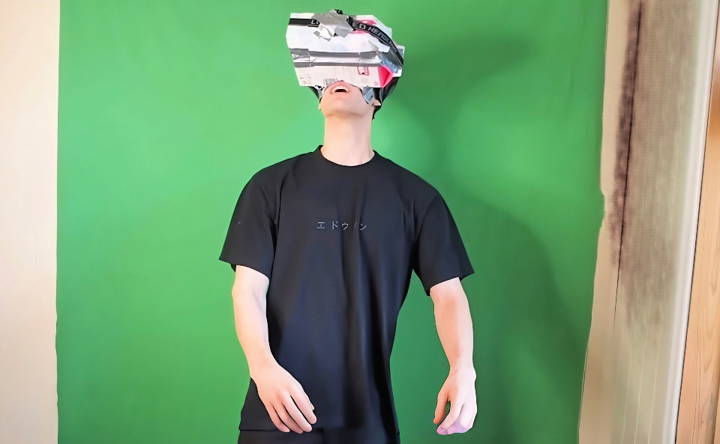
Next, I focused on making the headset wearable. Additional parts of the milk carton were sliced (carefully to avoid milk spills) and molded to fit my head. This phase was crucial, as comfort is key in the VR experience. More duct tape came into play, ensuring a secure yet comfortable fit. My DIY headset, now aptly named the ‘Oculus Milk,' was taking shape, promising a wireless experience rivaled by none.
Step 4: The Fun Part – Game Development
With the headset ready, it was game time - literally. I embarked on making simple VR games, starting with a test scene to check the setup. Surprisingly, my makeshift VR headset worked. I could look around in all directions, an achievement that filled me with pride.
However, I quickly realized the limitations of not having VR controllers. My solution? Using screams as inputs! It was unorthodox but perfectly aligned with my unconventional VR journey.
Step 5: Building a VR Game
Inspired by popular VR titles, I chose to replicate the experience of games like Beat Saber and Pistol Whip. Despite lacking the polish of these high-budget games, my versions offered a unique charm. Crafting these games required patience and creativity, from designing the environment to programming cube movements that responded to my 'controller' inputs.
The final products were rudimentary but functional, proving that with some ingenuity, even a milk carton can become a gateway to virtual realms.
Reflections and the Path Forward
As I wrapped up my project, I learned of Google Cardboard, a commercial version of what I had made. While humorous in its coincidence, it also sparked ideas for further innovation. My next challenge? Implementing VR hands for a more immersive experience.
Customization Tips
When making your own VR headset, personalizing it to fit your needs and preferences can greatly enhance your virtual reality experience. Here are some customization tips to help you make your DIY VR headset uniquely yours:
Comfort is Key
- Padding: Add extra padding around the eyes and nose bridge to prevent discomfort during extended use. Soft materials like foam or felt can be used.
- Straps: Adjust the straps for a snug fit. Consider replacing elastic straps with adjustable ones for better support and comfort.
Visual Clarity
- Lens Adjustment: Make sure the lenses are positioned correctly for your eyes. You can add sliders to adjust the distance between the lenses.
- Screen Resolution: If possible, use a smartphone with a high-resolution display to improve image clarity.
Enhanced Audio
- Headphone Integration: Attach headphones or earbuds directly to the headset for a more immersive audio experience.
- Soundproofing: Add sound-absorbing materials to the headset's design to reduce external noise.
Aesthetics
- Design: Personalize the exterior with paint, stickers, or decals to reflect your style.
- Cable Management: Organize cables with clips or ties to keep them from interfering with your movement.
Functionality
- Controller Holders: Make holders for your controllers on the headset for easy access.
- Ventilation: Incorporate vents or fans to prevent the lenses from fogging up and to keep you cool.
Accessibility
- Adjustable Focus: For those who wear glasses, make an adjustable focus mechanism to accommodate different vision needs.
- Weight Distribution: Balance the weight of the headset to reduce strain on the neck and shoulders.
By customizing your VR headset, you not only make it more comfortable and enjoyable to use, but you also get a chance to express your creativity.
Software Setup and Configuration
Setting up the software for your DIY VR headset is a crucial step to ensure a smooth and enjoyable virtual experience. Here's a straightforward guide to help you through the process:
Choosing the Right Software
- Compatibility: Ensure the software you choose is compatible with your smartphone or computer.
- VR Platform: Select a VR platform that offers a wide range of applications and games.
Installation Process
- Downloading: Download the VR software from a reliable source or app store.
- Installing: Follow the on-screen instructions to install the software on your device.
Pairing Devices
- Headset Recognition: Connect your VR headset to your device. The software should recognize it automatically.
- Controller Sync: Pair your controllers with the device following the software's guide.
Calibration
- Lens Calibration: Adjust the lens settings in the software to match your eyesight and enhance clarity.
- Motion Tracking: Calibrate the motion tracking for accurate and responsive movements.
User Interface Setup
- Navigation: Familiarize yourself with the software's interface to navigate through menus and settings easily.
- Customization: Customize the interface to your liking, adjusting settings for comfort and performance.
Safety and Comfort
- Boundary Setup: Define your play area to prevent accidents while immersed in VR.
- Health Settings: Adjust settings like brightness and motion sensitivity to avoid discomfort.
Testing
- Run a Demo: Use a demo application to test the setup and make sure everything works correctly.
- Troubleshoot: If you encounter issues, consult the software's help section or online forums for solutions.
By following these steps, you'll have your DIY VR headset up and running in no time.
Future of DIY VR
The realm of DIY VR is on the brink of transformative change, with advancements poised to redefine what enthusiasts and creators can achieve in their own homes. Here's a glimpse into the future of DIY VR:
- Accessibility and Inclusivity The future shines brightly on making VR more accessible to everyone. Innovations are underway to develop lighter, more comfortable headsets that can accommodate a broader range of users, including those with disabilities. Projects like Microsoft's SeeingVR are pioneering efforts to make VR experiences available to people with low vision or blindness.
- Integration with Emerging Technologies Expect to see a surge in VR experiences that cleverly integrate with other cutting-edge technologies such as artificial intelligence (AI) and machine learning. This integration will not only enhance the realism of VR environments but also make them more interactive and responsive to user input.
- Advancements in Hardware The DIY VR landscape is set to welcome a new generation of hardware. From headsets with advanced eye-tracking capabilities to controllers that offer more natural and intuitive interactions, the hardware evolution will significantly improve the DIY VR experience.
- Educational and Training Applications VR's potential as an educational tool is vast. For instance, VR simulations for astronaut training are already in development, which could eventually trickle down to DIY VR, allowing users to experience and learn from simulations of complex tasks.
- Immersive Storytelling and Experiences The future of DIY VR also includes immersive storytelling, where users can not only witness stories unfold but also participate and influence outcomes. This could revolutionize the way narratives are experienced, making them more personal and impactful.
- DIY VR in Everyday Life As VR technology becomes more integrated into our daily lives, DIY VR enthusiasts will have the opportunity to make personalized applications that enhance everyday experiences—from virtual tours of college campuses to simulations of home renovations.
DIY VR's future lies in democratization and innovation. VR will be accessible to all, not just tech giants, enabling personal creativity, exploration, and learning. The DIY VR community is poised to expand these possibilities.
FAQs About DIY VR Headset
Discover answers in our FAQs about DIY VR headsets. They cover everything from setup to troubleshooting, ensuring a seamless VR experience.
A DIY VR headset is a homemade virtual reality headset that you can build using readily available materials and components. It’s a cost-effective alternative to commercial VR headsets, allowing you to experience virtual reality without a significant investment.
To build your own VR headset, you’ll need a few key components such as lenses, a display (like a smartphone screen), and a structure to hold everything together. You can find detailed instructions and part lists on DIY websites. The basic steps involve assembling the structure, inserting the lenses and display, and connecting any necessary electronics.
Yes, most DIY VR headsets use a smartphone as the display because it’s an accessible and cost-effective option. Ensure your phone fits the headset structure and that the screen size is compatible with the lenses you choose.
Building a DIY VR headset can range from simple to complex, depending on the design and features you want to include. Basic cardboard designs are straightforward and can be assembled quickly, while more advanced setups with head tracking may require additional technical skills.
Yes, you can add head tracking to your DIY VR headset for a more immersive experience. You'll need a gyroscope and accelerometer sensor, like the 6DOF MPU 6050, and a microcontroller, such as an Arduino Micro, to process the movements. The sensor tracks the orientation of your head, and the microcontroller translates this into input for your VR content. Detailed instructions for integrating these components can be found online.
Lessons Learned and Advice
Completing my DIY VR headset from scratch was rewarding. I'm confident that with clear steps and patience, you'll feel the same pride and excitement. Each piece you construct will bring you closer to an astonishing virtual experience.


