Building your own DIY roller coaster can be an exciting adventure. I remember the first time I thought about it. I was watching a movie and saw a giant roller coaster. It looked so fun! I thought, "Why not build one in my backyard?" That day sparked my curiosity, and I decided to find ways to build my own ride. I wanted to learn how design and gravity worked together.
Why Build a Roller Coaster?
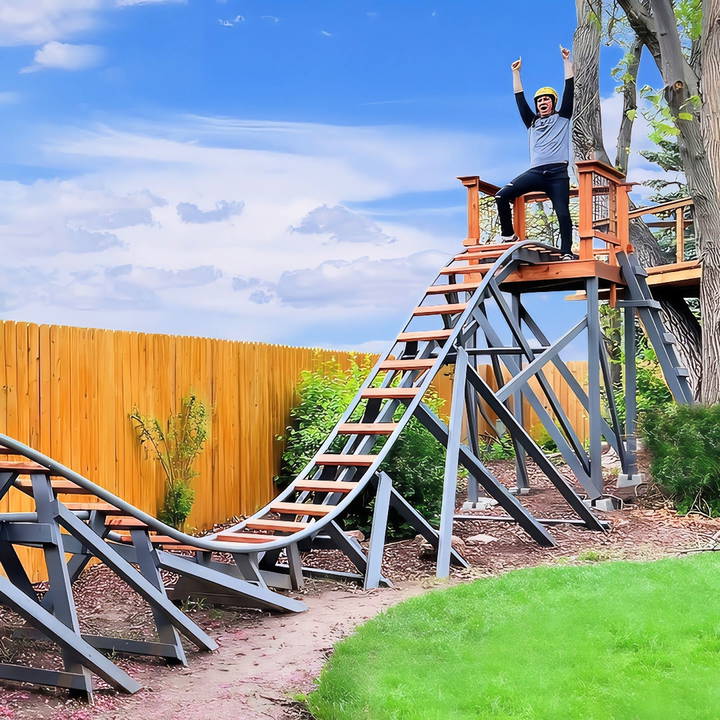
The inspiration sprang from a simple desire to build something extraordinary for my kids. I wanted to engineer a unique experience that would spark joy, foster creativity, and possibly teach them a thing or two about physics. Plus, let's be honest, who hasn't fantasized about having their very own roller coaster?
Materials Needed and Their Purpose
- Scrap Wood & PVC Pipes: The backbone of our coaster. Wood for the structure and PVC for the rails.
- Turkey Cooker & Hot Dog Water: Sounds bizarre, but this odd duo was essential for bending the PVC pipes to fit our design.
- Engineering Tools: From saws to drills, every tool had its moment in the spotlight, ensuring our coaster was both sturdy and safe.
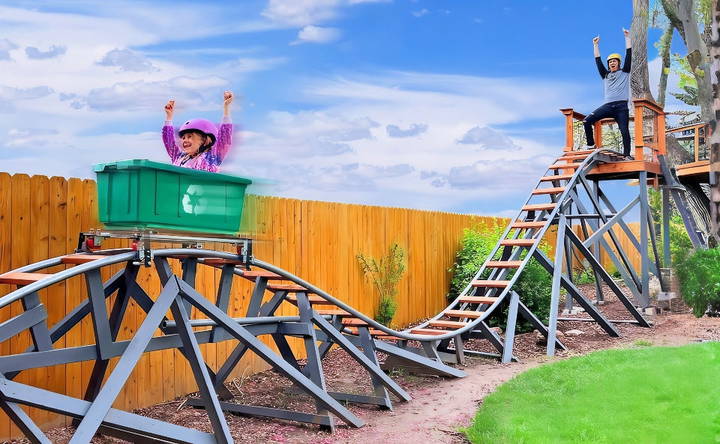
- Recycling Bin: This became our cart. It was the perfect size and gave the coaster a whimsical flair.
- Sandbags: Used for testing the coaster's durability and safety before any human trials.
- Paint & Decorations: To give our coaster that eye-popping allure and blend it into the backyard aesthetics.
Step by Step Instructions
Learn how to build your own roller coaster with step-by-step instructions from planning to launch day. perfect for thrill-seekers and DIY enthusiasts!
Initial Planning and Design
First, I sketched out a basic design, looping in my engineer friend to make sure the physics checked out. Deciding on a loop and a decent-sized drop, we calculated the necessary speed and support structure.
Gathering Materials
I scavenged for scrap wood and PVC pipes, utilizing resources like local construction site leftovers (with permission, of course) and my collection of odds and ends. Resourcefulness was key.
Bending PVC Pipes
The turkey cooker came into play here. We filled it with water, heated it up, then soaked our PVC pipes in the steaming hot water. This made them malleable enough to bend into the curves needed for our track. Oh, and the hot dogs? Well, every great project is fueled by snacks.
Building the Track
Laying out the bent PVC on the ground, we began forming the shape of our coaster, anchoring everything down with the scrap wood. It was crucial to get the angles just right to ensure a smooth ride and safe experience.
Crafting the Cart
Repurposing a recycling bin into our cart was a stroke of creative genius, if I do say so myself. A few modifications ensured it was comfortable and secure, then it was onto the tracks for a test run.
Test Runs
First with sandbags, then bravely with myself as the test pilot, we sent the cart down the track. These tests were crucial for pinpointing weaknesses and areas for reinforcement.
Safety Checks and Adjustments
After several tweaks, including re-engineering the cart attachment to ensure it stayed on the track, we conducted final safety checks. My heart was in my throat as we launched the cart with me inside down the track, but the thrill of success was unparalleled when it worked flawlessly.
Launch Day
The true test came when we invited the neighborhood kids (after thorough briefings on safety and parental permissions, of course) to take a ride. The joy on their faces and the laughter in the air solidified the project's worth in ways words can't capture.
Lessons Learned and Tips
- Planning is Paramount: Without a doubt, thorough planning and design groundwork made all the difference.
- Safety First: Continuous testing and willingness to make necessary adjustments ensured not just a fun experience, but a safe one.
- Community Engagement: Sharing this project brought our neighborhood together, making not just a roller coaster but a community landmark.
Decor and Theming
Adding a theme to your DIY roller coaster makes it more exciting and immersive. A good theme turns a simple ride into a memorable adventure. Here's how to decorate and theme your coaster in a fun, practical way.
Choose a Theme That Resonates
Start by picking a theme that you're passionate about. It could be anything from a space odyssey to a pirate's voyage. Your enthusiasm will shine through in the details, making the experience more enjoyable for everyone.
Simple Decor Can Make a Big Impact
You don't need to break the bank to build a themed environment. Use everyday items to craft decorations. For example, old tires can become asteroid rings for a space theme, or cardboard can be painted to look like treasure chests.
Engage the Senses
Theming isn't just about what you see; it's also about what you hear and feel. Play thematic music at the ride's entrance, or use fans to simulate wind in a stormy pirate scene. These small touches can greatly enhance the overall experience.
Safety Shouldn't Be Sacrificed for Style
While decorating, always keep safety in mind. Ensure that none of the decor interferes with the operation of the coaster or poses a hazard to riders.
Involve the Community
If you're struggling with ideas or need help crafting decorations, reach out to the community. Friends, family, and online forums can be great resources for inspiration and assistance.
Use these tips to build a safe, fun, and memorable DIY roller coaster. Make it an adventure that riders will want to experience repeatedly.
Maintenance and Upkeep
Keeping your DIY roller coaster in top shape ensures a safe and thrilling experience for riders. Here's a practical guide to maintaining your coaster:
Regular Inspections
- Visual Checks: Regularly inspect the entire coaster structure. Look for signs of wear, rust, or damage. Pay attention to welds, bolts, and joints.
- Lubrication: Apply lubricants to moving parts like wheels, axles, and joints. Proper lubrication reduces friction and ensures smooth operation.
- Track Alignment: Check that the track is aligned correctly. Misaligned sections can cause discomfort for riders and affect the coaster's performance.
- Safety Features: Test safety features such as restraints, emergency brakes, and sensors. Replace any malfunctioning components promptly.
Seasonal Preparations
- Winterizing: If your coaster operates year-round, prepare it for winter. Cover exposed parts to prevent snow and ice buildup. Lubricate components to prevent freezing.
- Spring Cleaning: Before reopening for the season, thoroughly clean the coaster. Remove debris, leaves, and any critter nests. Inspect for any damage caused during winter.
Addressing Wear and Tear
- Replace Worn Parts: Keep spare parts on hand. Replace worn-out wheels, bearings, and other components promptly.
- Paint Touch-Ups: Touch-up paint to prevent rust and maintain aesthetics. Use weather-resistant paint for outdoor coasters.
Document Everything
- Maintenance Log: Maintain a detailed log of inspections, repairs, and maintenance tasks. Note dates, findings, and actions taken.
- Emergency Procedures: Build an emergency protocol. Train staff on evacuation procedures and how to handle unexpected situations.
Safety First
When building your DIY roller coaster, safety should be your top priority. Here are essential guidelines and considerations to ensure a safe and thrilling ride:
1. Safety Guidelines
- Rider Height Restrictions: Determine the minimum and maximum rider heights for your coaster. Restrict access to riders who fall outside these limits.
- Secure Restraints: Design restraints (such as lap bars or harnesses) that keep riders securely in place during the ride. Test them rigorously to ensure they won't accidentally release.
- Emergency Stops: Install emergency stop buttons at various points along the track. These allow operators to halt the coaster immediately if needed.
FAQs About DIY Roller Coaster
Discover answers to common questions about DIY roller coasters, including safety tips, materials needed, and construction steps, in our comprehensive FAQs.
While it can be challenging, with the right planning and resources, building a backyard roller coaster is achievable. Take your time, follow safety guidelines, and enjoy the process!
Consider safety and thrill when designing your coaster:
Hills: Include at least one hill that’s 6 inches (15 cm) high. Hills provide potential energy for an exciting ride.
Track design: Plan for walls or railings to keep the marble on track. Anticipate danger zones, like curves and slopes.
Stopping mechanism: Ensure your coaster has a way to stop the marble safely at the end of the track.
Accurate measurements and a detailed plan are crucial:
Safety: Proper measurements ensure your coaster functions well and meets safety standards.
Thrill: A well-designed coaster provides an exhilarating experience.
Consider your budget:
Materials: Research prices for foam board, popsicle sticks, and aluminum foil.
Alternatives: Source materials from alternative suppliers to reduce costs.
Before taking the thrilling ride, follow these steps to ensure your coaster is safe and functional:
Dry Run: Conduct a dry run without the marble. Push an empty car along the track to check for any obstacles, misalignments, or weak points.
Weight Distribution: Test the coaster with a marble or small ball. Observe how it moves through curves, hills, and loops. Adjust the weight distribution if needed.
Friction Check: Ensure the marble doesn't get stuck due to excessive friction. Lubricate the track if necessary.
Safety Measures: Double-check safety features like railings, stopping mechanisms, and emergency stops.
Final Thoughts
In the end, building your own DIY roller coaster can be a fun and rewarding experience. You'll be amazed at how much you can learn while having fun. Gather your materials, and take that first step today. Building something with your own hands is a great way to explore your creativity and share a thrill.


