Setting up a DIY hoop house was one of the best decisions I made for my garden. I remember the first time my friend suggested it; I was hesitant. However, after doing my research, I learned it could protect my plants from harsh weather and help extend the growing season. The benefits convinced me it was worth a try.
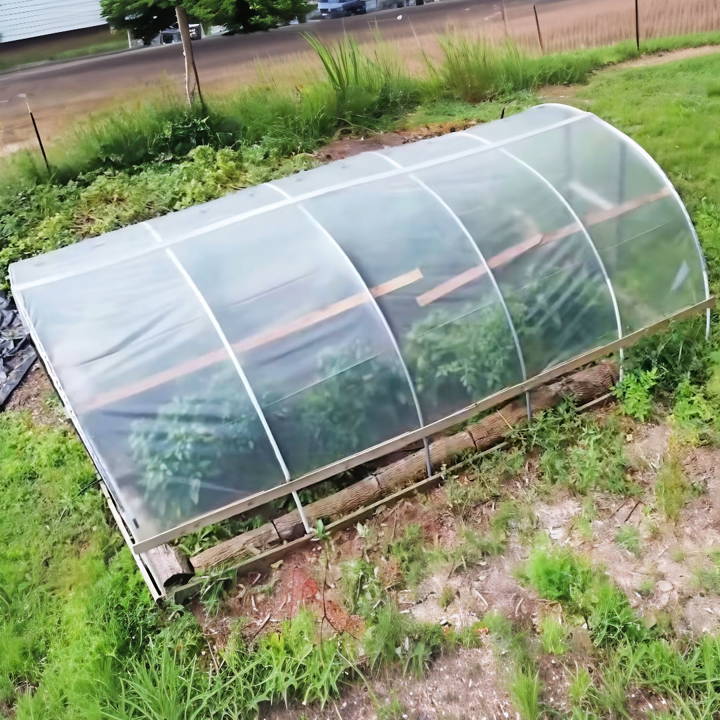
The initial setup seemed a bit daunting, but with a bit of planning, it turned into an exciting project. I carefully followed the step-by-step instructions I found online. With every step, I gained more confidence. The sense of accomplishment I felt when I finally finished was incredible. Now, I enjoy fresh veggies right from my garden almost year-round.
I'm helping with this: if you're thinking of getting started, this guide will be really useful for you.
Materials Needed and Why
- 2x6 Cedar Boards: These are used for the foundation. Cedar is chosen for its natural resistance to rot and pests.
- 2x2 Cedar Posts: To anchor the structure securely into the ground.
- Metal Poles and Rebar: The framework of your hoop house. Metal poles for the hoops and rebar to anchor them into the ground.
- Plastic Sheeting: This serves as the greenhouse cover, making a controlled environment for your plants.
- C-Channels and Wiggle Wire: These are used to securely attach the plastic to the hoop structure.
- 1x4 Treated Board and UV Tape: For connecting the hoops at the top and protecting the plastic where it contacts the metal.
Step by Step Instructions
Build a cost-effective DIY hoop house for your garden! Step-by-step instructions for a sustainable greenhouse. Learn how today!
Laying the Groundwork
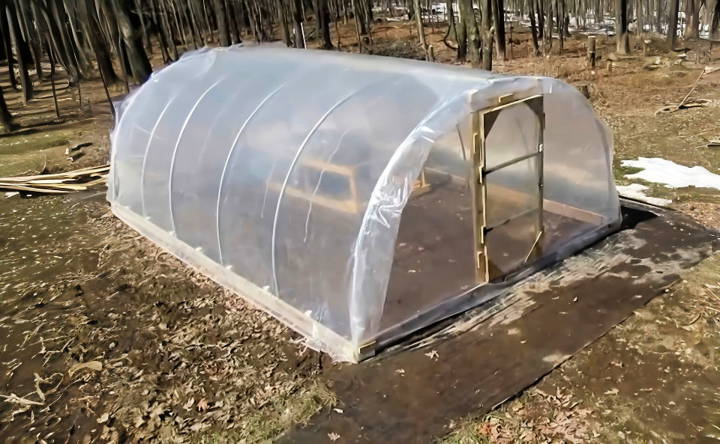
The first step was making a solid foundation using 2x6 cedar boards, forming a rectangle that measured 12 by 19 feet. Using the 2x2 cedar posts, we anchored the foundation firmly into the ground. This initial step is crucial because it sets the stage for the rest of the construction and ensures the longevity of the hoop house.
Bending the Poles
Arguably, bending the metal poles for the hoops was the most challenging part. We used a pole bender tool to achieve the right curve without kinking the metal—a mistake we learned the hard way ruins poles. Our trick was marking nine inches from each end before bending, ensuring flat ends that would rest against the rebar and a flat top to connect the hoops together.
Hoops and Supports
Once we had our poles ready, installing them over the rebar stakes was straightforward. We connected the hoops using screws for extra stability. Adding a 1x4 treated board across the top of the hoops not only unified the structure but also provided additional support against the elements.
Door and Window Framework
Framing the doors and windows required a bit of creativity to match our specific needs. We opted for a simple method where boards were attached directly to the hoop, shaping openings for doors and windows. This part of the process is highly customizable based on the size and layout of your hoop house.
Covering with Plastic
Covering our structure with plastic was a pivotal moment. We found that using C-channels and wiggle wire to attach the plastic to the front and back hoops, while using treated lumber to secure it to the baseboards, offered the best results in terms of durability and weather resistance. It's worth noting that applying UV tape to the metal hoops where they contact the plastic is essential to prevent damage.
One aspect we underestimated in our initial build was the need for adequate ventilation. Our solution was cutting a two-foot opening on each side of the greenhouse during summer and covering it back up for winter. This significantly improved air circulation, mitigating the overheating issue we faced during hotter months.
Customization Ideas for Your DIY Hoop House
Build a hoop house to extend your growing season and shield plants from the elements. Customize it to suit your gardening needs with these innovative ideas.
Choose the Right Covering
The covering is the heart of your hoop house. Opt for a durable polyethylene plastic that can withstand the weather and retain heat efficiently. The thickness of the plastic can vary, so choose one that suits your climate and the level of durability you need.
Reinforce the Structure
Use sturdy materials like PVC pipes or metal rebar for the hoops. They should be strong enough to support the weight of the covering and resist bending in the wind. Consider using galvanized screws and fasteners to prevent rust and ensure longevity.
Automate for Convenience
Install an automatic watering system to save time and ensure your plants receive consistent moisture. You can also add temperature-controlled vents that open or close based on the internal temperature, maintaining an optimal environment for your plants.
Roll-Up Sides for Ventilation
Incorporate roll-up sides into your design. This allows you to control the temperature and humidity levels inside the hoop house, providing ventilation during warmer days and retaining heat during cooler periods.
Add Insulation for Cold Climates
If you live in a colder region, consider adding a layer of bubble wrap or thermal screens inside the hoop house. This extra insulation can help retain heat during the night and prevent frost damage to your plants.
Build Raised Beds
Inside your hoop house, build raised beds to improve drainage and soil quality. Raised beds also make it easier to manage your plants and can help prevent back strain from bending over too low.
Incorporate a Trellis System
For climbing plants, install a trellis system inside your hoop house. This not only supports the growth of plants like tomatoes and cucumbers but also maximizes the use of vertical space.
Use Reflective Materials
Line the interior walls with reflective materials such as mylar to increase light distribution. This can lead to better growth and yield, especially for plants situated further from the center of the hoop house.
Customize your hoop house to boost efficiency, productivity, and gardening joy. Tailor these ideas to your needs and your plants' requirements.
Seasonal Planting Guides for Your Hoop House
A hoop house is a valuable asset for gardeners looking to extend their growing season. It provides a controlled environment where you can grow a variety of plants throughout the year. Here's a guide to what you can plant in each season to make the most of your hoop house.
Spring Planting
As the frost begins to thaw, your hoop house is ready for early spring planting. Start with cold-tolerant vegetables like:
- Lettuce and spinach for quick, leafy greens.
- Radishes and scallions for a spicy kick to your salads.
- Peas and broad beans for early harvests.
Summer Planting
With the heat in full swing, focus on plants that thrive in warmer temperatures:
- Tomatoes and peppers love the extra warmth a hoop house provides.
- Cucumbers and zucchinis will grow quickly in a controlled environment.
- Herbs like basil and cilantro will flourish and provide fresh flavors for your kitchen.
Autumn Planting
As the days get shorter, your hoop house can help protect plants from early frosts:
- Carrots and beets can be sown for a late harvest.
- Kale and cabbage are hardy and can grow well into the winter.
- Swiss chard offers a colorful and nutritious addition to autumn meals.
Winter Planting
Even in the coldest months, your hoop house can support growth:
- Leafy greens like spinach and mustard greens can survive the chill.
- Root vegetables such as turnips and parsnips can be harvested throughout the winter.
- Microgreens and sprouts provide fresh produce when outdoor gardens are dormant.
Recognize to adjust your planting schedule based on your specific climate and the exact conditions inside your hoop house.
Troubleshooting Common Issues in DIY Hoop Houses
Building and maintaining a DIY hoop house can be a rewarding experience, but it's not without its challenges. Here are some common issues you might encounter and how to address them effectively:
Covering Damage
The plastic covering of your hoop house is crucial for protecting your plants. If you notice tears or holes, it's important to repair them promptly to maintain the right temperature and humidity levels. You can use clear tape designed for greenhouse repair or replace sections of the plastic if necessary.
Structural Stability
Strong winds and heavy snow can put stress on the hoop house frame. Ensure that your PVC pipes or metal rebar are securely anchored into the ground. For added stability, consider installing cross braces or a ridge pole along the top of the structure.
Ventilation Issues
Proper ventilation is key to preventing overheating in your hoop house. If your plants are showing signs of heat stress, consider adding roll-up sides or ventilation windows at the ends of the hoop house. This will allow you to regulate the temperature more effectively.
Loose Connections
Regularly check the screws and fasteners that hold your hoop house together. Tighten any that have become loose and replace any that are damaged or rusted. This will help prevent structural failure, especially during adverse weather conditions.
Pest Control
Pests can find their way into the most secure hoop houses. Keep an eye out for signs of infestation and address them quickly. Use physical barriers, such as insect netting or organic pest control methods, to keep your plants safe without resorting to harsh chemicals.
Stay vigilant and address common issues quickly to keep your hoop house productive and safe. Regular maintenance prevents problems and extends its life.
Maintenance and Care for Your DIY Hoop House
Keeping your DIY hoop house in top condition is essential for the longevity of the structure and the health of your plants. Here's a straightforward guide to maintaining your hoop house throughout the year.
Regular Cleaning
Keep the plastic covering clean to ensure maximum sunlight penetration. Gently wash the exterior with a mild soap solution and rinse with water. Inside, remove any plant debris and disinfect surfaces to prevent disease.
Check for Damage
Inspect the hoop house regularly for any signs of wear or damage, especially after extreme weather events. Look for tears in the plastic, loose connectors, or bent hoops. Prompt repairs can prevent bigger issues down the line.
Pest and Disease Management
Monitor your plants for pests and diseases. Use organic methods like neem oil or insecticidal soap to manage infestations. Keep the interior dry to avoid mold and mildew growth.
Soil Preparation
Before each planting season, refresh the soil by removing any weeds and incorporating compost or other organic matter. This will nourish your plants and promote healthy growth.
Ventilation
Ensure your hoop house has adequate ventilation to control temperature and humidity. Roll-up sides or vented doors can help regulate the environment inside.
Seasonal Adjustments
- Spring: Prepare the soil and start seedlings. Clean the hoop house thoroughly after the winter months.
- Summer: Monitor temperatures closely. Use shade cloth if necessary to protect plants from intense heat.
- Fall: Clear fallen leaves and debris. Check the structure's integrity before the onset of winter.
- Winter: Remove snow from the roof to prevent structural damage. Check the insulation to keep plants warm.
By following these maintenance tips, you can ensure that your hoop house remains a productive and efficient space for growing a wide range of plants, season after season.
FAQs About DIY Hoop House
Discover answers to common questions about DIY hoop houses, including benefits, construction tips, and maintenance, in our comprehensive faq.
A DIY hoop house is a simple, tunnel-like structure made with hoops of metal or PVC covered with a layer of plastic. It builds a protected environment for plants, extending the growing season by shielding crops from cold, wind, and pests.
Yes, a hoop house can be built cost-effectively. Use affordable materials like PVC pipes for hoops and repurpose wood for the base. Look for discounts on plastic sheeting and consider building a smaller size to reduce costs.
Maintain your hoop house by:
Checking the plastic covering regularly for tears and repairing them.
Ensuring proper ventilation to prevent overheating.
Monitoring for pests and diseases.
Keeping the structure clean and removing any debris or snow that may accumulate on the plastic.
A hoop house is a type of greenhouse, but it’s usually simpler and less expensive. Unlike traditional greenhouses, hoop houses don’t typically have a permanent foundation or automated temperature controls. They rely on passive solar heating and manual ventilation to maintain the internal climate.
Hoop houses are great for growing a wide range of plants, especially those that require a warmer climate. You can grow vegetables like tomatoes, peppers, and leafy greens, as well as fruits like strawberries. They're also ideal for starting seedlings early in the season or extending the harvest period for many crops.
Final Thoughts:
In conclusion, building your own DIY hoop house is a rewarding and practical project. From understanding the materials to following the step-by-step instructions, this guide simplifies the process for you. By constructing a hoop house, you can extend your growing season and protect your plants. Enjoy the benefits of your hard work and watch your garden thrive year-round with your new hoop house. So, gather your materials and start your DIY hoop house project today!


