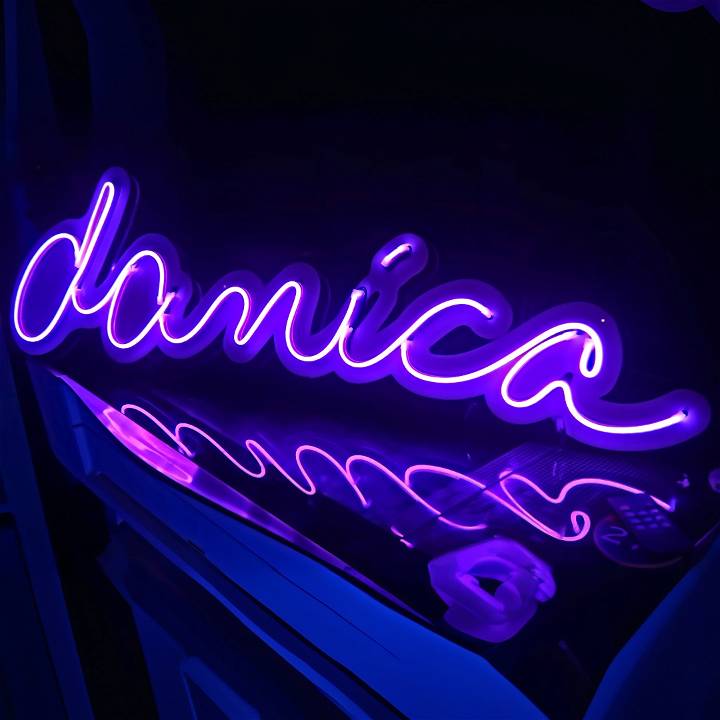
Making a handmade gift carries a special kind of magic, particularly when it illuminates a personal message in the style of neon lights. This project began as an anniversary gift idea for my wife, driven by my fascination with the vibrant LED signs I'd seen online. Here's a detailed narrative of my journey crafting a custom neon LED sign, aiming to shine some light on the process for anyone eager to try their hand at it.
Materials Needed and Their Purpose
- LED Silicone Tubes: The star of the project, these tubes paired with LED strips emulate the neon glow. The sideways orientation of the LEDs inside the tube diffuses light in a way that mimics traditional neon signs.
- Acrylic Sheets: For the backing and the layout template. They provide structure and support, enabling a sleek finish.
- Laser Cutter: Essential for cutting the acrylic with precision, making channels for the LED tubing, and ensuring a clean, accurate design.
- Adobe Illustrator or a Similar Vector Program: To design or convert handwriting into a vector path for the laser cutter.
- Soldering Iron and Accessories: To connect the LED strips properly, ensuring they light up.
- Miscellaneous: Wire cutters, measuring tape, and silicone end caps for finishing touches.
Discovering the Perfect Materials
The journey began with research to identify the ideal type of LED strips; ones that could be bent and manipulated without damage, emitting light sideways into silicone tubes for a neon effect. Sourcing these silicone tubes, available in various colors and lengths, was straightforward and affordable, running slightly over a dollar per foot.
Designing the Sign
Discover the art of designing neon LED signs to make eye-catching and vibrant displays for businesses, events, or personal use.
Digitalizing Handwriting
I wanted the sign to be deeply personal, so I digitized my wife's handwriting using a tablet and Adobe Fresco. This process involved her writing her name several times to capture the perfect iteration. While this project was dear to me, you, too, can personalize your sign by turning any handwritten message or signature into a digital vector.
From Handwriting to Laser-Cutting Template
The real magic happened in Adobe Illustrator. Here, I transformed the digital handwriting into a vector suitable for laser cutting. By adjusting the vector's path to account for the LED tubing's width, I prepared a design ready to be engraved and cut by the laser cutter on acrylic sheets.
The Cutting Phase
Using the laser cutter, I carefully cut out the designed channels on one acrylic sheet and a solid backing on another. This step was crucial for ensuring the LED tubing would fit snugly into place, and the sign would have a sturdy base. Precision here was key to a successful assembly later on.
Assembling the Neon LED Sign
Learn how to assemble a Neon LED sign with our step-by-step guide. From fitting the tubing to soldering for connectivity, master the art of neon sign making.
Fitting the LED Tubing
With the acrylic pieces ready, I began the meticulous task of fitting the LED tubing into the channels. This process required patience and a gentle hand to curve and cut the tubing exactly where needed. Plus, an extra bit of tubing was left at each cut to facilitate easier soldering connections later.
Soldering for Connectivity
Soldering each piece of LED tubing to its power source was both the most challenging and rewarding part. Ensuring each connection was secure and testing them as I went along was critical. Despite a few hiccups with delicate solder points, the principle of 'always be testing' helped me catch issues early.
Final Touches and Lessons Learned
Learn the final touches and valuable lessons in wiring neon signs in parallel and embracing imperfections for a unique DIY project.
Wiring in Parallel
Initially, I imagined wiring the segments in series, but a simpler solution presented itself: wiring in parallel. This approach saved time and reduced complexity, proving sometimes simpler is better.
Embracing Imperfections
Not every curve was perfect, not every solder point pristine, but the imperfections added character. The project taught me valuable lessons in crafting, electronics, and patience.
Illumination
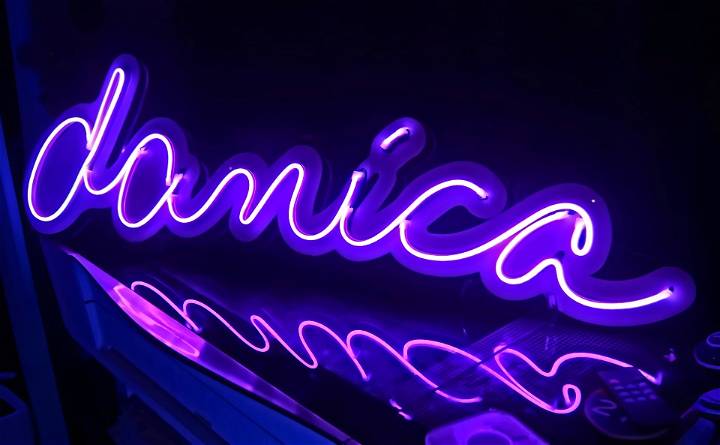
When I finally flipped the switch, the sign came to life, resonating with a warm, neon-like glow. It was a proud moment of making something unique and personal, a tangible expression of love and creativity.
Troubleshooting Common Issues
When making your own DIY neon sign, it's essential to anticipate and address potential problems. Here are some common issues you might encounter and practical solutions to overcome them:
1. Uneven Lighting or Dark Spots
Problem: Sometimes, certain sections of your neon sign may appear dimmer than others, resulting in uneven lighting. Dark spots can detract from the overall effect.
Solution:
- Check Your LED Strip Placement: Ensure that the LED strips are evenly spaced and securely adhered to the acrylic backing. Adjust any loose sections.
- Inspect the Wiring: Verify that all connections are secure. Loose wires can lead to inconsistent brightness.
- Use Diffusers: Consider adding diffusers (such as frosted acrylic sheets) over the LED strips. Diffusers help distribute light more evenly and reduce hotspots.
2. Flickering Lights
Problem: Your neon sign might flicker or blink unexpectedly, disrupting the smooth glow.
Solution:
- Stabilize the Power Source: Fluctuations in power can cause flickering. Use a stable power supply (such as a regulated adapter) to prevent voltage variations.
- Check for Loose Connections: Inspect all wiring connections. Tighten any loose screws or connectors.
- Replace Faulty Components: If a specific LED segment flickers persistently, it might be a faulty LED. Replace it with a new one.
3. Incorrect Wiring
Problem: Incorrectly wired components can lead to non-functional sections or unexpected behavior.
Solution:
- Follow the Wiring Diagram: Always refer to the manufacturer's wiring diagram for your specific LED strips. Incorrect connections can result in malfunctioning segments.
- Color Coding Matters: Pay attention to color-coded wires. Match positive (+) and negative (-) terminals correctly.
- Test Continuity: Use a multimeter to check continuity along the entire circuit. Ensure that electricity flows smoothly through each segment.
4. Overheating
Problem: Prolonged use can cause LED strips to overheat, affecting their lifespan.
Solution:
- Proper Ventilation: Mount your neon sign in a well-ventilated area. Avoid enclosing it in a tight frame without ventilation holes.
- Avoid Overdriving LEDs: Stick to the recommended voltage and current for your LED strips. Overdriving them can lead to excessive heat.
- Cooling Fans or Heat Sinks: Consider adding small cooling fans or heat sinks behind the acrylic sheet to dissipate heat.
5. Glue Residue or Imperfections
Problem: After assembling your neon sign, you might notice glue residue, fingerprints, or scratches on the acrylic surface.
Solution:
- Clean Thoroughly: Use a lint-free cloth and mild soap to clean the acrylic sheet before assembly. Remove any fingerprints or dust particles.
- Choose the Right Adhesive: Opt for clear, non-staining adhesives. Avoid using excessive glue to prevent visible residue.
- Polish the Acrylic: After assembly, polish the acrylic surface gently with a microfiber cloth to remove minor imperfections.
Troubleshooting is important in DIY. Be patient, experiment, and learn from challenges. Your persistence will pay off when you see your neon sign light up beautifully!
Finishing Touches and Display Ideas
Congratulations on making your custom neon sign! Now it's time to add those finishing touches and explore creative ways to display your glowing masterpiece. Here are some helpful ideas:
1. Wall Mounting
- Choose the Perfect Spot: Select a prominent location on your wall. Consider areas where the neon sign will catch attention, such as above a bed, near a home bar, or in your workspace.
- Secure Installation: Use wall anchors or sturdy hooks to hang your sign. Ensure it's level and centered for a professional look.
- Frame It: Frame your neon sign with a simple wooden or metal frame. This adds elegance and protects the edges.
2. Floating Shelves or Ledges
- Make Layers: Install floating shelves or ledges below your neon sign. Place decorative items, plants, or small collectibles on these shelves to complement the sign.
- Backlighting: Add LED strip lights behind the shelves to make a soft glow around your neon sign.
3. DIY Lightbox
- Build Your Own Lightbox: Construct a shallow wooden box with an acrylic front. Place your neon sign inside, and let the light spill through the transparent surface.
- Customize the Background: Paint the interior of the lightbox with a color that complements your neon sign. Experiment with gradients or patterns.
4. Neon Words in Art
- Word Art: Combine multiple neon signs to form a phrase or quote. Arrange them vertically or horizontally for a striking visual impact.
- Layered Neon: Overlap different words or symbols to make depth. For example, “Love” overlapping “Dream.”
5. Party Decor
- Backdrop for Celebrations: Use your neon sign as a backdrop for parties, birthdays, or special occasions. It adds a festive touch to photos.
- Color Coordination: Match the neon color to your party theme. Think pink for a birthday bash or blue for a beach party.
6. Minimalist Frames
- Clear Acrylic Frames: Frame your neon sign with clear acrylic panels. This minimalist approach keeps the focus on the glowing letters.
- Thin Metal Frames: Opt for slim metal frames that blend seamlessly with the sign. Black or gold frames work well.
7. Outdoor Installations
- Patio or Balcony: If weather-resistant, hang your neon sign outdoors. Illuminate your patio or balcony during evenings.
- Garden Trellis: Attach your neon sign to a garden trellis or pergola. Imagine it glowing softly amidst climbing plants.
Your DIY neon sign reflects your creativity, so feel free to personalize it according to your style and space. Whether it's a cozy bedroom or a lively party, your neon creation will shine bright!
FAQs About DIY Neon Sign
Discover all your answers to DIY neon sign questions. Find helpful tips for making your own neon sign at home in this comprehensive FAQ guide.
1. Can I Make a Neon Sign Without Soldering?
Absolutely! If soldering intimidates you, try these no-soldering techniques:
- Connectors: Use connectors to join LED segments.
- Adhesive Tapes: Secure wires with strong adhesive tapes.
- Clip-On Connectors: Clip-on connectors are hassle-free alternatives.
2. What Should I Do If My Neon Sign Flickers?
Flickering lights can be fixed:
- Stable Power: Use a regulated power supply to prevent fluctuations.
- Check Connections: Tighten loose wires and connectors.
- Replace Faulty LEDs: Swap out any flickering LED segments.
4. How Do I Avoid Overheating in My Neon Sign?
Keep your neon sign cool:
- Ventilation: Mount it in a well-ventilated area.
- Recommended Voltage: Stick to the LED strip's voltage specs.
- Cooling Solutions: Add small fans or heat sinks if needed.
3. What's the Best Way to Display My Neon Sign?
Get creative with display ideas:
- Wall Mounting: Choose a prominent spot on your wall.
- Floating Shelves: Make layers with shelves below the sign.
- DIY Lightbox: Build a shallow wooden box with backlighting.
4. Is Neon Sign-Making Safe?
Safety first! Follow these precautions:
- Electrical Safety: Handle components carefully.
- Avoid Overdriving LEDs: Stick to the recommended voltage.
- Clean Acrylic: Remove fingerprints and glue residue for a polished finish.
Remember, DIY neon signs are all about personal expression. Experiment, have fun, and let your creativity shine!
Conclusion
Making this custom neon LED sign was a journey filled with learning, challenges, and ultimately, immense satisfaction. For those looking to embark on a similar project, remember to enjoy the process, embrace the learning curve, and cherish the look of delight on your loved one's face when you present them with a piece of illuminated art. Whether for an anniversary, a special occasion, or just because, a custom neon LED sign offers a bright reminder of creativity's power to express our deepest sentiments.


