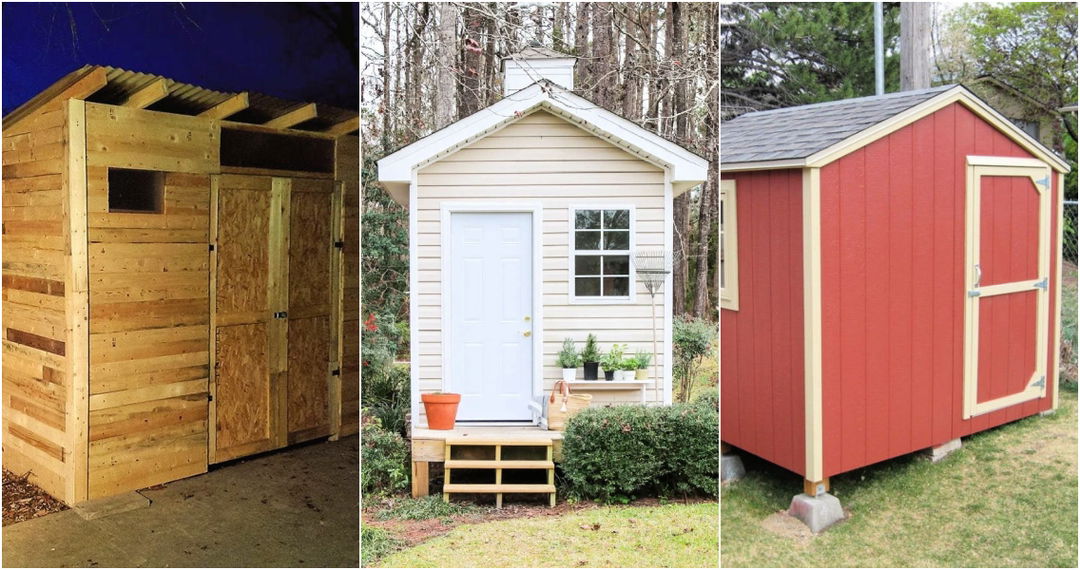
Preparing a DIY concrete slab for your shed comes with a distinct sense of achievement. This guide walks you through how to effectively pour a concrete slab, covering everything from selecting the right concrete mix to detailed steps ensuring a sturdy and durable finish. It's crafted to help DIYers navigate through the process with ease, underlining the importance of every step involved in laying a foundation that lasts.
Understanding the nuances of choosing the right concrete mix and mastering the art of pouring are pivotal. Each section, from site preparation to the final step of curing, is designed to equip you with the knowledge needed to tackle common challenges confidently and make informed decisions regarding materials and costs.
Keep reading to dive deeper into each step packed with actionable advice, and ensure your shed has a strong and level foundation.
Choosing the Right Concrete Mix
When you're getting ready to pour a concrete shed slab, selecting the right concrete mix is a critical decision that will affect the longevity and durability of your shed. Concrete comes in various mixes, each designed for different applications. Understanding the options will help you make an informed choice for your project.
Understanding Concrete Mixes
Regular Concrete Mix: This is the most common type of concrete used for a variety of projects, including sidewalks, patios, and shed slabs. It typically has a strength rating of around 2,500 to 3,000 psi (pounds per square inch) and is suitable for projects that don't require exceptional strength or resistance.
High-Strength Concrete Mix: For projects demanding higher durability and strength, high-strength concrete mixes are available, with ratings ranging from 4,000 to 5,000 psi and above. These mixes are made with carefully selected materials to ensure superior performance under stress.
Factors to Consider
- Size and Weight of the Shed: Larger sheds or those intended to store heavy equipment need a more durable foundation. In such cases, a high-strength concrete mix might be the best choice.
- Soil Conditions: Analyze the soil where you plan to pour the slab. Soft, loamy, or sandy soils may require a stronger concrete mix to prevent cracking and shifting.
- Expected Weather Conditions: If your area is prone to extreme weather conditions, such as freezing temperatures or heavy rainfall, opt for a mix that's designed to withstand these conditions.
Calculating the Right Amount
Determining the correct amount of concrete involves calculating the volume of your slab. This is typically done by multiplying the length by the width by the thickness of the slab you plan to pour. However, to simplify this process and ensure accuracy, using an online concrete mix calculator can be incredibly helpful. While specific brand calculators are available on manufacturers' websites, general resources like the Quikrete calculator (https://www.quikrete.com/calculator/main.asp) offer a straightforward way to estimate the amount of mix you need based on your slab's dimensions.
Choose the correct concrete mix for your shed slab based on project needs like shed size, soil, and weather. Use online calculators to figure out concrete quantity. This ensures a stable, long-lasting shed foundation.
How to Pour a Concrete Slab - Step by Step
Learn how to pour a concrete shed slab step by step with our detailed guide below:
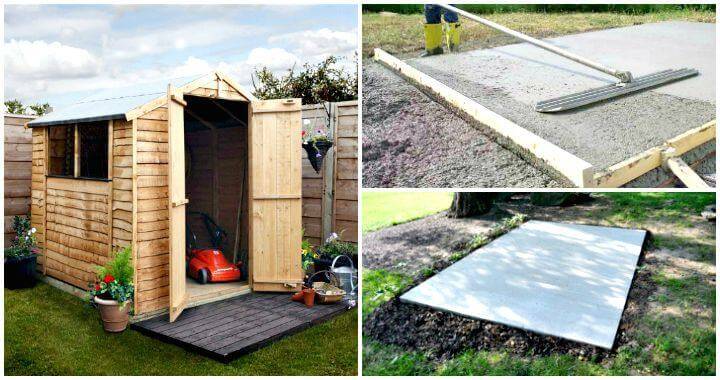
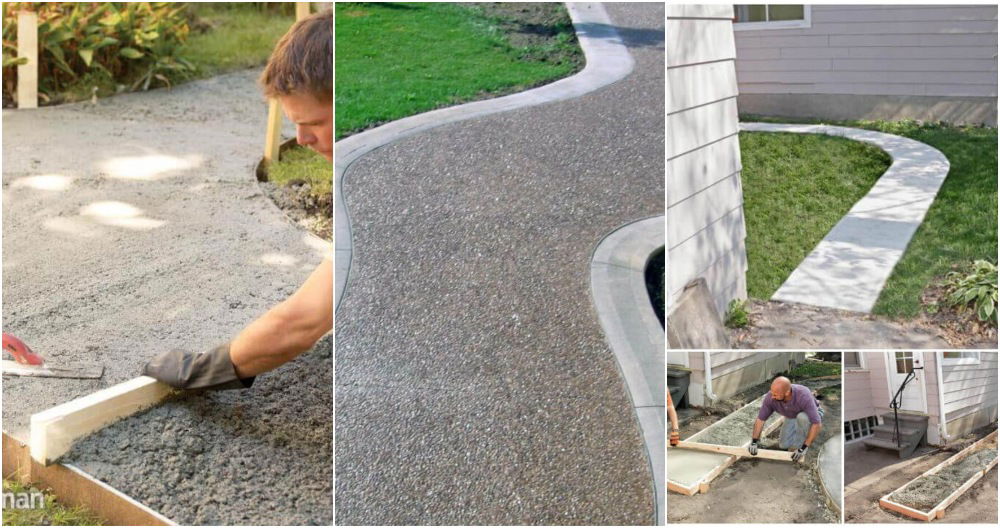
Step 1: Preparing the Site
Start by clearing the area where you plan to lay your slab. Remove any grass, rocks, and debris. Level the ground as best as you can. It's crucial for your shed’s stability that the slab is laid on flat, compacted soil.
Step 2: Making the Formwork
Use 2x4 lumber to make the formwork that outlines the slab. Ensure all corners are square. This can be achieved with a carpenter’s square or the three-four-five triangle method for accuracy. Remember to consider the width of your formwork when measuring the dimensions of your slab.
Step 3: Level and Compact the Ground
Once the formwork is in place, use a level to check that the entire area is even. Any variations in height can be fixed by adding or removing soil. Water the ground slightly and compact it to make a solid base for your concrete.
Step 4: Mix and Pour the Concrete
Choose a concrete mix suitable for beginners, such as a Blue Hawk 4500 PSI from Lowe’s. It’s user-friendly and offers a smooth finish. Mix the concrete according to the instructions on the package, then pour it into the formwork. Spread the concrete evenly with a screed board and use a concrete float to smooth out any air pockets or uneven surfaces.
Step 5: Level the Concrete
As the concrete starts to set, use a level to check its evenness across the entire formwork. It’s simpler to adjust the height by adding more concrete or smoothing excess off while it’s still wet.
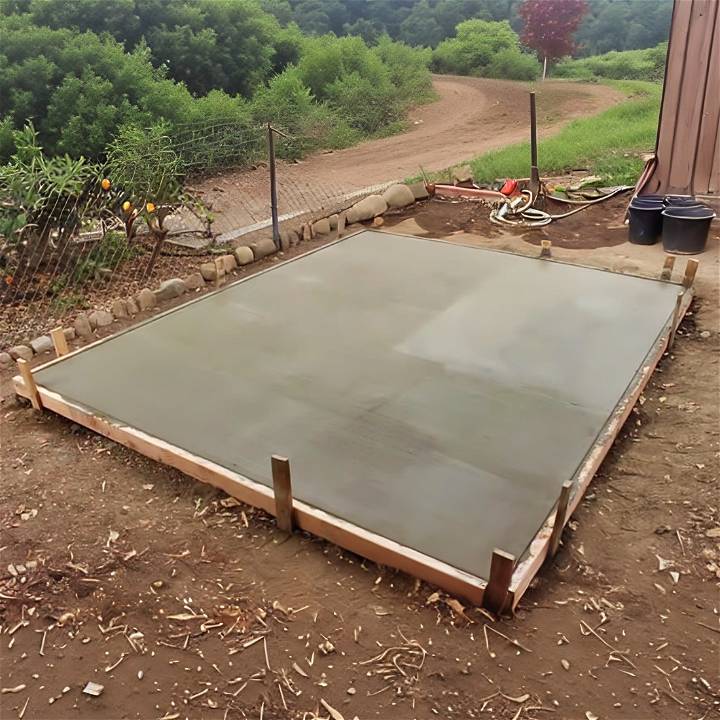
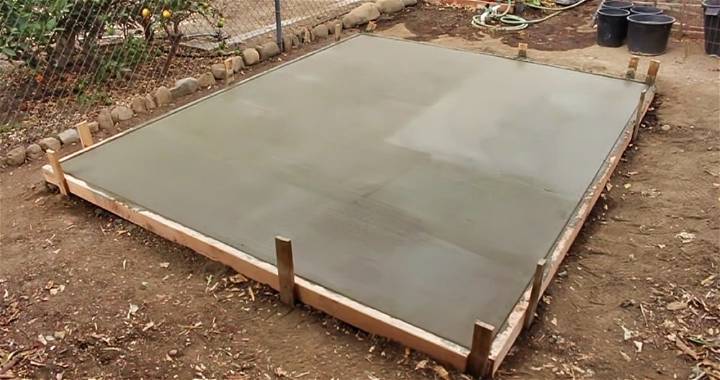
Step 6: Edge and Finish
Once the concrete has begun to harden but is still pliable, use an edging tool to make smooth edges along the perimeter of the slab. For the surface, depending on the desired finish, a float can smooth it out for a sleek look, or a broom can texture it for slip resistance.
Step 7: Curing
Give your concrete slab enough time to cure properly. Avoid walking on it for at least 24-48 hours, and keep it moist by covering with a plastic sheet or watering it lightly several times a day for up to a week. This helps prevent cracks.
Maintaining Your Slab
Keep an eye on your slab, especially during the first few months, for any signs of cracking or shifting. Seal any cracks immediately to prevent water infiltration and potential damage.
Video Tutorial
For a step-by-step video tutorial on pouring a concrete shed slab, watch this helpful YouTube video.
It pairs seamlessly with this written guide, offering visual demonstrations of the techniques detailed here, making it easier to grasp the process from start to finish.
This guide, when followed carefully, will help ensure your shed stands on a sturdy and level concrete slab. Remember, taking your time to measure accurately and prepare meticulously will save you from potential issues down the line.
Common Challenges and How to Overcome Them
Pouring a concrete slab for a shed might seem straightforward, but various challenges can arise. Understanding these challenges and knowing how to tackle them will ensure a successful project.
Uneven Ground
- Challenge: Uneven ground can lead to an unstable shed foundation, making it crucial to address before pouring your concrete.
- Solution: Use a long level and landscaping rakes to assess and even out the terrain. For significant unevenness, consider renting a compacting machine or bringing in extra soil to level the ground. Compact the soil thoroughly to prevent future settling.
Hot Weather
- Challenge: Concrete cures through a hydration process, and hot weather can speed up this process, potentially leading to cracks.
- Solution: If pouring concrete in hot weather, keep the following tips in mind:
- Schedule Early or Late: Aim to pour early in the morning or late in the afternoon to avoid the peak temperatures.
- Use Cold Water: Mix your concrete with cold water to slow down the curing process.
- Keep it Moist: After pouring, cover the slab with wet burlap or a similar material, and periodically sprinkle water over the surface for the first few days.
Unexpected Rain
- Challenge: Rain can be detrimental during the pour, diluting and damaging the uncured concrete.
- Solution: Always check the weather forecast before starting your project. If rain seems likely:
- Cover the Area: If you're expecting light rain, consider setting up a temporary cover over your work area.
- Delay the Pour: In cases of heavy rain, it's best to postpone your project.
- Protect Fresh Concrete: If rain catches you by surprise after pouring, cover the slab with a waterproof tarp. Remove the tarp once the rain stops to allow the surface to finish curing.
By preparing for common challenges, you increase chances of a successful concrete slab for shed.
Cost Considerations for Pouring a Concrete Shed Slab
Pouring a concrete slab for a shed involves various expenses, from materials to equipment. Understanding these costs can help you budget effectively and avoid surprises.
Materials
- Concrete: The cost depends on the thickness of your slab and the price per cubic yard in your area.
- Rebar or Mesh: Necessary for reinforcing the slab, adding to the material cost.
- Form Boards: Used to hold the concrete in shape while it sets.
- Gravel: For the sub-base, improving drainage and stability.
Tools and Equipment
- Concrete Mixer: Essential for mixing concrete, unless you order pre-mixed concrete.
- Trowels and Floats: For smoothing and finishing the concrete surface.
- Compactor: For preparing the sub-base, ensuring a stable foundation.
Rental Equipment
- Concrete Mixer: If you don’t own one, renting is a viable option.
- Compactor: Necessary for compacting the gravel base, available for rent at most equipment rental centers.
Permit Fees
- Depending on your location, you might need a permit to construct a shed slab. Check with local authorities for the exact requirements and fees.
Budgeting Tips
Compare Prices
- Material Suppliers: Shop around and compare prices from different suppliers. Bulk purchasing can also save money.
- Rental Equipment: Compare rental fees from different outlets. Some might offer discounts for longer rental periods.
Rent vs. Buy
- Evaluate the cost of renting equipment versus buying, especially if you plan on using it for future projects. For one-time use, renting is more cost-effective.
Do-It-Yourself
- If you’re handy, consider doing the work yourself to save on labor costs. However, ensure you understand the process thoroughly to avoid costly mistakes.
Alternative Options
- Gravel Pads: A more budget-friendly option compared to concrete. Suitable for smaller sheds and acceptable in some local regulations. It’s worth considering if you’re looking to save money.
By carefully planning and considering alternative options, you can manage the costs associated with pouring a concrete shed slab effectively. Always prioritize quality and durability to ensure your shed stands on a solid foundation for years to come.
Safety Precautions and Best Practices
Ensuring safety is paramount in any construction project, and pouring a concrete shed slab is no exception. Protecting yourself and others from potential hazards requires attention and care throughout the project. Let’s break down the key safety measures and best practices to keep in mind.
Personal Protective Equipment (PPE)
Wearing the right PPE is your first line of defense against potential injuries. Make sure to equip:
- Safety goggles to protect your eyes from harmful dust and debris.
- Dust masks or respirators for working in environments with concrete dust.
- Heavy-duty gloves to safeguard your hands from cuts, abrasions, and the caustic nature of wet concrete.
- Steel-toe boots to protect your feet from heavy objects and sharp tools.
- Long-sleeved shirts and pants to cover your skin, reducing the risk of irritation from concrete.
Safe Handling of Materials and Tools
Concrete, tools, and other materials used in the project can pose risks if not handled properly. Here are some tips to ensure safety:
- Lift properly: Use your legs, not your back, and keep the load close to your body to avoid strain injuries.
- Stay alert: Always be aware of your surroundings, especially when operating machinery or moving heavy materials.
- Tool maintenance: Keep tools in good working condition and use them as intended to prevent accidents.
Best Practices for a Safe Project
Following these best practices will help ensure a smooth and safe project:
- Plan ahead: Before starting, plan your work and clear the area of any obstacles or hazards.
- Stay hydrated: Working with concrete often means exposure to the sun and physical exertion, so drink plenty of water.
- First aid kit: Always have a first aid kit nearby for immediate response to minor injuries.
- Take breaks: Regular breaks will help prevent fatigue, keeping you alert and focused.
Prioritize safety for a successful project. Keep yourself and others safe with precautions and best practices. Ensure your concrete shed slab project is both successful and safe.
Long-Term Maintenance and Upkeep
Ensuring the longevity and durability of your concrete shed slab requires regular maintenance and immediate action to address any issues. Here's a straightforward guide to help you keep your concrete slab in top shape for years.
Preventing and Addressing Cracks
Prevention is Key: The first step in maintaining your concrete slab is to prevent cracks from occurring. Ensure proper drainage around the slab to avoid water accumulation, which can lead to cracking and erosion. Applying a concrete sealer can also help protect the surface from water damage and wear.
Early Detection and Repair: Inspect your slab regularly for signs of cracks. Small cracks can often be filled with a concrete repair caulk or a concrete patching compound. This simple step can prevent water from seeping in and worsening the crack.
Cleaning Your Concrete Slab
Routine Cleaning: Keeping your concrete slab clean is essential for its maintenance. Sweep it regularly to remove dirt and debris. For general cleaning, a hose and a push broom are effective. For tougher stains, a mild detergent and a scrub brush can be used.
Choosing Cleaning Products: When dealing with more stubborn stains like oil or grease, use a concrete cleaner specifically designed for these types of stains. Avoid using harsh chemicals that can damage the concrete or affect its finish.
Recognizing and Solving Potential Problems
Signs to Watch For: Be on the lookout for uneven settling or sinking of the slab, as this can indicate issues beneath the surface, such as improper compaction of the subgrade. Large, widening cracks or pitting on the surface are also signs that your slab may need attention.
Solutions: For uneven slabs, professionals can often perform mudjacking or slabjacking to level the concrete without replacing it. If the damage is too extensive, consulting with a professional about replacement or resurfacing may be necessary.
Regular Inspections: An annual inspection can help catch potential problems early. Pay attention to the edges of the slab and any areas where water pools after a rain.
By following maintenance tips, you can keep your concrete shed slab strong and appealing for years. Addressing small issues promptly saves time and money, preserving your shed's value and functionality.
FAQS on Pouring Concrete Slab for Shed
Here, we address some commonly asked questions about pouring a concrete slab for your shed, ensuring you have the knowledge and confidence to embark on this project.
What is the best thickness for a concrete shed slab?
The ideal thickness for a concrete shed slab generally ranges from 4 inches for light to medium usage (such as storage of garden tools) to 6 inches if you plan to store heavier items or vehicles. Consider the shed's purpose and the weight it needs to support when deciding on the thickness.
How do I calculate how much concrete I need for my shed slab?
To calculate the amount of concrete required, multiply the length by the width by the thickness of the slab (all in feet) to get the volume in cubic feet. Then, convert this volume to cubic yards by dividing by 27 (since there are 27 cubic feet in a cubic yard), as concrete is typically sold by the cubic yard.
Can I pour concrete directly on dirt?
Yes, you can pour concrete directly on dirt, but it's essential to prepare the area properly. The ground should be leveled and compacted to provide a stable base for the concrete. Laying a sub-base of gravel can also improve drainage and help prevent the concrete from cracking.
Do I need rebar for a shed slab?
Rebar or mesh reinforcement is recommended for a shed slab, especially if you expect to place heavy items inside the shed. This reinforcement helps to prevent cracking and provides additional strength to the concrete slab.
How long does it take for a concrete slab to cure?
Concrete typically takes about 28 days to reach its full strength, but it's safe to start building on it after 7 days. For the first week, it's crucial to keep the concrete moist to aid in the curing process and prevent cracking.
What should I do if my concrete slab cracks?
Minor cracks can often be filled with a concrete repair caulk or a concrete patching compound. If you're dealing with larger cracks or structural issues, it might be necessary to consult a professional to assess the best course of action.
Is it better to pour concrete in the morning or afternoon?
It's best to pour concrete when temperatures are cooler, typically in the early morning or late afternoon. Pouring during cooler times of the day helps slow down the curing process, reducing the risk of cracking.
Can I pour a concrete slab by myself?
Pouring a small to medium-sized concrete slab can be a manageable DIY project, especially with proper preparation and a step-by-step guide. However, for larger projects, you might want to consider hiring professionals to ensure the job is done correctly.
By addressing these common questions, you should feel more prepared to tackle your concrete slab project, ensuring a sturdy and reliable foundation for your shed.
In wrapping up our journey through the detailed process of how to pour a concrete slab for a shed, it's clear that a successful project pivots on meticulous planning, understanding the right materials, and following each step with precision. From choosing the right concrete mix to navigating the nuances of leveling and curing, we've covered the essential aspects to empower you to tackle this DIY concrete slab project with confidence.
Whether you're addressing a rugged landscape or determined to ensure the longevity of your slab, this guide aims to serve as your go-to resource. Remember, a well-poured concrete slab not only lays the foundation for your shed but also elevates the overall functionality and value of your outdoor space.
Related DIY Ideas to Try: