Making a homemade DIY busy board is both fun and practical. It provides endless entertainment for children while supporting their developmental skills. Busy boards typically feature items like latches, zippers, and buttons. They keep young minds stimulated and engaged for hours. Making your own busy board allows you to customize it according to your child's interests and safety needs.
This guide covers everything you need to know to build a DIY busy board at home. From choosing materials to assembling the board, the process is straightforward and rewarding. Perfect for parents and caregivers, it ensures a personalized and fun learning tool for your little ones.
Keep reading to find detailed instructions and helpful tips to get started on crafting your homemade DIY busy board.
Why a Baby Busy Board?
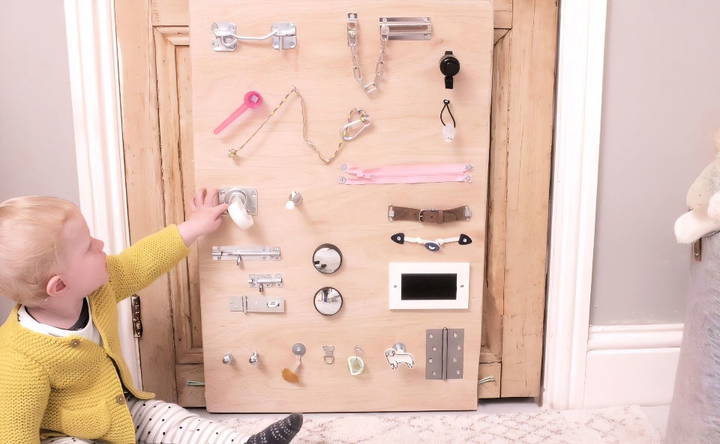
A busy board is a fantastic way for babies and toddlers to explore different objects, textures, and mechanisms safely. It's designed to stimulate their senses, develop their fine motor skills, and, most importantly, keep them occupied. I got the inspiration from a video by Hester from Handmade Home, and I decided to craft one tailored to my little one's interests.
Materials Needed
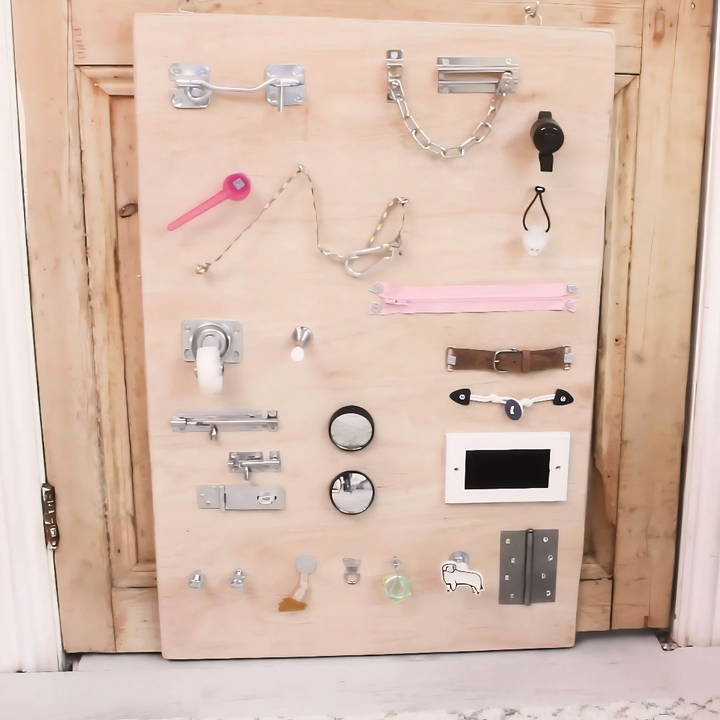
- Plywood: I chose a 70x40 cm piece, but any size that fits your space will do. It's essential because it serves as the foundation of the busy board.
- Sandpaper: To ensure that all corners and edges are smooth and safe for little hands.
- Paint (Optional): I painted mine to give it a nice, clean finish, but it's up to personal preference.
- Various Hardware and Toys: This includes hinges, locks, latches, zippers, door stoppers, bicycle bells, and anything that can be interesting for a baby to touch and explore. Each item adds a unique texture or function for the baby to discover.
- Screws, Nuts, and Washers: Necessary for securing items to the board. Adding washers helps prevent fabric items like zippers from tearing upon use.
- Adhesive: For sticking lighter or smaller objects that can't be screwed in, such as mirrors.
Step by Step Instructions
Learn how to build a DIY busy board with our step-by-step guide. Follow these easy instructions for a fun and safe project for kids.
Step 1: Prepare the Board
First, I sanded down the plywood to make sure there were no sharp edges or splinters. Safety first! After sanding, you can paint the board any color you prefer.
Step 2: Plan Your Layout
Here comes the fun part. Lay out all your items on the board before securing them. This step allows you to visualize the board and rearrange items to your liking. Remember, there's no right or wrong way to do this. It's all about making a stimulating experience for your child.
Step 3: Attach the Items
Once you're happy with the layout, it's time to secure everything in place. Most items can be screwed directly onto the board. For fabric items like zippers, I found using little washers along with the screws prevented tearing. For self-adhesive items like mirrors, make sure they're securely stuck to avoid any choking hazards.
Step 4: Fine Tuning
After attaching all the items, I went back to make sure everything was tight and secure. I added additional washers where needed to ensure that items like the spinning wheel had enough space to move freely.
Step 5: Safety Check
Before introducing the board to my little explorer, I did a thorough safety check, ensuring all screws were tight and no small parts could come loose.
Personalization Tips
Building a DIY busy board that resonates with a child's unique interests can significantly enhance their engagement and learning experience. Here are some personalization tips to make your busy board special:
Know the Child
- Favorites: Discover the child's favorite colors, animals, or characters. Incorporate these into the board to capture their interest.
- Hobbies: If the child loves nature, consider adding elements like leaves or flowers. For vehicle enthusiasts, use wheels or car parts.
Involve the Child
- Choice: Let the child choose some items to include. This gives them a sense of ownership and pride in the busy board.
- DIY Together: If possible, build the board together. It's a great bonding activity and allows for immediate feedback on what they enjoy.
Themed Boards
- Interests: Build a board based on a theme, like space, ocean, or dinosaurs. Use images and items related to the theme to spark curiosity.
- Seasonal: Make interchangeable parts to reflect seasons or holidays, like snowflakes for winter or leaves for autumn.
Learning Goals
- Educational: Add elements that align with what the child is learning, such as shapes, numbers, or letters.
- Skills: Focus on areas the child is developing, like fine motor skills or color recognition, and tailor the board to these skills.
Sensory Play
- Textures: Use a variety of materials to build a sensory-rich experience. Soft, rough, sticky, or smooth surfaces can be very stimulating.
- Sounds: Incorporate items that produce different sounds, like bells for a clear ring or containers with beads for a shaker effect.
Adaptability
- Growth: Design the board so that it can evolve with the child. Make parts removable or adjustable to increase the board's difficulty level as the child grows.
- Accessibility: Ensure that the board is accessible to the child. Adjust the height and reach of items according to the child's size.
Personalize a busy board to be fun, educational, and meaningful. It can become a cherished item that grows with the child. Ensure the design is safe, engaging, and adaptable to their changing interests and abilities.
Age-Appropriate Designs
When making a DIY busy board, it's essential to tailor it to the child's age and developmental stage. Here's how you can design an age-appropriate busy board:
For Infants (0-1 Year)
- Textures and Colors: Use soft fabrics and bright colors. Infants are drawn to sensory play, so include items with different textures.
- Simple Interactions: Add elements like large, soft buttons or wheels that move easily. These should be big enough to avoid choking hazards.
For Toddlers (1-3 Years)
- Motor Skills: Incorporate items that promote fine motor skills, like zippers, latches, or simple locks.
- Cause and Effect: Use parts that make noise or have visual effects when interacted with, like bells or lights, to teach cause and effect.
For Preschoolers (3-5 Years)
- Problem Solving: Introduce more complex mechanisms like combination locks or gear systems to encourage problem-solving.
- Imaginative Play: Include elements that allow for creative play, such as a pretend phone or a small mailbox.
General Tips
- Safety: Ensure all parts are securely fastened, and edges are smooth to prevent injuries.
- Supervision: Always supervise children while they play with the busy board to ensure they are safe and using it as intended.
Build a busy board that's fun, supports learning, and is safe by considering the child's age and abilities. Keep the design simple and engaging.
Educational Value
A DIY busy board is not just a source of entertainment; it's a powerful educational tool. Here's how to maximize the educational value of your busy board:
Sensory Development
- Touch: Incorporate materials like felt, sandpaper, and silk to stimulate the sense of touch.
- Sight: Use bright colors and patterns to catch the eye and improve visual tracking.
- Sound: Add items that make noise, such as bells or rattles, to develop auditory skills.
Cognitive Skills
- Memory: Place objects that can be hidden and found again to enhance memory recall.
- Reasoning: Use puzzles or matching games to encourage logical thinking and problem-solving.
Language Skills
- Communication: Attach pictures and words to promote language development and vocabulary building.
- Storytelling: Include sequence cards or simple story elements to inspire narrative skills.
Fine Motor Skills
- Dexterity: Add small knobs, buttons, and switches to practice precise finger movements.
- Coordination: Use lacing cards and beads to improve hand-eye coordination.
Emotional Intelligence
- Empathy: Feature faces with different emotions to help children recognize and name feelings.
- Self-Regulation: Build activities that require patience, like slow-moving dials or timers.
Social Skills
- Sharing: Design the board to be large enough for multiple children to play together.
- Turn-Taking: Introduce elements that can be used in a sequence, encouraging waiting for one's turn.
Focus on these areas to make your busy board a comprehensive learning tool that nurtures many skills. Keep activities varied, safe, and age-appropriate. This builds a fun, educational environment for children to enjoy and grow.
Cultural Inclusivity
Incorporating cultural inclusivity into a DIY busy board is a wonderful way to celebrate diversity and teach children about different cultures. Here's how you can build a culturally inclusive busy board:
Reflecting a World of Cultures
- Colors and Patterns: Use colors and patterns that are significant in various cultures. For example, vibrant African kente cloth or intricate Indian mandala designs.
- Symbols: Include recognizable symbols from around the world, like the peace sign or a heart, which convey universal messages.
Celebrating Festivals and Holidays
- Calendar: Build a section where children can learn about and celebrate global festivals and holidays, such as Lunar New Year, Diwali, or Eid.
- Storytelling: Use pictures and short stories to explain the significance of these celebrations.
Language and Writing
- Alphabets: Introduce children to different writing systems, such as Arabic script, Chinese characters, or Cyrillic alphabet, with simple words or their name.
- Greetings: Teach common greetings in various languages, like “hello,” “hola,” or “salaam,” through interactive elements.
Music and Instruments
- Sounds: Add small, safe-to-use instruments or sound makers that represent different musical traditions, like a mini djembe drum or a kalimba.
- Dance: Encourage movement with images of traditional dances and simple steps that children can follow.
Food and Cuisine
- Textures: Use fabric or textured materials to mimic foods from different cultures, such as felt sushi rolls or a pizza with removable toppings.
- Cooking: Include simple recipes or cooking actions, like rolling dough, to engage children in culinary arts.
Dress and Attire
- Dolls: Have dolls dressed in traditional attire from various countries that children can dress and undress.
- Fabrics: Offer swatches of fabric representing different traditional garments for tactile exploration.
Adding these elements makes your busy board fun and a way to learn about world cultures, presented respectfully and age-appropriately. This fosters inclusivity and global awareness early on.
FAQs About DIY Busy Board
Find answers to common questions about DIY busy board. Discover tips, materials, and safety guidelines for making an engaging, busy board at home.
A busy board is a personalized activity panel for young children, typically made with everyday items like zippers, latches, knobs, and wheels. It’s designed to engage their senses and develop motor skills through exploration and play.
To build a busy board, you'll need a sturdy board like MDF or plywood, various items such as locks, handles, and textured fabrics, and tools to secure them. Arrange the items on the board, drill holes if necessary, and attach them securely, ensuring no sharp edges or small parts are exposed.
Items that stimulate tactile, visual, and auditory senses are great for a busy board. Think of things like light switches, door stoppers, fabric swatches, and mirrors. Ensure all items are safe for children to handle and explore.
You can find materials for a busy board around your home or at local hardware stores. Look for spare parts like bolts, washers, and old keys. You can also repurpose items from old toys or furniture.
Safety is paramount. Wash all items before use, sand down any sharp edges, and secure small parts firmly. Avoid long cords, and always supervise your child during play. Regularly check the board for loose parts to prevent choking hazards.
Final Thoughts
Wrapping up, making a homemade DIY busy board can be a fun and educational project for your little one. It enhances their sensory and fine motor skills, while also providing hours of entertainment. By following the steps and tips mentioned, you'll ensure your board is safe and engaging. So, gather your materials and start crafting your very own busy board today!


