Water damage is a common issue that many homeowners face, especially when proper preventive measures aren't in place. One of the critical structural elements that can suffer from this is the header – a beam that supports the weight of the wall and the roof above. If you've discovered a rotten header in your home, don't panic. With a few tools, some know-how, and a bit of effort, you can repair it yourself and prevent further damage. In this guide, I’ll walk you through the steps to identify, repair, and safeguard your home from water damage affecting the header.
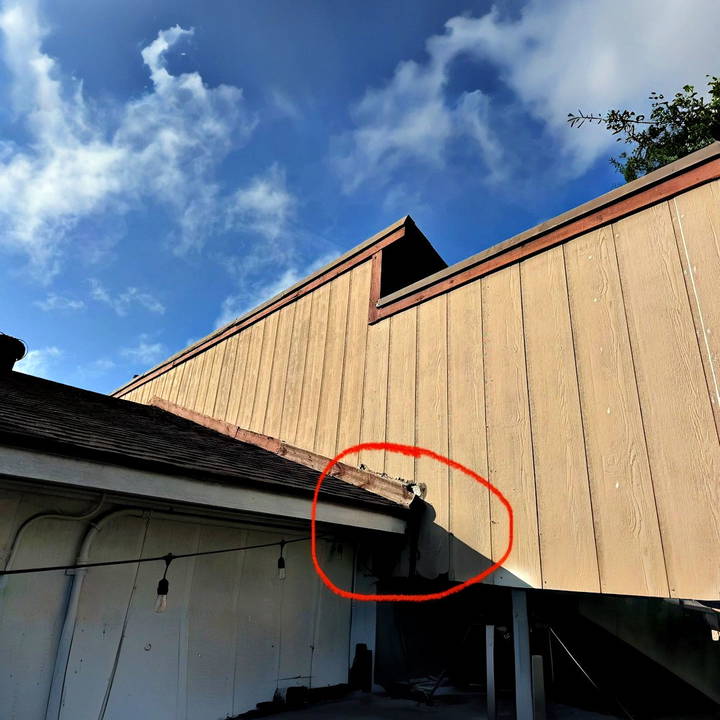
Why Rotten Headers Are a Problem
Headers are essential to the structural integrity of your home. When they become compromised due to rot, typically caused by prolonged exposure to water, the strength of your walls and roof can be at risk. If left untreated, a rotten header can lead to sagging ceilings, walls, and even potential collapse. Moreover, water damage can spread to adjacent wooden structures, leading to more extensive (and expensive) repairs.
So, if you’ve noticed a section of your header is rotting, it’s crucial to address it promptly.
Step-by-Step Guide to Repairing a Rotten Header
Repairing a rotten header involves identifying the extent of the damage, removing the affected wood, and reinforcing or replacing it with new material. Here’s how you can do it:
Step 1: Assess the Damage
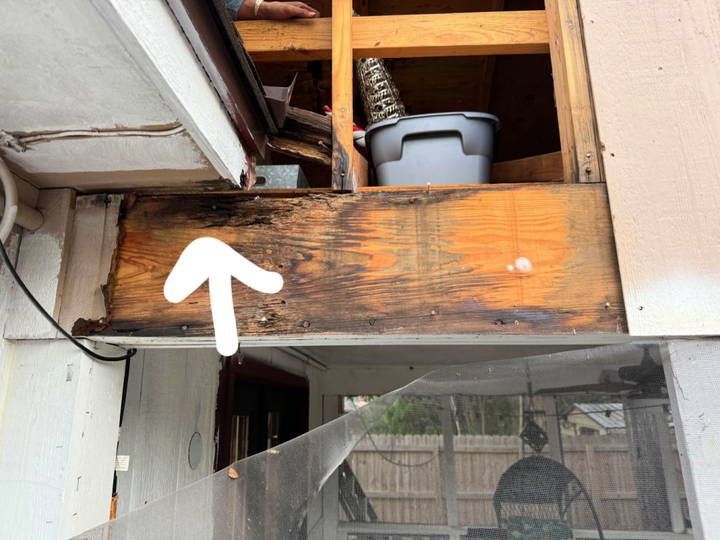
Start by thoroughly inspecting the header to determine the extent of the rot. You might see signs like darkened wood, soft spots, or crumbling areas. It’s essential to determine if only a portion of the header is affected or if the rot has spread throughout.
- Tools Needed: Flashlight, screwdriver, hammer.
- Tip: Use a screwdriver to poke the wood gently. If it sinks in easily, the wood is rotten.
Understanding the extent of the damage will help you decide whether to repair or replace the header. For minor rot, you can cut out the affected area and reinforce it. However, if more than 50% of the header is compromised, replacement is the safer option.
Step 2: Remove the Damaged Section
If you’re dealing with a partially rotten header, the next step is to remove the damaged wood. Carefully cut out the affected portion using a reciprocating saw or a circular saw. Make sure to cut back to sound wood that is not affected by the rot.
- Tools Needed: Reciprocating saw, circular saw, safety goggles, gloves.
- Tip: Wear safety goggles and gloves to protect yourself from flying debris and sharp tools.
When cutting the damaged section, ensure the cut is clean and straight. This will make it easier to fit the new piece of wood and reinforce the structure properly.
Step 3: Treat the Remaining Wood
Before installing new wood, treat the remaining exposed header with a wood preservative to prevent future rot. This is crucial to ensure the problem doesn’t recur.
- Materials Needed: Wood preservative, paintbrush.
- Tip: Apply the preservative generously, covering all exposed wood surfaces to protect against moisture and insects.
Allow the preservative to dry completely according to the manufacturer’s instructions before moving on to the next step.
Step 4: Install a New Header or Reinforcement
Depending on the extent of the damage, you may need to either replace the entire header or reinforce it with new wood. If you’re reinforcing, cut a piece of treated lumber that fits snugly into the space where the rotten section was removed. If replacing the header, you'll need to support the structure temporarily while you remove the old header and install a new one.
- Tools Needed: Measuring tape, saw, hammer, nails or screws, carpenter’s level.
- Tip: Use treated lumber for the replacement or reinforcement to resist future water damage.
Fit the new piece into place and secure it with screws or nails. Ensure it is level and well-supported on both ends. Double-check the alignment and fit, as a poorly installed header can lead to structural issues down the line.
Step 5: Flashing and Siding Considerations
A critical aspect of preventing future water damage is proper flashing and siding installation. The root cause of the rotten header is often poor water management, such as improper flashing or lack of gutters. Flashing helps direct water away from the vulnerable joints and seams of your home’s exterior.
- Materials Needed: Step flashing, Z flashing, roofing nails, caulk.
- Tip: When installing flashing, ensure there’s a gap of at least 2 inches from the bottom of the siding to prevent water from seeping in.
Properly install the flashing around the area, particularly where the roof meets the wall. If your home doesn’t have gutters, consider installing them to divert rainwater away from the siding and foundation.
Step 6: Reinstall the Siding and Finish
Once the new header or reinforcement is securely in place and the flashing is correctly installed, it’s time to reinstall the siding. Be sure to leave adequate space between the siding and the roof to prevent water retention and subsequent rot.
- Tools Needed: Hammer, nails, siding materials.
- Tip: Follow the manufacturer’s guidelines for the siding installation to ensure a water-tight seal.
Ensure all seams are well-sealed with caulk to prevent water intrusion. After finishing, check the area thoroughly to ensure no gaps or potential entry points for water.
Tips for Preventing Future Water Damage
- Regular Inspections: Inspect your home's exterior regularly, especially after heavy rains, to spot any signs of water damage early.
- Maintain Gutters and Downspouts: Keep gutters clear of debris and ensure downspouts are directing water away from the house foundation.
- Proper Flashing Installation: Ensure flashing is installed correctly around all doors, windows, and other potential water entry points.
- Seal Gaps and Cracks: Regularly check and seal any gaps, cracks, or holes in the siding or around windows and doors.
- Use Treated Lumber: When replacing any exterior wood, use treated lumber to resist moisture and rot.
Conclusion
Repairing a rotten header isn’t just about fixing the immediate problem; it’s about preventing future damage and ensuring the longevity and safety of your home. By following these steps and using proper materials, you can repair a rotten header effectively and take steps to keep water damage at bay. Remember, proactive maintenance is key to avoiding such issues in the future. Stay vigilant, inspect your home regularly, and take action at the first sign of trouble.
FAQs on Repairing a Rotten Header
Repairing a rotten header can raise several questions, especially for those new to DIY home repairs. This FAQ section addresses some common concerns and provides additional details to help ensure a successful repair process.
Step flashing is a type of flashing used at the joint between a roof and a vertical wall to prevent water from seeping into the structure. It is installed in a "stepped" fashion along the roof line, overlapping with each shingle. Step flashing is crucial because it directs water away from the roof and walls, protecting against leaks and rot in headers and other structural elements.
Tip: When installing step flashing, ensure each piece overlaps the previous one by at least 2 inches for proper water shedding.
Yes, Z flashing is recommended, especially where the siding meets trim or other horizontal surfaces. Z flashing creates a barrier that prevents water from getting behind the siding. When installed properly, Z flashing should sit under the siding and extend over the trim or any exposed wood to provide a continuous path for water to flow away from the building.
Tip: For optimal water protection, install Z flashing behind the siding and over the trim, leaving a 2-inch gap under the bottom edge to avoid water buildup and ice damming.
A structural survey might be necessary if there is extensive rot or if the integrity of the surrounding structures is in question. Signs you might need a survey include sagging or uneven roof lines, large areas of rotted wood, or if the damage is widespread and affects load-bearing elements. Consulting a professional can help ensure safety and prevent future issues.
Tip: If more than 50% of the header or adjacent structural elements are compromised, a structural survey is highly recommended.
Whether you repair or replace a rotten header depends on the extent of the damage. If the rot is localized and affects less than 50% of the header, you can often cut out the damaged section and reinforce it with new treated wood. For more extensive damage, replacing the entire header is the safer and more effective option.
Tip: Always use treated lumber for repairs or replacements to prevent future rot and insect damage.
Some common mistakes in repairing a rotten header include improper flashing installation, using untreated wood, not allowing enough gap between siding and roofing, and failing to address the root cause of the water damage (such as missing gutters).
Tip: Ensure proper flashing techniques, use treated wood, maintain a 2-inch gap between siding and roofing, and install gutters if they are missing.
In most cases, you will need to remove some siding around the rotten header to assess the extent of the damage fully and to install flashing correctly. However, you do not necessarily need to remove all of it. The amount of siding to remove depends on the spread of the damage and the need to install or repair flashing.
Tip: Carefully remove only what is necessary to access the damaged area and install flashing, but be prepared to remove more if rot or water damage is more extensive than initially thought.
Preventing future water damage involves ensuring proper water drainage around your home. This includes installing gutters, maintaining them to ensure they are clear of debris, using step and Z flashing correctly, sealing gaps and cracks, and inspecting the home's exterior regularly for signs of water damage.
Tip: Regularly inspect and maintain gutters, downspouts, and flashing. Ensure they are directing water away from the home to avoid pooling and potential leaks.
This depends on your comfort level and experience with DIY repairs. If you are familiar with carpentry, have the right tools, and the damage is not too extensive, you can repair a rotten header yourself. However, if the damage is severe or you're unsure about any step, consulting a professional can save time and prevent costly mistakes.
Tip: When in doubt, get a professional opinion. It’s better to spend a little extra for peace of mind than to risk a repair that might not hold up.
The basic tools and materials needed include a reciprocating saw or circular saw, hammer, nails or screws, safety goggles, gloves, treated lumber, wood preservative, step flashing, Z flashing, caulk, and paintbrush. Ensure you have all these ready before starting the repair.
Tip: Safety first! Always wear safety goggles and gloves when handling tools and materials.


