Starting your own DIY standing desk converter project can be a great way to improve your workspace. I found that building my own desk converter was a fun, simple, and cost-effective solution for my health. I needed more movement during my workday, and this project helped me stay active without needing to buy an expensive product.
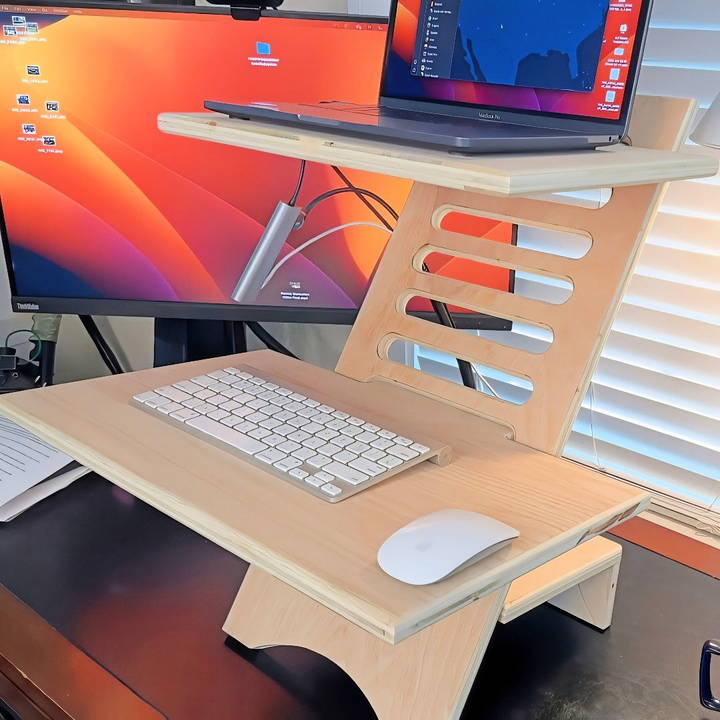
Now that I've gone through it, I can say it's easier than you think. I'm sharing my experience here to make it easy for you, too. If you're ready to transform your workspace, I'm sure these steps will help you get started. I'm here to guide you.
Materials Needed and Why
- 3/4 Inch Plywood: I chose plywood for its sturdiness and because it was readily available in my shop.
- Table Saw or Alternative Cutting Tool: Essential for cutting straight, precise lines.
- Sandpaper (Various Grits): Smoothens the wood, preparing it for staining or painting.
- Jigsaw: For cutting intricate shapes and slots.
- Router (Optional): With a flush trim bit and a quarter-inch round-over bit, it builds smooth edges and perfect slots.
- Sacrificial Piece of Wood: Prevents tear-out when drilling.
- Super Glue and Painter's Tape: For attaching templates without leaving marks or holes.
- Stain or Polyurethane (Optional): To protect the wood and extend the life of the desk converter.
Step by Step Instructions
Learn how to build a DIY standing desk converter with our step-by-step guide. Simple planning, cutting, assembling, and finishing techniques are included!
Step 1: Planning and Measuring
Before venturing into the workshop, I measured the ideal height for my standing desk setup. Using a tape measure, I found that 26 inches was a good start, but I decided to aim a bit higher for versatility. This allowed room for adjustment based on the task at hand or different users' heights.
Step 2: Cutting the Pieces
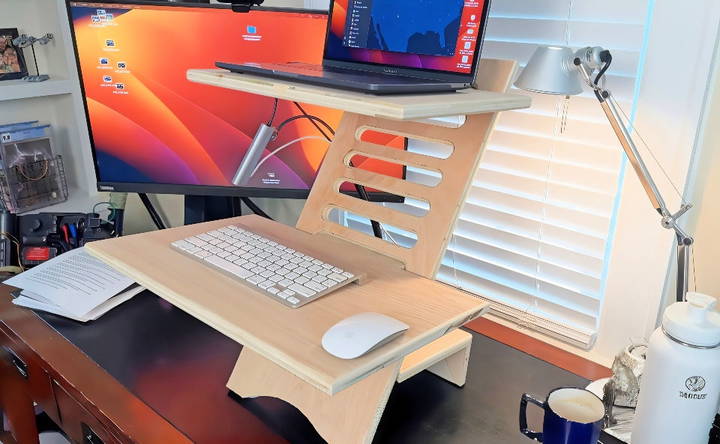
Armed with measurements, I cut my 3/4-inch plywood down to size. The main piece measured 12 inches by 26 inches, aiming for slots that were 1 inch tall by 8 inches wide, spaced 1 inch apart. This was the most nerve-wracking part, but precision here meant everything later fit together snugly.
Step 3: Shaping and Smoothing
Using my jigsaw, I carefully cut out the slots, guided by marks I made earlier. Next, a round-over bit on my router (or sandpaper for those without a router) smoothed out any rough edges. This step was crucial for both aesthetics and safety, eliminating any sharp edges.
Step 4: Assembling the Frame
Now came the true test of my handiwork — putting it all together. The slots I cut into the main piece would hold the shelves, which I also cut from plywood. Getting the angle right for the back leg (that keeps everything standing) required some trial and error and, admittedly, a bit of guesswork.
Step 5: Finishing Touches
Once assembled, I smoothed everything down with sandpaper, starting with 120 grit and moving up to 220 grit for a flawless finish. The option of staining or applying polyurethane came next, though I opted to wait until I was sure no further adjustments were needed.
Lessons Learned
- The Importance of Sharp Tools: Dull blades caused more problems than they were worth. Investing in sharp, new blades made a significant difference.
- Patience is Key: Particularly when figuring out the slot positions and when to stop drilling to prevent tear-outs.
- Flexibility: Although I had a plan, being open to changes (like the back leg adjustments) was vital.
DIY Standing Desk Conversion Techniques
Make your own standing desk converter easily! Save money, customize your space, or enjoy a DIY project with these simple steps to convert your desk to a standing setup:
1. Adjustable Riser Platform
Increase workspace comfort with our Adjustable Riser Platform. Follow simple steps for installation and improve ergonomics in your office setup.
What You'll Need:
- A sturdy platform (such as a wooden board or shelf)
- Adjustable risers or furniture legs
- Screws, a drill, and a screwdriver
Steps:
- Measure and Cut: Measure the dimensions of your desk surface. Cut the platform material to match this size.
- Attach Risers: Attach adjustable risers or furniture legs to the underside of the platform. These will allow you to raise or lower the platform easily.
- Secure the Platform: Place the platform on your desk and secure it in place using screws. Make sure it's stable and level.
- Test and Adjust: Adjust the risers to your desired height. Test the stability and ensure it can hold your monitor, keyboard, and other essentials.
2. Stackable Wooden Crates
Organize effortlessly with Stackable Wooden Crates. Learn what you'll need and follow simple steps for perfect storage solutions.
What You'll Need:
- Wooden crates (available at hardware stores or repurposed old ones)
- Sandpaper, paint, or stain (optional)
- Non-slip pads
Steps:
- Prepare the Crates: Sand any rough edges and clean the crates. You can paint or stain them for a polished look.
- Stack the Crates: Arrange the crates in a stable stack on your desk. Ensure they're level and won't wobble.
- Add Non-Slip Pads: Place non-slip pads or rubber feet under each crate to prevent sliding.
- Organize Your Gear: Use the top crate for your monitor, keyboard, and mouse. Lower crates can hold books, supplies, or other items.
3. Shelf-Style Converter
Easily convert any space with our Shelf-Style Converter. Follow step-by-step instructions and see what you'll need to get started. Transform your storage today!
What You'll Need:
- A sturdy shelf (wood or metal)
- Brackets or L-shaped supports
- Screws and a drill
Steps:
- Choose the Shelf: Select a shelf that fits your desk and provides enough space for your work essentials.
- Mount the Brackets: Attach L-shaped brackets or supports to the underside of the shelf.
- Secure the Shelf: Position the shelf on your desk and secure it using screws. Make sure it's level and stable.
- Personalize: Add organizers or dividers to keep your items organized.
4. Laptop Stand Hack
Discover the ultimate laptop stand hack! Learn what you'll need and follow simple steps to enhance your workspace and boost productivity.
What You'll Need:
- A laptop stand or cooling pad
- A separate keyboard and mouse
Steps:
- Elevate Your Laptop: Use a laptop stand or cooling pad to raise your laptop screen to eye level.
- External Keyboard and Mouse: Place your laptop on the stand and connect an external keyboard and mouse.
- Build a Mini Standing Desk: Clear some space on your desk, stand up, and work comfortably with your laptop at an ergonomic height.
Recognize how to adjust the height of your DIY converter to maintain proper posture and comfort. Experiment with different setups until you find what works best for you.
FAQs About DIY Standing Desk Converter
Discover vital FAQs about DIY standing desk converters. Learn the benefits, materials, and easy steps for a healthier work setup.
A DIY standing desk converter is a home-made solution that allows you to transform your existing desk into a standing desk. This can be done by adding a platform or mechanism to raise your working surface to a standing height.
To build your own standing desk converter, you’ll need materials like wood or metal for the frame and a surface for the desk. You can use adjustable legs or a crank system to change the height. Make sure to measure the correct height for your body to ensure ergonomic comfort.
Using a standing desk converter can help reduce back pain and increase energy levels by promoting more movement throughout the day. It’s also a cost-effective way to try out a standing desk without purchasing a new piece of furniture.
Yes, ergonomics are important. Your standing desk should allow you to keep your wrists straight and your elbows at a 90-degree angle while typing. The top of your monitor should be at eye level to avoid neck strain.
Absolutely! You can build an adjustable standing desk converter by incorporating a manual or motorized mechanism that allows you to change the height of your desk. This way, you can switch between sitting and standing throughout the day.
Conclusion
Wrapping up, building your own DIY standing desk converter is a rewarding and practical project that can improve your workspace and health. With a few materials and tools, you can build a customized solution that fits your needs perfectly. Not only is it cost-effective, but it also allows you to stay active throughout your workday. Take control of your workspace and enjoy the flexibility of standing or sitting whenever you want with your very own diy standing desk converter.


