If you're facing the challenge of a rotted engineered post on your patio cover, you're not alone. Many homeowners encounter this issue, especially with older structures or those exposed to moisture and the elements over time. Replacing a rotted post may seem daunting, but with the right tools and approach, it's a manageable DIY project that can restore the stability and aesthetic appeal of your patio cover.
In this guide, I'll walk you through the process step-by-step, from identifying the right replacement materials to safely removing the old post and installing a new one. Let’s dive in!
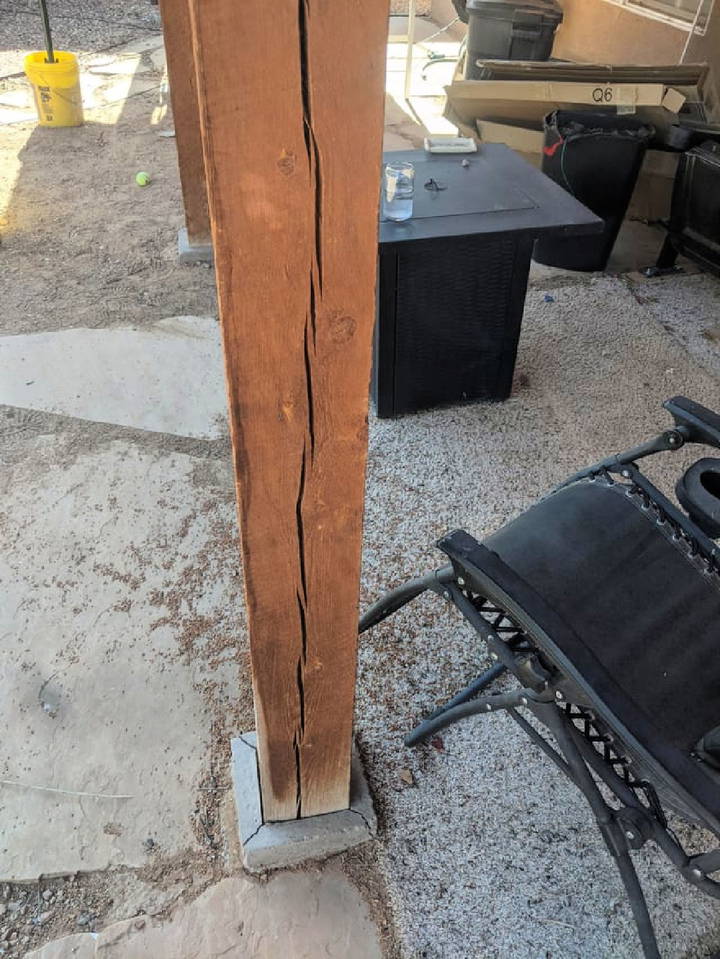
Understanding the Problem: Why Posts Rot and What It Means for Your Patio Cover
Posts that support patio covers are often exposed to harsh weather conditions, moisture, and insects, which can lead to rot over time. When a post becomes compromised, it not only affects the look of your patio but also its structural integrity. A rotted post can lead to sagging, instability, and potential safety hazards.
For this reason, replacing a rotted post isn't just about aesthetics—it's crucial for maintaining the safety and longevity of your patio cover.
Step 1: Assess the Damage and Choose the Right Replacement Post
First, assess the extent of the rot. Is the rot limited to just the base, or has it affected the entire post? In some cases, you might be able to cut out the rotted portion and use a post base, but often, a complete replacement is necessary.
Options for Replacement:
- Pressure-Treated Lumber: A popular choice due to its resistance to moisture and insects. However, pressure-treated posts can have cracks and knots that some homeowners find unappealing.
- Engineered Wood or Composite Posts: These can provide a more uniform appearance and greater resistance to elements but can be more expensive.
- Steel Posts with Faux Columns: For a modern or industrial look, steel posts covered with a faux column can be a unique solution that combines durability with aesthetic flexibility.
The post size is also a key consideration. If the original was a 6x6 engineered post, replacing it with a similar-sized post will maintain the same load-bearing capacity. You can opt for a 4x4 post and build it up with fascia or trim boards to match your existing decor.
Step 2: Gather Your Tools and Materials
Before diving into the replacement, ensure you have all the necessary tools and materials on hand:
- Replacement post (pressure-treated, composite, or steel)
- Circular saw or hand saw
- Hammer and chisel
- Level
- Post base (if applicable)
- Drill with appropriate bits
- Fasteners (galvanized or stainless steel screws)
- Safety equipment (gloves, safety glasses, etc.)
Tip: It's essential to use galvanized or stainless steel screws and fasteners to prevent future rust and corrosion, which could lead to another replacement down the road.
Step 3: Support the Structure Before Removing the Old Post
Removing a support post without adequate support can be dangerous. Before you remove the rotted post, you need to temporarily support the weight of the patio cover:
- Use a Temporary Support Beam: Place a sturdy beam or 4x4 under the patio cover, close to where the rotted post is. Ensure it is stable and can bear the weight of the cover.
- Secure with a Jack: Use a bottle jack or a floor jack to lift the beam slightly. This relieves the load on the rotted post, making it easier and safer to remove.
Step 4: Remove the Rotted Post
With the structure adequately supported, it’s time to remove the rotted post:
- Cut the Post: Use a circular saw or hand saw to cut the rotted post near its base. If the post is set in concrete, you may need to chisel away some of the concrete to free the post.
- Remove the Post Base (if applicable): If the post is anchored with a base, remove the screws or bolts holding it in place. A hammer and chisel can help pry it loose if it's stuck.
Tip: Be cautious during this step, especially if there is significant weight still on the post. Ensure your temporary support beam is stable throughout the removal process.
Step 5: Prepare the Area for the New Post
Before installing the new post, you’ll need to prepare the area:
- Clean the Area: Remove any debris, old fasteners, or concrete remnants from the post base area.
- Check for Level: Use a level to ensure the area where the new post will sit is even. If it isn't, use a concrete patch or leveling compound to create a stable, level surface.
Step 6: Install the New Post
With the area prepped, it's time to install the new post:
- Position the Post Base: If you're using a post base, secure it to the concrete or foundation using the appropriate fasteners. Ensure the base is level before proceeding.
- Place the New Post: Set the new post into the base. Ensure it is plumb (vertically level) by using a spirit level.
- Secure the Post: Fasten the post to the base using galvanized or stainless steel screws. For additional stability, consider using brackets or braces, especially if the post will bear a significant load.
Step 7: Finish and Protect the Post
Once the post is securely in place, you’ll want to finish it to match your patio cover and protect it from future damage:
- Apply Trim or Fascia Boards (Optional): To achieve a more polished look and hide any unsightly cracks or knots, you can wrap the post in trim or fascia boards. This also provides a surface that can be painted to match your home.
- Seal the Post: Apply a weatherproof sealant or paint to protect the new post from moisture, UV rays, and other elements. Be sure to follow the manufacturer's instructions for the best results.
Step 8: Remove Temporary Supports and Check Stability
After installing and finishing the new post:
- Slowly Remove the Temporary Support Beam: Lower the jack slowly and remove the temporary support beam.
- Check Stability: Ensure the new post is bearing weight properly and that the patio cover is stable. Make any final adjustments as needed.
Conclusion: A Safe and Sturdy Patio Cover Ready for Use
Replacing a rotted engineered post on your patio cover is a practical DIY project that can significantly improve both the safety and appearance of your outdoor space. By choosing the right materials, preparing adequately, and following these steps, you can complete the task with confidence.
Remember, every step—from selecting the right replacement material to ensuring proper support and stability—is crucial. With careful planning and attention to detail, you’ll have a patio cover that stands strong and looks great for years to come.
FAQ: Replacing a Rotted Engineered Post on Your Patio Cover
Here are some common questions and additional details to help you successfully replace a rotted engineered post on your patio cover. This section covers alternative methods, troubleshooting tips, and specific scenarios to enhance your understanding of the process.
What Are the Alternatives to Using a Pressure-Treated 4x4 Post?
While a pressure-treated 4x4 post is a common choice due to its durability, there are other options to consider:
- 6x6 Pressure-Treated Post: This matches the size of most engineered posts and can be shaved down to the desired size for a perfect fit. It provides better stability and support for heavy loads.
- Steel Post with Faux Column: This is ideal if you want a modern, sleek look. Steel is incredibly strong and can be covered with a faux column to match your patio's aesthetics.
- Composite or Engineered Lumber: These materials offer a uniform appearance and resist rot better than traditional wood. They are more expensive but require less maintenance over time.
How Can I Prevent Future Rot in My Replacement Post?
To avoid the same problem down the line, consider these steps:
- Install Stand-Off Bases: These bases elevate the post slightly above the ground or concrete, preventing direct contact with moisture. This can significantly reduce the risk of rot.
- Use Weatherproof Sealants: Apply a high-quality, water-resistant sealant or paint to protect the post from moisture, UV rays, and insects. Make sure to reapply as needed based on weather conditions.
- Ensure Proper Drainage: Check the area around the post for water pooling. Good drainage prevents water from accumulating at the base of the post, which is crucial for longevity.
What Should I Do If the Rotted Post is Set in Concrete?
If your rotted post is embedded in concrete, removing it can be more challenging. Here's what you can do:
- Chisel Away the Concrete: Use a hammer and chisel to carefully break away the concrete surrounding the post. Be cautious to avoid damaging the surrounding patio area.
- Use a Reciprocating Saw: Cut the post at the base and use a reciprocating saw to remove any remaining parts stuck in the concrete.
- Install a New Post Base: Once the old post is removed, you may need to install a new post base anchored to the concrete for the replacement post.
Can I Use a 4x4 Post Instead of a 6x6 Post?
Yes, you can use a 4x4 post as a replacement, but there are a few considerations:
- Build Up the Post with Trim Boards: If you opt for a 4x4 post, you can build it up with fascia or trim boards to create a bulkier look and match the dimensions of the original 6x6 post.
- Ensure Load-Bearing Capacity: Make sure the 4x4 post can bear the same load as the original post. If your patio cover supports a heavy load, a 6x6 post might be more appropriate.
What Safety Precautions Should I Take When Replacing the Post?
Safety is paramount when undertaking this DIY project. Follow these guidelines:
- Support the Structure Properly: Always use a temporary support beam and jack to hold up the patio cover while you remove and replace the post. Never remove a load-bearing post without this support.
- Wear Safety Gear: Use gloves, safety glasses, and proper footwear to protect yourself from debris, sawdust, and accidental cuts.
- Check for Power Lines and Utilities: Before digging or drilling, ensure there are no underground utilities or power lines in the area where you'll be working.
How Do I Handle Posts with Minimal Load Requirements?
If your patio cover or structure doesn’t bear a heavy load, you have more flexibility with replacement options:
- Use Lightweight Materials: Consider using lighter materials like vinyl-wrapped posts or smaller wooden posts that are easier to handle and install.
- Decorative Columns: For purely decorative purposes, you can use hollow or faux columns that offer aesthetic appeal without significant structural support.
What If My Post Replacement Doesn’t Look Even or Level?
Uneven or unlevel posts can compromise the appearance and stability of your patio cover. To fix this:
- Adjust the Base: If the post base isn’t level, you can use shims or a leveling compound to even it out before securing the post.
- Check with a Level: Continuously check the post with a level as you install it. Make adjustments as needed before fully securing it in place.
- Recheck After Removing Supports: Once you remove temporary supports, recheck to ensure the post remains plumb and stable.
Can I Add Decorative Elements to My New Post?
Yes, adding decorative elements can enhance the look of your patio cover:
- Add Trim or Wraps: Use trim or wrap around the post to hide knots or cracks and give a polished finish.
- Paint or Stain: Choose paint or stain that complements your home's exterior. Make sure to use weather-resistant products for durability.
- Add Decorative Brackets: Decorative metal brackets can be both functional and aesthetic, adding style and extra support.
How Can I Ensure the Patio Cover is Stable After Replacing the Post?
To ensure your patio cover is stable after replacing the post:
- Double-Check All Fasteners: Ensure all screws and bolts are tight and secure.
- Test the Load: Carefully test the stability of the patio cover by applying light pressure. If it feels wobbly, check for loose connections or supports.
- Monitor Over Time: Over the next few weeks, keep an eye on the post and structure. If you notice any shifting or instability, address it immediately.
By addressing these common questions and scenarios, you can confidently tackle the task of replacing a rotted engineered post and ensure a safe, durable, and visually appealing result for your patio cover.


