When I first embarked on the journey of organizing my tools, I had no idea just how personal and rewarding the experience would become. Each wrench and tool held a story, a memory of my late father who passed away not long ago. You see, my father was a mechanic, and his toolbox was one of the most cherished things he left behind.
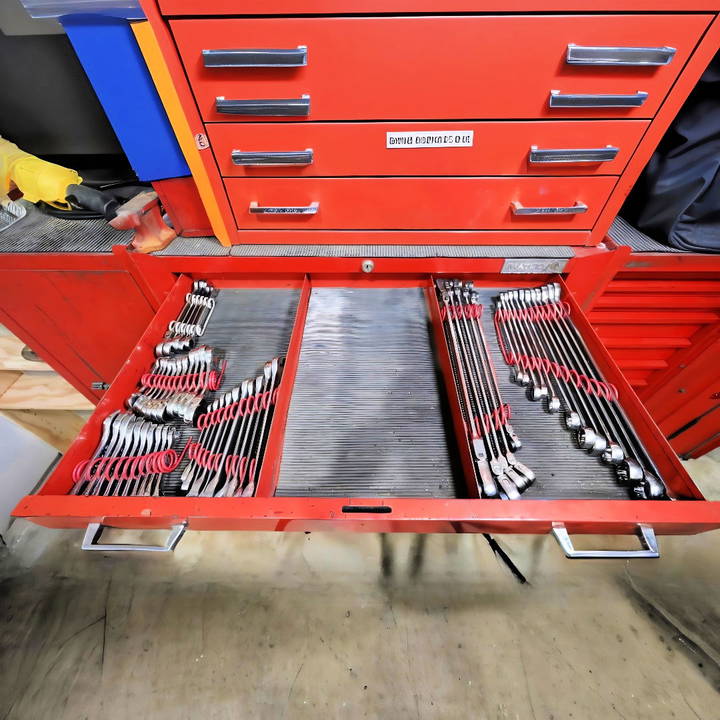
As I set out to incorporate his extensive collection of wrenches into my garage, I realized I needed a practical and efficient wrench organizer. What follows is a detailed guide on how I maked a DIY wrench organizer using simple techniques and materials anyone can access.
Why Organizing Tools is Essential
Before diving into the process, let's discuss why organizing tools is important. An organized toolbox not only saves time but also reduces frustration. Imagine needing a specific wrench during a repair and not being able to find it because everything is jumbled together. Efficiency in workflow is often improved when tools are sorted and easy to access.
Materials You'll Need
The materials for this DIY project are inexpensive and easy to find. Here's what you'll need:
- Wire (12 Gauge): A 12-gauge wire is ideal because it is strong enough to hold the wrenches securely, yet flexible enough to bend easily. You might already have some extra wire lying around, as I did, from previous projects.
- Dowel or Round Object: You'll use this to form the coils for the wrench holder. It could be a wooden dowel or a metal rod with a consistent shape.
- Wire Cutters: Essential for cutting the wire to the desired length.
- Pliers: Useful for bending and shaping the wire with precision.
Step by Step Instructions
Learn how to make your own DIY wrench organizer with easy step-by-step instructions. Perfect for keeping your wrenches neatly stored and accessible.
Step 1: Gather Your Tools
Before you start bending wires, gather all your tools in one place. This includes your wrenches, a 12-gauge wire, pliers, and wire cutters. Having everything within reach will streamline the process.
Step 2: Cut the Wire
Using wire cutters, cut a piece of 12-gauge wire. The length will depend on how many wrenches you want the organizer to hold and their size. For instance, longer wrenches might require more wire for stability.
Step 3: Make the Base Coil
Using your dowel or round object, wrap the wire around it to make a coil. This is the base of each hanger that will hold your wrenches in place. Count the number of coils based on the number of wrenches you wish to accommodate. Typically, five coils will allow four slots for the wrenches.
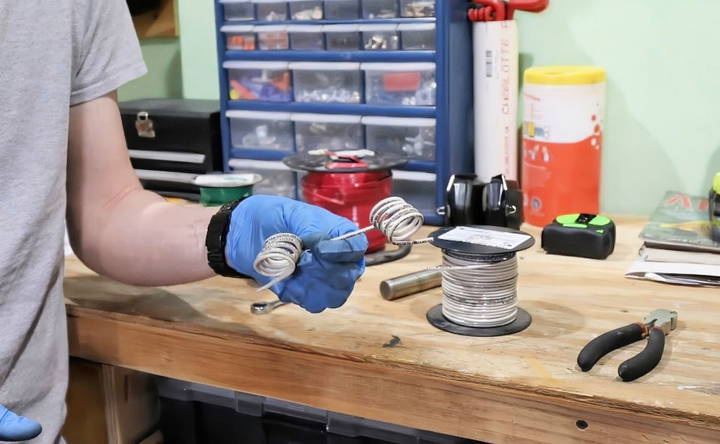
Step 4: Make the Double Coil for Larger Wrenches
For larger wrenches, you might want to add more stability using a double coil. Simply continue coiling in a second layer for added strength.
Step 5: Adjust and Fit
After forming your coils, adjust the spacing to fit your wrenches snugly. You want the coils to hold the wrenches securely, spreading them out slightly if necessary.
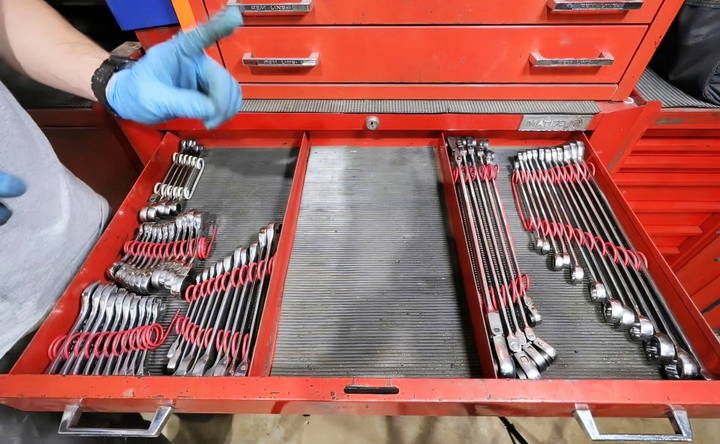
Step 6: Install in Drawer
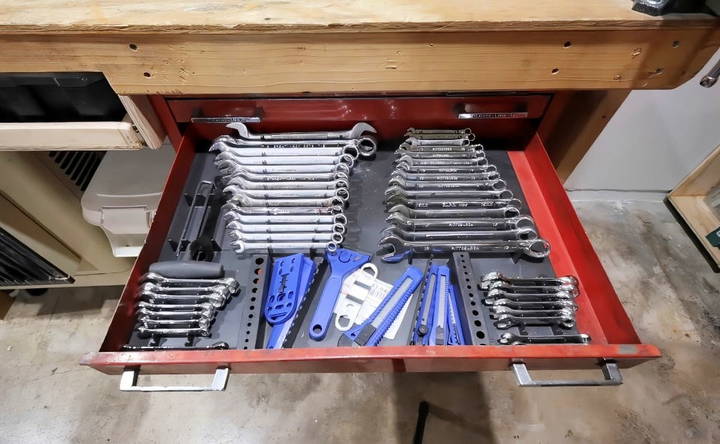
Place the completed organizer in your drawer. Arrange your wrenches by size or type, whatever makes the most sense for your workflow. As you lay them out, notice how much space you've saved compared to a scattered pile.
Tips for Wrench Organization
- Color Code: Consider using different colored wires for metric and standard wrenches. This visual cue will help quickly identify the wrench type you need.
- Labeling: You could add small labels to indicate wrench sizes if the wire is thick enough, although I found this to be more challenging with my 12-gauge wire.
- Customization is Key: This method is highly adjustable. You can easily modify and bend the wire to fit new wrenches or change the layout, unlike wooden organizers that are more permanent and difficult to adjust.
Final Results
After completing my organizer, I stood back and admired the efficiency it brought to my workbench. All my father's wrenches were neatly lined up, easily accessible, and ready for use. More than just a functional project, it was a way to preserve a piece of my father's legacy in a manner that was both respectful and practical.
Common Mistakes to Avoid
When organizing your wrenches, it's easy to make mistakes that can lead to frustration and inefficiency. Here are some common pitfalls and how to avoid them:
Not Measuring Your Space
One of the biggest mistakes is not measuring the space where you plan to store your wrenches. Without proper measurements, you might end up with an organizer that doesn't fit. Always measure your drawer, wall, or toolbox before starting your project.
Ignoring Wrench Sizes
Mixing different sizes of wrenches can make it hard to find the right one when you need it. Group your wrenches by size and type. This way, you can quickly grab the correct wrench without rummaging through a pile.
Using Weak Materials
Choosing the wrong materials can lead to a flimsy organizer that won't last. Use sturdy materials like wood, metal, or high-quality plastic. This ensures your organizer can handle the weight and frequent use.
Overcomplicating the Design
A complex design might look impressive, but it can be impractical. Keep your design simple and functional. The goal is to make it easy to store and retrieve your wrenches, not to make a work of art.
Neglecting Maintenance
Even the best organizer needs regular maintenance. Clean your organizer and wrenches periodically to prevent rust and dirt buildup. This keeps your tools in good condition and extends the life of your organizer.
Not Labeling
Without labels, it can be hard to remember where each wrench goes. Use labels or color codes to mark the spots for each wrench. This makes it easier to put them back in the right place after use.
Overloading the Organizer
Putting too many wrenches in one organizer can make it cluttered and hard to use. Ensure your organizer has enough space for each wrench without overcrowding. This helps keep everything neat and accessible.
Forgetting About Accessibility
Your wrench organizer should be easy to access. Avoid placing it in hard-to-reach areas. Make sure it's within arm's reach when you're working on a project. This saves time and effort.
By avoiding these common mistakes, you can make a wrench organizer that is both practical and durable.
FAQs About DIY Wrench Organizers
Discover answers to common questions about DIY wrench organizers. Learn tips, techniques, and tools for building efficient storage solutions.
Organizing wrenches by size and type is straightforward:
Sort by Type: Separate adjustable, combination, open-end, and ratchet wrenches.
Arrange by Size: Line them up from smallest to largest.
Labeling: Use labels or markers to indicate sizes.
Use Pegboards: Hang wrenches on pegboards for easy access.
This method ensures you can quickly find the wrench you need.
Here are a few creative ideas for DIY wrench organizers:
Magnetic Strips: Attach magnetic strips to a wall or toolbox to hold wrenches.
Foam Tool Trays: Cut foam to fit your wrenches and place it in a drawer.
Carabiners: Clip wrenches onto a carabiner for easy portability.
Pegboards: Use pegboards with hooks to hang wrenches.
These ideas help keep your workspace tidy and your tools within reach.
Keeping wrenches organized has several benefits:
Efficiency: Saves time by making it easy to find the right wrench.
Prevents Loss: Reduces the risk of losing tools.
Protects Tools: Keeps wrenches in good condition by preventing damage.
Safety: Reduces clutter, making your workspace safer.
An organized tool area enhances productivity and safety.
Making a wrench organizer with a pegboard is simple and effective:
Materials Needed: Pegboard, hooks, screws, and a drill.
Step-by-Step: Measure and Cut: Measure the space where you want to install the pegboard and cut it to size.
Mount the Pegboard: Secure the pegboard to the wall using screws and a drill.
Add Hooks: Insert hooks into the pegboard to hang your wrenches.
Organize Wrenches: Hang the wrenches by size and type on the hooks.
This method keeps your wrenches visible and easily accessible.
Using magnetic strips for wrench organization offers several advantages:
Space-Saving: Magnetic strips can be mounted on walls, saving drawer and bench space.
Easy Access: Wrenches are held securely and can be easily removed and replaced.
Versatility: Magnetic strips can hold various types of wrenches and other metal tools.
Customization: You can cut magnetic strips to fit any space.
This solution is ideal for keeping your tools organized and within reach.
Conclusion
Building a DIY wrench organizer is not just about tidying up your workspace; it's about finding joy and efficiency in organization. This project offers flexibility, cost savings, and an easy skill-building exercise for any DIY enthusiast. Most importantly, carrying out this project allowed me to honor my father's memory in a tangible way, blending my need for creativity with his love for tools. Whether you're looking to tidy up your toolbox or take on a meaningful home project, a DIY wrench organizer might just be the perfect solution.


