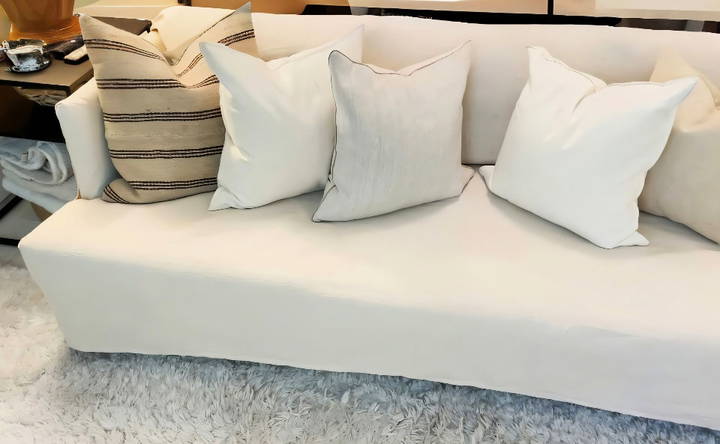
Finding a cost-effective solution for home decor can be tough. One day, I looked at my couch and noticed how worn out it had become. Buying a new one wasn't an option, so I decided to make a DIY couch cover. It was surprisingly easy and affordable, and it transformed my living room.

Making your own DIY sofa cover is a helpful way to give your furniture a fresh look. I chose a fabric that I liked, measured my couch, and cut the fabric according to the measurements. Sewing it together took a bit of time, but the result was worth it. You don't need to be an expert, just some patience and effort.
So, ready to transform your couch? Follow these steps, and your old couch will look as good as new. Let's get started, and you'll see how easy it can be!
What You Need and Why
- 9x12 ft Drop Cloth: The size might vary based on your couch dimensions, but a 9x12 ft worked perfectly for mine. It's essential to choose a color that matches your decor theme. A seamless drop cloth gives a more polished look.
- Upholstery Pins: These little corkscrew-shaped pins are crucial for securing the cloth in place without damaging your couch.
- Measuring Tape: To ensure you get the right size drop cloth, you'll need to accurately measure your couch.
- Scissors (Optional): If you need to trim any excess drop cloth, sharp fabric scissors will do a clean job.
- Iron: To remove any wrinkles or creases in the drop cloth for a sleek finish.
Step by Step Instructions
Learn how to make a DIY couch cover with our step-by-step instructions. Perfectly measure, prep, position, and style your couch with ease!
Step 1: Measure Your Couch
First up, grab your measuring tape. You'll need to measure from the ground on one side of the couch up over the arm, across the seating area, over the opposite arm, and down to the ground. Repeat this process for the couch's depth – from the front edge up over the back and down to the ground behind the couch. I recommend adding two feet to each measurement to ensure you have enough material to tuck and adjust.
Step 2: Prep Your Drop Cloth
Wash and dry your drop cloth according to the care instructions. This step helps to soften the fabric and ensures it shrinks before you fit it to your couch. Once dry, iron out any stubborn wrinkles. Patience is key here for a crisp end result.
Step 3: Position the Drop Cloth
Start by draping the drop cloth over your couch, making sure it's evenly distributed from left to right. For a neat front appearance, allow the cloth to slightly puddle on the floor - this adds to the chic, relaxed vibe.
Step 4: Tuck and Smooth
Now, the fun part begins. Tuck the drop cloth into the crevices of your couch to secure it in place. It's like making a bed but with a bit more tucking involved. Aim for a smooth surface without any bulk. If your couch cushions are removable, lift and tuck the cloth underneath them for added stability.
Step 5: Secure with Upholstery Pins
This step truly transforms the look from drab to fab. Use the upholstery pins to secure the drop cloth where necessary – along the couch's arms, back, and especially the seating area. The goal is to make a tailored look that stays in place. Be strategic with your pin placement, hiding them under folds for a seamless aesthetic.
Final Touches: Style Your Couch
Once everything is tucked and pinned, step back and admire your handiwork. From here, you can add throw pillows, blankets, or whatever else brings your style to life. This simple change can breathe new life into your living room.
Customization Tips for DIY Couch Covers
Making a DIY couch cover is not just about protecting your furniture; it's also an opportunity to express your personal style and add a unique touch to your living space. Here are some tips to help you customize your couch cover:
- Choose Your Fabric Wisely: The fabric you select is the canvas for your creativity. Opt for a material that not only complements your decor but also stands up to daily use. Cotton blends are durable and easy to work with, while velvet can add a touch of luxury.
- Play with Colors and Patterns: Don't shy away from bold colors or patterns. A vibrant hue can brighten up a room, while a chic pattern can make a statement. If you're not ready for a big change, consider making accent pieces like cushions in eye-catching fabrics.
- Add Texture: Texture can add depth and interest to your couch cover. Think about incorporating elements like ruffles, pleats, or quilting. These details can transform a simple cover into a work of art.
- Consider the Details: Small details can have a big impact. Adding piping along the edges or decorative buttons can give your couch cover a professional and polished look.
- Make It Reversible: For a cover that's versatile, make it reversible. Choose two complementary fabrics and sew them back-to-back. This way, you can change the look of your couch with a simple flip.
- Include Practical Features: Functionality is key. Add features like pockets to store remotes or magazines. Ensure your cover is easy to remove and wash, making maintenance a breeze.
- Personalize It: Embroidery, appliqué, or iron-on patches are great ways to personalize your couch cover. Add your initials, a favorite quote, or a design that speaks to you.
The goal is to make a couch cover that you love and that serves your needs. With these tips, you can craft a cover that is as unique as you are.

Troubleshooting Common Issues with DIY Couch Covers
When crafting your own couch covers, you might encounter a few hiccups along the way. Here's how to solve some of the most common issues you may face:
- Fitting Problems: If your cover is too loose or tight, adjust the seams. For a loose cover, sew a deeper seam to tighten it. If it's too tight, let out the seams slightly. Always measure your couch before cutting the fabric to ensure a good fit.
- Fabric Wrinkles: To avoid wrinkles, iron your fabric before you start sewing. Choose wrinkle-resistant fabrics like polyester blends for an easier time. If wrinkles appear after fitting, use a steamer to smooth them out while the cover is on the couch.
- Uneven Hemlines: Ensure your couch is on a level surface when measuring for the hem. Use a ruler or measuring tape to mark a consistent hemline all around. Pin the fabric in place before sewing to keep it even.
- Sewing Machine Troubles: If your sewing machine is acting up, check the manual for troubleshooting tips. Common issues include incorrect threading, a dull needle, or tension problems. Regular maintenance can prevent these issues.
- Choosing the Wrong Fabric: The wrong fabric can make your project more difficult. Heavy fabrics are durable but hard to sew, while light fabrics might not offer enough protection. Consider your sewing skills and the cover's purpose when selecting fabric.
- Color Bleeding: To prevent color bleeding, pre-wash your fabric with a color-catching sheet. Test a small piece first to ensure the color doesn't run. Choose high-quality fabric dyes if you're coloring the fabric yourself.
- Attachment Issues: If your cover doesn't stay in place, add straps or Velcro to secure it. Place them strategically where they can be hidden but still hold the cover firmly.
Foreseeing these issues and addressing them will help you make a great DIY couch cover. Patience and practice are key. Don't let small setbacks discourage you; they're part of the process.
Maintenance and Care for DIY Couch Covers
Keeping your DIY couch covers looking fresh and clean doesn't have to be a chore. With the right care, they can stay beautiful for years. Here's how to maintain them effectively:
- Regular Cleaning: Dust and dirt can accumulate on your couch cover. Vacuum it regularly to keep it clean. For everyday spills, spot clean with a mild detergent and water.
- Washing Instructions: Most fabric couch covers can be machine washed. Use a gentle cycle with cold water to prevent shrinking. If your cover is made of a delicate material, hand washing is best.
- Drying Tips: Air dry your couch cover to maintain its shape. Avoid using a dryer, as high heat can cause shrinkage. If you must use a dryer, choose a low-heat setting.
- Ironing: If your cover gets wrinkled, iron on a low setting suitable for the fabric type. For fabrics that can't handle heat, use a steamer.
- Stain Removal: Act quickly on spills to prevent stains. Blot, don't rub, to soak up the liquid. Use a stain remover that's safe for your fabric type.
- Storage: When not in use, store your couch cover in a cool, dry place. Fold it neatly or roll it to prevent creases.
- Repairing Tears: If your cover gets a tear, mend it promptly to prevent further damage. Use a matching thread and a simple stitch to repair it discreetly.
Maintain and care for your DIY couch cover regularly to keep it protecting and beautifying your couch for years.
FAQs About DIY Couch Cover
Discover answers to common questions about DIY couch cover projects, from materials to measurements, ensuring a perfect fit for your furniture.
To measure your couch for a DIY cover, you’ll need to take precise measurements of the length, depth, and height of your couch. Measure from the outer edge of one armrest to the other for the length, from the front of the couch to the back for the depth, and from the floor to the highest point of the couch for the height. Don’t forget to measure the dimensions of any cushions separately.
Yes, you can make a no-sew couch cover using materials like drop cloths or old bed sheets. You can secure the fabric in place with creative folding, tucking, and maybe even some safety pins or fabric glue for a more tailored look.
Customizing your DIY couch cover can be as simple as choosing a fabric that matches your style or as intricate as adding tufting, piping, or dyeing the fabric to your desired color. These personal touches can make your couch cover unique and better suited to your interior design.
For a quick and budget-friendly couch cover, consider using a large sheet or a simple drop cloth. You can drape the fabric over your couch and tuck it into the cushions for a snug fit. This method is not only cost-effective but also easily changeable if you decide to update your room’s look.
To maintain your DIY couch cover and ensure its longevity, regular cleaning is key. If you've used a washable fabric, remove the cover and wash it according to the fabric's care instructions—usually in cold water on a gentle cycle. For spot cleaning, use a mild detergent and avoid bleach to prevent fabric damage. Additionally, rotating the cover if possible can help prevent uneven wear and fading from sunlight exposure.
In Conclusion
DIY couch cover on a budget
In conclusion, making a DIY couch cover on a budget is a rewarding project that blends creativity with cost efficiency. With simple materials and a bit of effort, you'll have a beautiful, custom-made DIY couch cover. This guide has shown how straightforward it is to transform your living space without breaking the bank. Start your DIY sofa cover project today and enjoy a refreshed home!


