When my partner and I started planning our wedding, we knew we wanted it to have personal touches that reflected our journey together. One project I was particularly excited about was making our DIY wedding seating chart. It was a unique challenge that combined my love for crafts and my ambition to add a personal touch to our special day. In this guide, I'm sharing how I tackled this project, hoping it inspires and helps you craft your own.
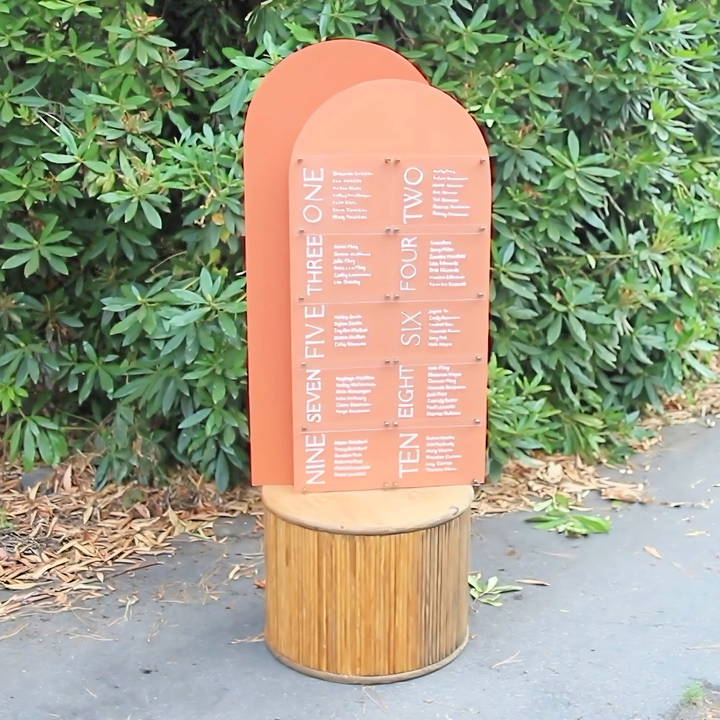
Materials Needed and Why
Discover essential materials for a custom woodworking project: wooden panels, acrylic signs, paint, primer, dowels, support blocks, and tools.
Wooden Panel
I chose a wooden panel as the base for the seating charts. Wood offers a timeless appeal and sturdiness. I picked an oversized panel to accommodate all guest names and ensure visibility.
Acrylic Signs
For the names and table numbers, I used acrylic signs. Acrylic provides a modern, sleek look that complements the rustic wood. It's also durable and easy to write on with the right markers.
Paint and Primer
The paint and primer were necessary to color and protect the wood. I selected a rust color that matched our wedding theme. Primer ensures the paint adheres well and lasts longer.
Wooden Dowels and Support Blocks
These were used to make the base and support for the wooden panels, ensuring stability. I recycled cedar blocks for an eco-friendly touch.
Tools: Brad Nailer, Jigsaw, Screws
A brad nailer made securing parts together quick and easy. The jigsaw was crucial for custom cuts, especially for the base supports. Screws held everything tightly together.
Step by Step Instructions
Learn how to prepare a wooden panel, construct the base, fix supports, stain, add greenery, and attach acrylic signs with step-by-step instructions.
Preparing the Wooden Panel
I began by cutting an arch on the top of the wooden panel with a jigsaw - this added elegance to the design. After sanding the edges smooth, I applied a coat of primer and let it dry. The rust paint followed, enhancing our chosen color theme beautifully.
Constructing the Base
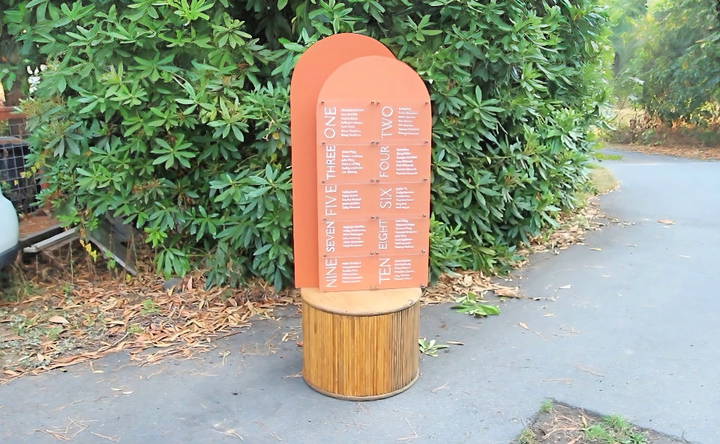
My husband and I worked on a sturdy base using wooden dowels and cedar blocks. Drilling holes and securing the dowels formed a frame. We also added middle supports for extra stability. This base would later support the wooden panels securely.
Fixing the Support for Panels
Making supports for the panels involved more intricate cuts. We measured and cut holes on the base for the panel supports, ensuring a snug fit. This step was crucial for the overall stability of the seating chart.
Staining the Base
I chose a stain for the base that complemented the overall rustic yet modern look. This not only protected the wood but also tied the design elements together seamlessly.
Adding Greenery (Optional)
On the day, our florist added some greenery around the base for an extra touch of elegance. This simple addition elevated the appearance of the seating chart and integrated it beautifully with our wedding theme.
Attaching the Acrylic Signs
For attaching the acrylic signs, I opted for acrylic mounters found online. My dad, who helped with this part, assured me it was straightforward. The clear mounters didn't detract from the design and held the signs in place effectively.
Personalization Tips for Your DIY Wedding Seating Chart
Making a seating chart for your wedding can be a fun and personal part of the planning process. Here are some tips to help you make a seating chart that is not only functional but also a memorable part of your special day:
- Reflect on Your Story Think about the journey you and your partner have taken together. Use symbols, colors, or themes from your relationship to add a personal touch to the seating chart. For example, if you met while hiking, you could use a mountain theme with table names like “Everest” or “Fuji.”
- Interactive Elements Make your seating chart interactive by adding elements that guests can take with them, such as a small photo or a handwritten note. This not only helps them find their seat but also serves as a keepsake.
- Use of Colors and Fonts: Choose colors and fonts that match your wedding theme. If you're going for a rustic look, consider earthy tones and handwritten fonts. For a modern wedding, try bold colors and sleek, simple typography.
- Incorporate Your Hobbies If you have a shared hobby or interest, incorporate it into your seating chart. Love books? Name your tables after your favorite novels. Enjoy wine? Use different types of wine for table names.
- Cultural Elements Celebrate your heritage by incorporating cultural elements into your seating chart. Use traditional patterns, symbols, or languages to honor your background.
- Seasonal Touches: If your wedding is tied to a particular season, use that to your advantage. Autumn weddings could have leaves and warm colors, while summer weddings might feature beachy elements or bright florals.
- Guest Comfort Consider your guests' comfort when assigning seats. Place elderly guests away from loudspeakers and ensure they have easy access to restrooms.
- Space for Personal Messages: Leave space for personal messages or quotes that resonate with you as a couple. This adds an intimate touch and shares your love story with your guests.
- DIY Craftsmanship: Show off your DIY skills by handcrafting elements of the seating chart. Whether it's painting, calligraphy, or woodworking, your craftsmanship will add a unique and personal touch.
Personalize your wedding seating chart to reflect your story as a couple. It's more than seating; it's sharing a part of your special day. Keep it simple, meaningful, and true to yourselves for lasting memories.
Common Mistakes to Avoid in DIY Wedding Seating Charts
When making a DIY wedding seating chart, it's easy to get caught up in the excitement and overlook some details that can make a big difference. Here are some common mistakes to avoid:
- Overcrowding Tables Avoid squeezing too many chairs at a table. Guests should have enough space to move comfortably. A good rule of thumb is to allow about 24 inches of space per person.
- Ignoring the Venue Layout Make sure to consider the layout of your venue when planning your seating chart. Take note of where the doors, windows, and restrooms are located to ensure a logical flow.
- Forgetting Special Needs: Always consider guests with special needs. Ensure that there is wheelchair access and that family members who need to be close to each other are seated accordingly.
- Neglecting the View Everyone wants a good view of the festivities. Avoid placing tall centerpieces that might block guests' views or seating them in a way that they can't see the main events.
- Last-Minute Changes: Try to finalize your seating chart at least a week before the wedding. Last-minute changes can lead to confusion and errors.
- Not Having a Backup Plan: Always have a backup plan in case of unexpected guests or no-shows. Having a few extra seats can save you from last-minute stress.
- Skipping Table Numbers Table numbers or names are essential. They guide your guests to their seats quickly and efficiently.
- Lack of Coordination with Caterers If you have a meal choice, make sure the seating chart is coordinated with the caterers. This will ensure that the right meals are served to the right guests.
- Forgetting to Display the Chart: Make sure your seating chart is displayed in a prominent place where all guests can see it as they enter the reception area.
Avoid these mistakes to ensure your seating chart helps your wedding run smoothly. Plan ahead and prioritize guest comfort and convenience.
FAQs About Cheap DIY Wedding Seating Chart
Find answers to faqs about making a cheap DIY wedding seating chart to plan your big day on a budget, while keeping it elegant and organized.
Start by listing all your guests and grouping them into tables. Then, choose your material and layout. Next, assign seats and label them clearly on your chart. Finally, decorate your chart to match your wedding style. You can also use online tools to help with the layout and design.
Yes, instead of a traditional chart, you could opt for escort cards or place cards that guests can pick up on their way to the reception. Another idea is to have a welcome board with table assignments listed, or even a digital display if you’re tech-savvy.
While not mandatory, a seating chart helps to organize the reception and ensures that guests find their seats easily. It can also prevent any confusion or awkward moments. However, if you’re having a small, informal wedding, you might choose to let guests sit where they like.
Absolutely! There are digital tools and apps available that can help you organize your seating chart. You can input your guest list and use drag-and-drop features to arrange tables. Some apps even allow you to visualize the layout in a 3D view. This can be a great way to save time and make changes easily.
When planning your seating chart, it's important to consider guests with mobility issues or other special needs. Ensure that they are seated close to entrances and exits, and that there is ample space for wheelchairs or walkers. It's also thoughtful to consult with these guests beforehand to understand their preferences and needs.
Final Thoughts
Making our DIY wedding seating chart was a project that brought not just me but my family together in the wedding preparations. It stood as a testament to love, creativity, and personal touch throughout the wedding. Seeing our guests admire the chart and find their seats smoothly was incredibly rewarding.
Taking on a DIY project for your wedding can seem daunting, but with the right plan and some help from your loved ones, it's an enriching experience. Not only does it add personal flair to your special day, but it also makes memories and stories to share for years to come. I hope this guide inspires you to add your personal touch to your wedding, crafting pieces that reflect your journey and love.


