Discover these DIY string light posts that can brighten your evenings and build a welcoming outdoor space. Making your posts for string lights is an affordable and straightforward way to get creative and improve your backyard or patio. With a few materials and some simple steps, you can set up an enchanting atmosphere perfect for gatherings or quiet nights at home.
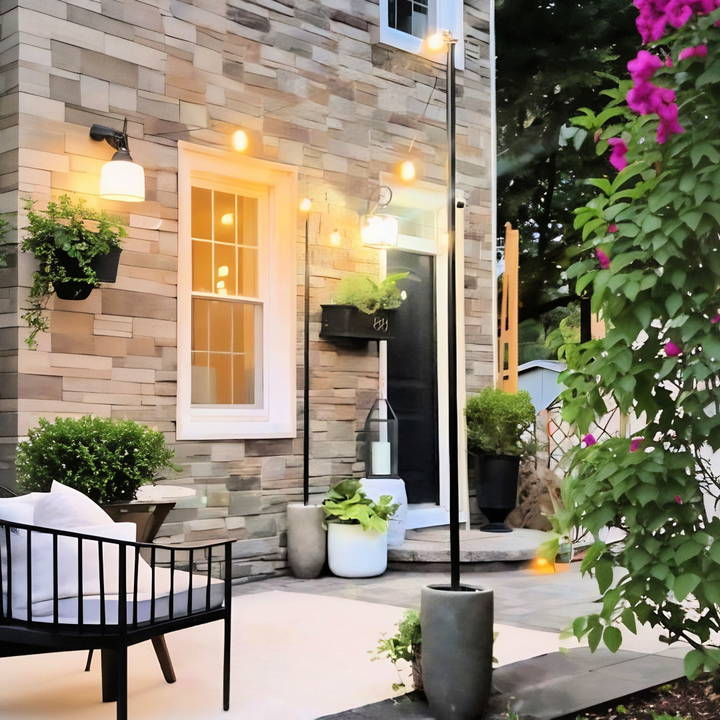
We'll guide you through selecting the right materials, securing your posts, and hanging your lights efficiently. This project requires minimal tools, and the results can transform your space dramatically.
Ready to get started? Dive into our detailed instructions in the next section for everything you need to know.
Why Moveable Bistro Light Posts?
The main goal was to build something modern, durable, and versatile. Traditional wooden poles can rot over time, especially when exposed to water. I wanted something that could withstand the elements and still look chic. Plus, the flexibility of moving these light posts around means you can redesign your outdoor space whenever the mood strikes, perfect for renters or those of us who love to shake things up.
Materials Needed:
- Heavy-duty closet rods (your modern pole solution)
- Large modern planters
- Fast-setting concrete mix
- Painters tape
- Water and sand (for concrete setting and additional weight)
- Marble chips (for aesthetic topping)
- String lights of your choice
- Zip ties (for attaching lights securely)
- Wooden pole sockets, screw eye hooks, and toggles (for light attachment)
I chose closet rods as they were an affordable, durable alternative to traditional poles and large modern planters to match the contemporary vibe I was going for. The concrete mix ensures the poles stay put, and adding marble chips on top gives it a polished look. This project is a great blend of functionality and stylistic design.
Step by Step Instructions
Learn how to build outdoor ambiance with our DIY string light posts guide. Follow step-by-step instructions on setting up poles, planters, and lights.
Setting Up Your Poles
- Prepare the Light Attachment: Start by screwing the screw eye into the wooden pole socket. If facing resistance, use a screwdriver for leverage. Ensure it's secured well as this will bear the weight of your lights.
- Adding the Toggle: Though the threads might not match perfectly, force the toggle onto the screw eye. This is crucial for making tension inside the pole, ensuring it's not solely relying on adhesive for support.
- Gluing the Setup: Apply a generous amount of metal adhesive around the screw eye base before inserting it into the closet rod's end. This will be what holds your light attachment in place securely.
Preparing the Planters
- Mixing Concrete: Fill each planter with half a bag of fast-setting concrete mix. Ensure your planters are sizable, as they need to support the weight and withstand windy conditions.
- Setting the Poles: Insert the prepared closet rods into the center of the planters filled with concrete mix. Align them perfectly straight using painter's tape, which will hold them in place while you add water to set the concrete.
- Adding Water and Sand: Pour water over the concrete to activate it, ensuring complete saturation. After letting it set, add a layer of sand for extra weight and a nice base for planting or adding decorative stones in the future.
- Decorative Topping: For a refined finish, add marble chips or your choice of decorative rocks on top of the sand. This not only looks great but also adds additional weight.
Installing the Lights
- Attaching the Lights: Once your poles are securely set in concrete and decorated, use zip ties to attach the string lights to the loops you buildd with the screw eyes. Space out the poles as needed to build a gentle sag in the lights for a cozy look.
- Final Touches: Adjust the light strands to your preference, ensuring they're tight enough to form a smooth arc but not so tight that they pull excessively on the poles.
Advanced Customization Techniques
When you've mastered the basics of making DIY string light posts, you might be interested in adding a personal touch or integrating advanced features. Here are some techniques that can elevate your project:
- Incorporating Dimmers: Dimmers are a great way to control the ambiance of your outdoor space. You can install a dimmer switch compatible with your string lights to adjust the brightness according to the occasion. Look for outdoor-rated dimmers to ensure safety and durability.
- Smart Home Integration: For tech-savvy individuals, connecting your string lights to a smart home system can add convenience and customization. Choose smart plugs that can be controlled via a smartphone app or voice commands through devices like Amazon Echo or Google Home.
- Color-Changing Bulbs: Add a splash of color to your garden or patio with color-changing LED bulbs. These bulbs often come with a remote control, allowing you to switch colors or set them to rotate through a spectrum.
- Motion Sensors: Installing motion sensors can provide security and efficiency. The lights will only turn on when movement is detected, saving energy and providing light only when needed.
- Solar Power Conversion: If you're interested in sustainability, consider converting your string light system to solar power. This can be done by using solar panels that charge during the day and power the lights at night.
- Custom Light Patterns: Make custom light patterns with programmable LED string lights. These lights can be programmed to display patterns and messages or even synchronize with music.
- Weatherproofing: To ensure your string lights withstand the elements, apply weatherproof coatings to the posts and connections. Seal any exposed wiring with waterproof sealant and use outdoor-rated fixtures.
Use these tips for a custom, beautiful, and functional string light setup. Prioritize safety with electrical work and seek professional advice if needed.
Troubleshooting Common Issues
When it comes to DIY string light posts, you might encounter a few hiccups along the way. Here's a straightforward guide to solving some common issues:
Lights Not Turning On:
- Check the Power Source: Ensure your lights are plugged in and the outlet is functioning.
- Inspect the Bulbs: Look for any burnt-out bulbs and replace them if necessary.
- Examine the Fuse: String lights have a small fuse in the plug. If blown, replace it with the correct type.
Flickering Lights:
- Secure Connections: Loose bulbs or plugs can cause flickering. Tighten them to ensure a stable connection.
- Replace Faulty Bulbs: Sometimes, a defective bulb can cause others to flicker. Test and replace if needed.
Dim Lights:
- Check Voltage: If the lights are dimmer than usual, verify that they're receiving the correct voltage.
- Evaluate the Wiring: Over time, wiring can degrade. If safe to do so, check for any visible damage and consider rewiring.
Lights Turning Off Unexpectedly:
- Overheating Protection: Some lights have built-in overheating protection. Allow them to cool down before restarting.
- Circuit Overload: Too many lights on one circuit can trip a breaker. Spread the load across multiple circuits.
Rust or Corrosion:
- Clean Contacts: Gently clean any rust or corrosion from plug contacts with a suitable cleaner.
- Preventive Measures: Apply a dielectric grease to protect against future corrosion.
Weather Damage:
- Inspect for Damage: After severe weather, check for any physical damage to the lights or posts.
- Weatherproofing: Ensure all outdoor connections are sealed with weatherproof materials.
Sensor Issues:
- Adjust Sensitivity: If your lights have motion sensors and aren't responding correctly, adjust the sensitivity settings.
- Clear Obstructions: Make sure the sensor's path is clear of any obstructions like branches or debris.
Safety first! Always turn off the power before inspecting your lights, and if you're unsure about any electrical work, consult with a professional.
FAQs About DIY String Light Posts
Discover FAQs about DIY string light posts. Learn how to choose materials, install, and maintain your perfect outdoor lighting setup easily!
Yes, solar string lights are an excellent choice for outdoor lighting. They eliminate the need for extension cords and are convenient since they charge during the day and light up at night. This is especially useful if you don’t have an outdoor outlet nearby.
The height of your string light posts can vary based on your preference and the area you’re illuminating. Generally, 8 to 10 feet tall posts are sufficient to provide a good spread of light and keep the lights out of reach. Adjust the height according to the scale of your space and the intensity of the lights you’re using.
To ensure longevity, choose pressure-treated wood or cedar for natural weather resistance. If you’re in an area with extreme weather, consider using metal poles or PVC pipes for added durability. Regular maintenance, like checking for loose fittings and replacing bulbs, will also help your setup last longer.
When selecting string lights, consider the size of your outdoor area and the ambiance you want to build. For a warm, cozy glow, opt for LED lights with a warm white color temperature. If you're covering a large area, commercial-grade string lights are more durable and can be connected for extended lengths. Solar-powered lights are a great option if you prefer an eco-friendly solution.
The best method to hang string lights is to use eye hooks or screw-in cup hooks at the top of each post. You can then thread the string lights through these hooks. For added support, use guide wires to prevent sagging, especially if the span between posts is long. Ensure the lights are hung with a slight droop for a relaxed, aesthetic look.
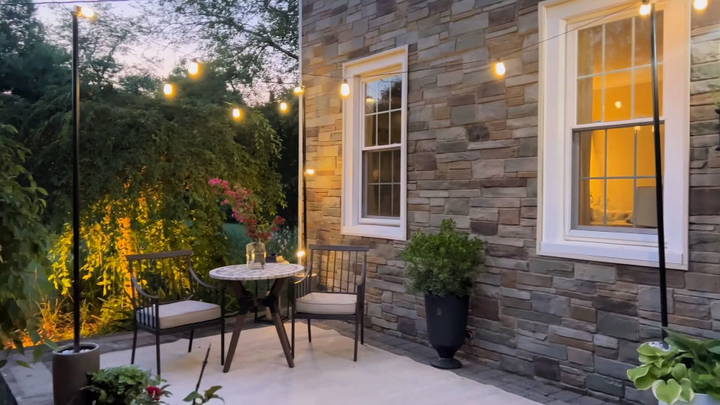
The Result: A Magical Outdoor Space
Wrapping up, making DIY string light posts is a fun and simple way to enhance your outdoor space. By following our guide, your posts for string lights will soon be shining bright, adding charm and functionality to your evenings. Enjoy the warm glow and ambiance with minimal effort and cost. Start your DIY project today and transform your yard into a magical retreat!


