I've always enjoyed working on my car, whether it's for simple maintenance or a more involved repair. However, getting under the vehicle was always the most challenging part. Commercial car ramps are often bulky, expensive, or not suited for my low-clearance car.
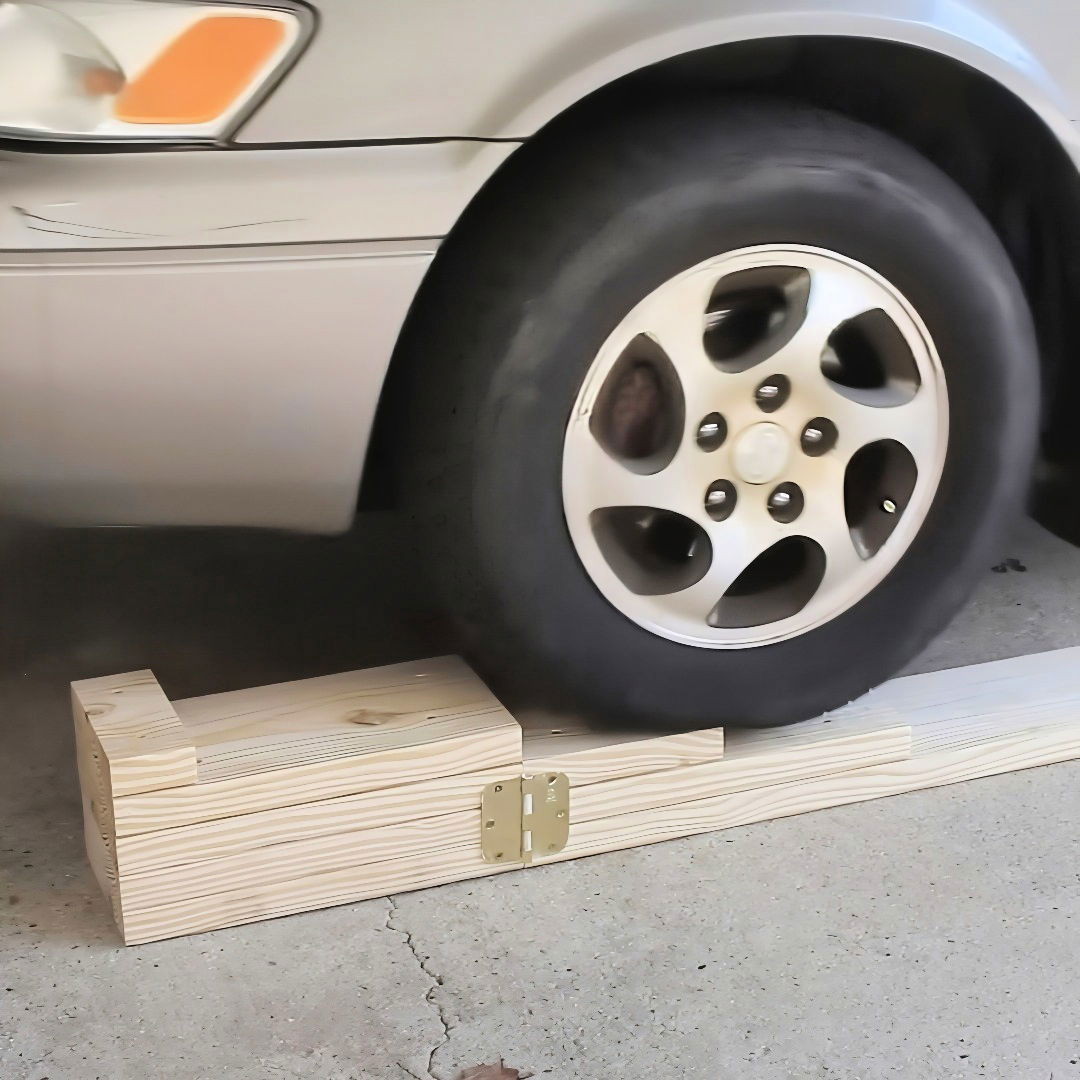
A few months ago, I came across the idea of building your own DIY car ramps. Inspired by that notion, I set off on a journey to build a versatile, cost-effective, and efficient car ramp. If you're anything like me and love a good DIY project, follow along as I walk you through my experience step-by-step.
Planning the Car Ramps: What I Needed to Achieve
Learn how to plan and design the ideal car ramp with the right materials, tools, and optional tips for optimal performance and safety.
Designing the Ideal Car Ramp
The first thing I determined was that my car ramp needed to accommodate a regular tire width while being strong enough to handle the car's weight. The design had to include a pivot mechanism to allow easier under-car access. And I wanted all of this under $20. This was my challenge.
Choosing the Right Materials
I chose to make the ramps out of wood. Wood is sturdy, readily available, and affordable. I opted for two 2x8x10 boards, which are seven and a quarter inches wide and one and a half inches thick. These boards are perfect for most vehicles because they only require a few layers to elevate a car enough to work comfortably underneath it.
Why Wood?
- Durability: Wood is incredibly durable and can handle substantial weight.
- Availability: Easily found at any hardware store.
- Cost-effective: Fits within a tight budget, making it perfect for projects under $20.
Tools I Used
I relied on a few essential tools to cut and assemble the wood:
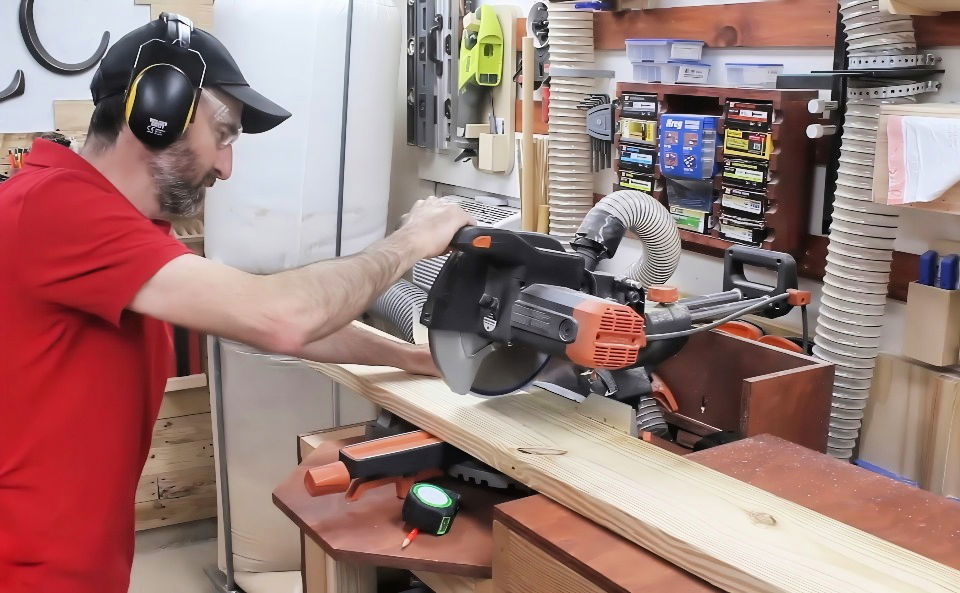
- Miter Saw: For accurate cuts.
- Circular Saw or Hand Saw: Alternatives if a miter saw isn't available.
- Drill: Necessary for securing the pieces.
- Screws: Two and a half-inch screws work best.
- Hammer: For making modifications.
- Clamps: Useful for keeping pieces stable.
Optional but Helpful
- A measuring tape: Ensures precise measurements for each cut.
- Safety glasses and gloves: Essential for protection during cutting and assembly.
Step by Step Instructions
Follow our detailed DIY car ramps guide with step-by-step instructions, from planning to final safety checks, ensuring your project is a success.
Cutting the Wood
Learn precise measurements and cuts with our cutting the wood guide. Master woodworking techniques effortlessly with expert tips!
Measurements and Cuts
Each board was cut into specific lengths:
- One piece at 28 inches
- One piece at 16 inches
- Four pieces at 15 inches
- One piece at 8 inches
- One piece at 3 inches
Important Tip: Ensure your cuts are as close to 90 degrees as possible for the best fit.
Building the Ramp Base
Learn how to build a sturdy ramp base, build layers, assemble the top layer, and test the assembly with our step-by-step guide.
Building the Layers
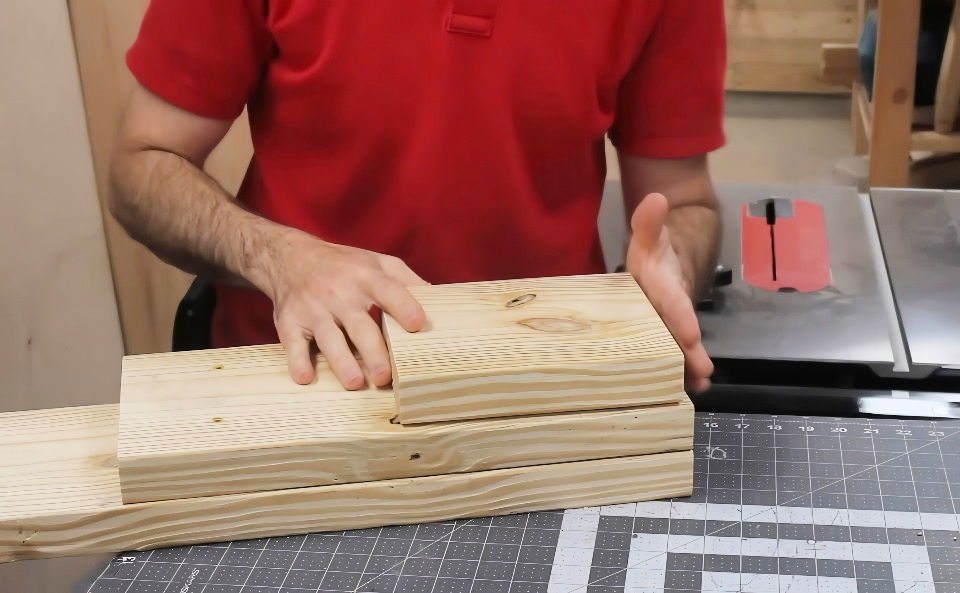
- Stack the 15-inch Pieces: I started by stacking two 15-inch pieces together, aligning them as perfectly square as possible. I used clamps to hold them in place and then secured them with screws.
- Add the 3-inch Piece: This piece goes on one end of the stacked 15-inch boards. Pre-drill holes to prevent splitting before screwing it into place.
Assembling the Top Layer
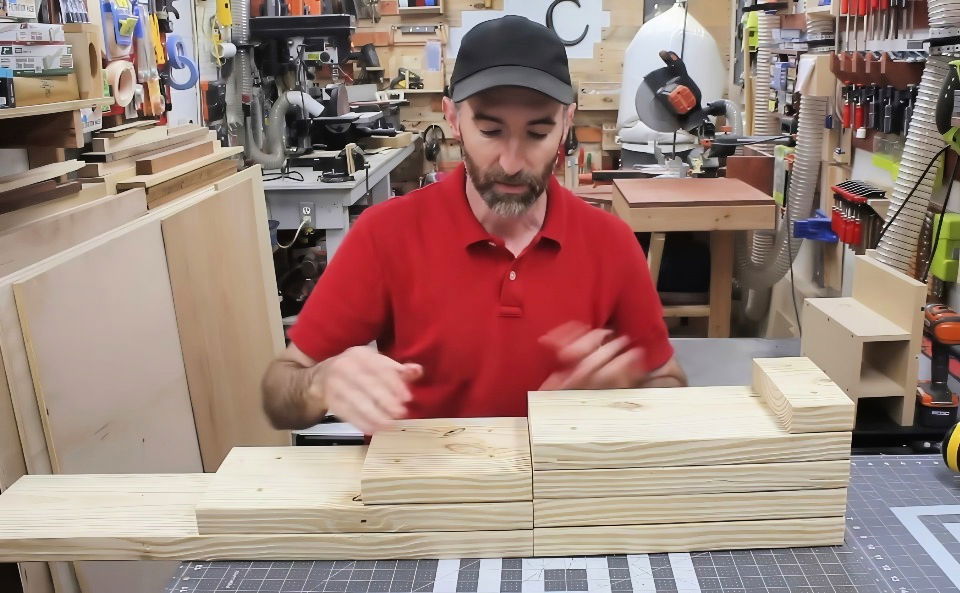
- Attach the 16-inch Board: Place this on the longest 28-inch board, aligning it to one side, and secure with screws.
- Add the 8-inch Board: This completes the setup, flush with the same end for a uniform shape.
Testing the Assembly
Before finalizing the design, I dry-fitted the pieces to ensure all layers aligned without large gaps. If errors occur, disassemble and realign as necessary.
Adding the Pivot Feature: Installing Hinges
Learn how to install hinges effectively, from sourcing and flattening to attaching, in our detailed guide on adding the pivot feature.
Sourcing Hinges
I found some old, functional door hinges at a local yard sale, which fit into my budget. You can source similar hinges from flea markets or hardware stores.
Flattening the Hinges
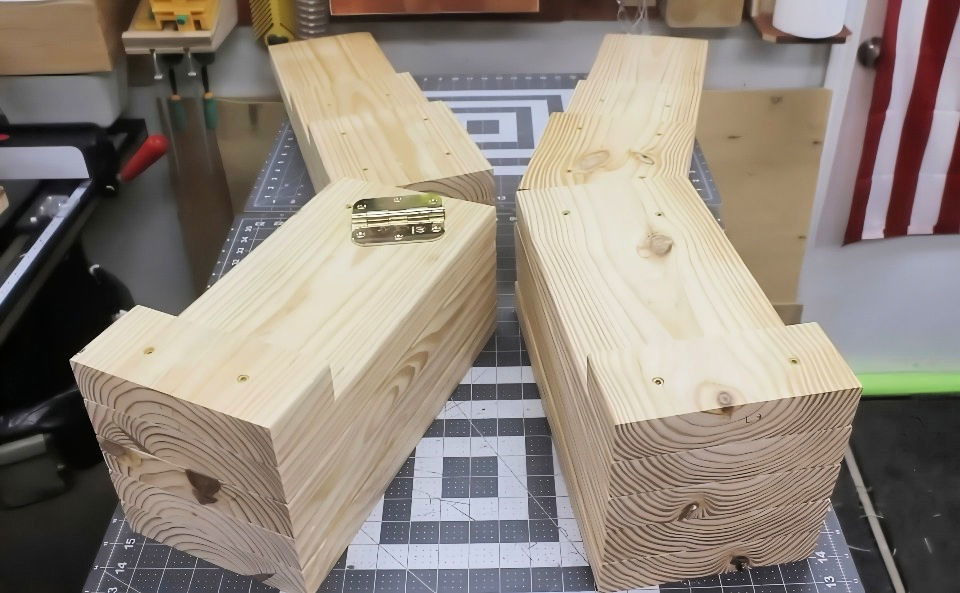
The hinges needed to be as flat as possible for a snug fit. I used a hammer and improvised anvil to hammer out any irregularities.
Attaching the Hinges
To prevent the ramps from moving while installing the hinges, I clamped everything together. If clamps aren't available, a ratchet strap or even a person's body weight can suffice. Each ramp pivoted outward, ensuring that one doesn't swing under the car—a crucial design consideration.
Final Touches: Safety Additions and Budget Check
Finalize your project with essential safety additions and a budget check. Learn about installing safety hooks and reviewing the final budget.
Final Budget Review
I kept my initial $20 budget in mind throughout the project:
- Wood: $16
- Hinges: $2 (purchased at a yard sale)
Installing Safety Hooks
With $2 left, I added safety hooks on the non-hinged sides of the ramps. These hooks keep the ramps together during movement and prevent the ramps from swinging apart unexpectedly.
Testing and Storing the Ramps
Learn expert tips on testing the ramps for safety and storing them effectively. Ensure longevity and performance with our practical guide.
Practical Testing
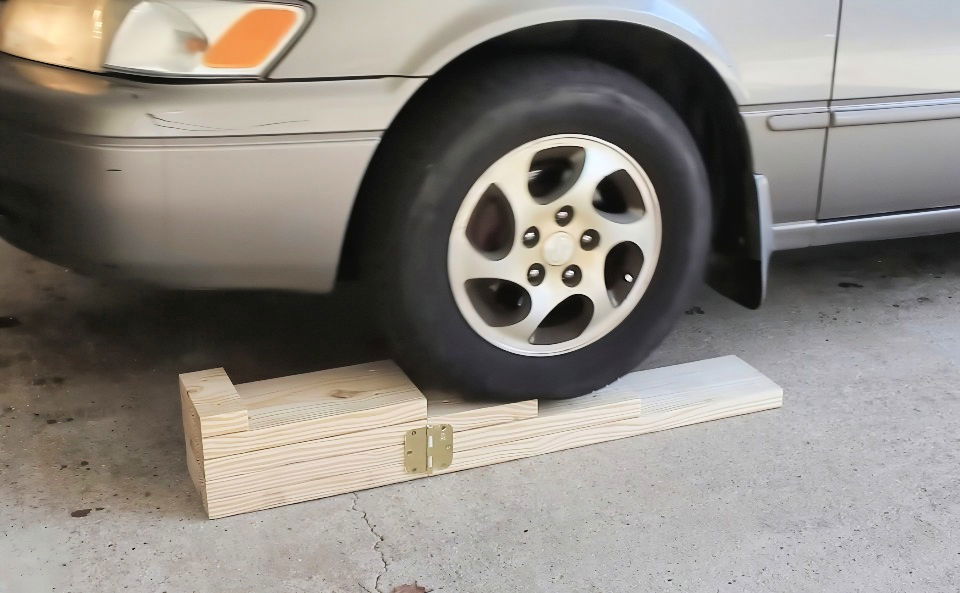
I ensured to test the ramps without a vehicle first, checking stability and functionality. Once satisfied, I cautiously drove my car up the ramps, with chocks placed behind the rear wheels as a precaution.
Storing the Ramps
The cut dimensions left a small scrap piece, which was intentional. This allowed the ramps to fold into a compact shape, making them easy to store without occupying too much space.
Customization Options
Learn the best customization options for ramps, including adjustable heights, portable vs. fixed designs, custom features, and expert tips for personalization.
Adjustable Heights
One of the key benefits of DIY car ramps is the ability to customize them to suit different vehicle heights. Here's how you can make your ramps adjustable:
- Design with Multiple Levels: Build ramps with multiple levels or steps. This allows you to choose the height that best suits your vehicle.
- Use Removable Blocks: Build removable blocks that can be added or removed to adjust the height. Ensure these blocks are securely fastened when in use.
- Telescoping Design: Consider a telescoping design where sections of the ramp can slide in and out to adjust the height. This requires precise measurements and sturdy materials to ensure safety.
Portable vs. Fixed Ramps
Depending on your needs, you might prefer portable ramps or fixed ramps. Here's a comparison to help you decide:
Portable Ramps
- Advantages: Easy to move: you can easily move portable ramps around your garage or take them with you. Space-saving: when not in use, you can store them away to save space.
- Disadvantages: Stability: they might not be as stable as fixed ramps, especially on uneven surfaces. Weight limit: portable ramps might have a lower weight limit compared to fixed ramps.
Fixed Ramps
- Advantages: Stability: fixed ramps are generally more stable and can handle heavier vehicles. Durability: they are often more durable since they are permanently installed.
- Disadvantages: Space: Fixed ramps take up permanent space in your garage. Flexibility: you can't move them around or take them with you.
Custom Features
To make your DIY car ramps even more useful, consider adding these custom features:
- Non-Slip Surface: Apply a non-slip coating or attach non-slip strips to the surface of the ramps. This will prevent your vehicle from slipping off.
- Handles: Add handles to the sides of portable ramps to make them easier to carry.
- Wheel Stops: Install wheel stops at the end of the ramps to prevent your vehicle from rolling off.
- Reflective Tape: Use reflective tape on the edges of the ramps to make them more visible in low light conditions.
Tips for Customization
- Measure Twice, Cut Once: Always double-check your measurements before cutting materials to ensure accuracy.
- Test for Stability: Before using your ramps, test them with a lighter load to ensure they are stable and secure.
- Consult Experts: If you're unsure about any aspect of the customization, consult with a professional or experienced DIYer.
Customizing your DIY car ramps tailors them to your needs, enhancing functionality, safety, and reliability for vehicle maintenance.
Common Mistakes and How to Avoid Them
Building and using DIY car ramps can be straightforward, but there are common mistakes that can compromise safety and functionality. Here's how to avoid them:
Incorrect Measurements
- Mistake: Using incorrect measurements can lead to ramps that are unstable or don't fit your vehicle properly.
- Solution: Always double-check your measurements before cutting any materials. Use a tape measure and ensure accuracy.
Using Weak Materials
- Mistake: Choosing materials that are not strong enough to support the weight of your vehicle can be dangerous.
- Solution: Use high-quality, sturdy materials like hardwood or heavy-duty metal. Check the weight capacity of the materials before purchasing.
Poor Construction Techniques
- Mistake: Improper assembly can result in weak joints and an unstable ramp.
- Solution: Follow a detailed construction guide and ensure all parts are securely fastened. Use screws and bolts rather than nails for added strength.
Ignoring Safety Features
- Mistake: Skipping safety features like non-slip surfaces or wheel stops can make the ramps hazardous to use.
- Solution: Always include safety features such as non-slip coatings, wheel stops, and reflective tape. These additions can prevent accidents and improve visibility.
Inadequate Testing
- Mistake: Not testing the ramps before using them with your vehicle can lead to unexpected failures.
- Solution: Test the ramps with a lighter load first to ensure they are stable and can handle the weight. Make any necessary adjustments before using them with your vehicle.
Improper Storage
- Mistake: Storing ramps in a damp or unprotected area can cause them to deteriorate over time.
- Solution: Store ramps in a dry, sheltered place. If possible, keep them off the ground to prevent moisture damage.
Overloading the Ramps
- Mistake: Using the ramps with a vehicle that exceeds their weight capacity can cause them to break.
- Solution: Check the weight capacity of your ramps and ensure your vehicle does not exceed this limit. If in doubt, build ramps with a higher weight capacity.
Ignoring Regular Maintenance
- Mistake: Failing to maintain the ramps can lead to wear and tear, making them unsafe over time.
- Solution: Regularly inspect your ramps for any signs of damage or wear. Tighten any loose bolts and replace any worn-out parts.
Improper Use
- Mistake: Using the ramps on uneven or unstable surfaces can cause them to tip over.
- Solution: Always use the ramps on a flat, stable surface. Avoid using them on slopes or soft ground.
Avoid these mistakes to ensure your DIY car ramps are safe and reliable, making vehicle maintenance easier and more efficient.
FAQs About DIY Car Ramps
Discover everything you need to know with our FAQs about DIY car ramps. Learn about materials, safety tips, and step-by-step guides!
Building your own car ramps comes with several advantages:
Cost savings: DIY ramps are generally cheaper than buying pre-made ones.
Customization: You can tailor the size and design to perfectly fit your vehicle and needs.
Skill development: It's a great way to learn basic carpentry and construction skills.
Satisfaction: There's a sense of accomplishment in making something useful with your own hands.
Consider these factors when deciding on the dimensions:
Vehicle ground clearance: Measure the lowest point of your car's undercarriage to ensure the ramps provide enough clearance.
Ramp angle: A safe angle is typically between 15 and 30 degrees. Steeper angles can be dangerous, especially for low-clearance vehicles.
Ramp width: Make sure the ramps are wide enough to accommodate your car's tires with some extra space on each side for safety.
Ramp length: The length depends on the desired height and angle. Longer ramps build a gentler slope, making it easier to drive up.
Safety is paramount when working with car ramps:
Use sturdy materials: Choose materials that can support the weight of your vehicle and any additional load.
Secure the ramps: Make sure the ramps are stable and won't slip or move while in use. Consider adding stops at the end to prevent the car from rolling off.
Use proper lifting techniques: If you need to lift heavy materials, use proper form to avoid injuries.
Wear protective gear: Gloves, safety glasses, and sturdy shoes are recommended.
Work with a partner: Having someone assist you can make the process safer and easier.
Never work under a car supported only by ramps: Always use jack stands for additional support.
Proper maintenance ensures the longevity and safety of your ramps:
Inspect regularly: Check for signs of wear and tear, such as cracks, splinters, or loose screws.
Repair or replace damaged parts: Address any issues promptly to prevent accidents.
Protect from the elements: Store the ramps in a dry place when not in use, or apply a weather-resistant coating to protect them from moisture and sun damage.
Clean regularly: Remove any dirt, debris, or oil that can make the ramps slippery.
Yes, DIY car ramps can be used for various maintenance tasks that require access to the underside of your vehicle, such as oil changes, filter replacements, or inspections. However, always prioritize safety by using jack stands for additional support and never working under a car supported only by ramps.
Conclusion: Efficient, Budget-Friendly Car Ramps
In less than a day and for under $20, I buildd a set of DIY car ramps that remarkably improved my car maintenance tasks. The hinge mechanism made maneuvering under the car much easier while maintaining the ramp's structural integrity. If you're considering a DIY project car ramp, I hope my detailed guide will prove helpful. I'd love to hear about any modifications or additional ideas you may have, so feel free to share.
Building this car ramp not only saved money but also provided a sense of accomplishment. Who knew a simple project could make such a difference?
Disclosure: This project was based on personal requirements and should be adapted to fit specific car weights and dimensions. Always prioritize safety and consult a professional if unsure about the materials and process.


