Learn how making your own DIY book covers can be a fun and personalized project. You'll find that designing a book cover lets you express your creativity while protecting and styling your books. From selecting the right materials to choosing designs, this guide will help you step by step.

The benefits of making your own DIY book covers go beyond aesthetics. A custom cover can protect your book from wear and tear, and it's also a great way to give old books a fresh look. You're not limited to just one design; you can make different styles for different books.
Ready to get started? Let's explore the next section and begin your free book cover design journey!
Step by Step Instructions
Learn how to make DIY book covers with step-by-step instructions. Gather materials, choose artwork, design with canva, and print your custom cover.
Step 1: Gather Your Materials
Before we start, let's gather everything we need. Here's the list of items and why you'll need them:
- Computer and Internet Access: Essential for accessing design tools and resources.
- Account on KDP (Kindle Direct Publishing): Necessary for uploading and printing your book cover.
- Book Information: You'll need your book's title, author name, and any other relevant information.
- Canva Account: This free design tool will be used to make your book cover.
- Photos or Artwork: Make sure they are legally permitted for use.
- Patience and Time: Designing a book cover is a meticulous task that requires patience.
Why These Materials?
- Computer and Internet Access: Almost all the tools and references are online.
- Account on KDP: Essential for publishing and making your book available for print.
- Book Information: Accurate details ensure your cover looks professional and contains all necessary information.
- Canva Account: User-friendly and accessible for everyone, even without professional design skills.
- Photos or Artwork: Quality images make your cover visually appealing.
- Patience and Time: Perfection takes time and several iterations.
Step 2: Choose Your Artwork
Discover the differences between public domain vs. paid images and explore canva's extensive image library for your next project.
Public Domain vs. Paid Images
When choosing artwork, it's crucial to ensure that you have the legal right to use it:
- Public Domain Images: These are free to use for any purpose.
- Paid Images: Websites like Shutterstock or Adobe Stock offer high-quality images for a fee.
Canva's Image Library
Canva offers a significant advantage with its built-in library of images, most of which come with the necessary usage rights. This allows for an efficient and worry-free selection of visuals.
- Tip: Avoid using images from Pinterest due to potential copyright issues.

Step 3: Design the Front Cover Using Canva
Learn how to design the perfect front cover using canva. Set up your canva project and customize your cover with our step-by-step guide.
Set Up Your Canva Project
- Choose Book Cover Template: Start a new project in Canva and select the "Book Cover" template to get the correct dimensions.
- Upload Artwork or Use Canva's Library: Import your chosen artwork or use Canva's built-in images.
Customizing Your Cover
- Add Title and Author Name: Ensure the title is prominent and easy to read. Similarly, your author name should be visible but not overshadowing the title.
- Tagline (Optional): A short line that can intrigue potential readers.
- Experiment with Fonts: Choose fonts that are readable and match the genre of your book.
- Pro Tip: Follow the 80/20 Rule. Make sure 80% of the cover is a dominant color (dark or light) and the remaining 20% the contrasting color.

Step 4: Make the Full Wrap (Spine and Back Cover)
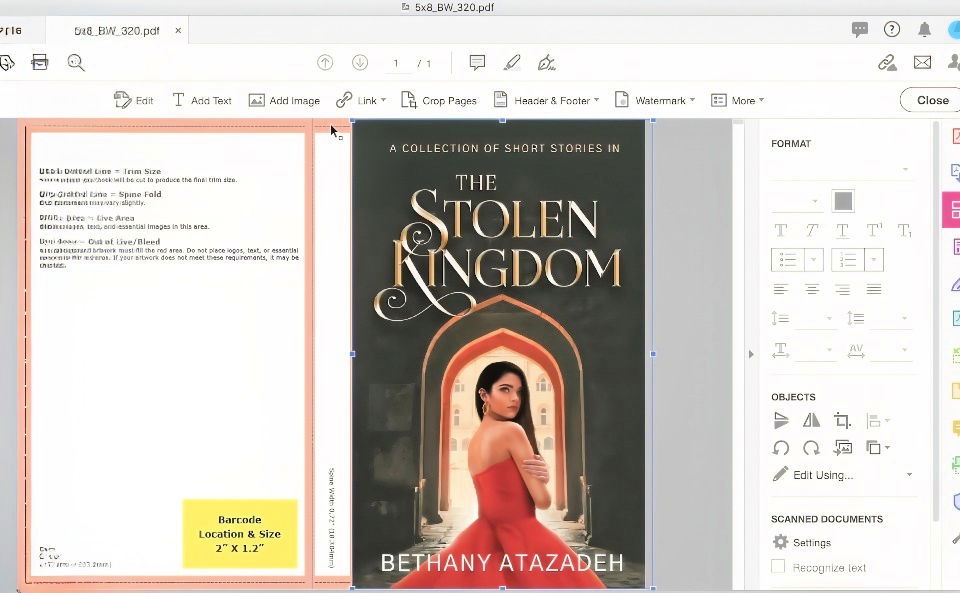
If your book is going to be printed as a paperback, you'll need to make a full wrap around it which includes the spine and back cover.
Using KDP Cover Creator
- Input Book Details in KDP: Enter your book size, page count, and paper type.
- Download Template: KDP provides a template based on your book's specifications.
Designing the Spine and Back
- Align Front, Spine, and Back in Canva: Utilize Canva to ensure all parts of the cover align correctly according to the template.
- Add ISBN and Barcode Area: Ensure there's space for the ISBN and the barcode.
Detailed Designing
Overlay templates from KDP onto your Canva project. Adjust the artwork to fit within the dotted lines, ensuring vital elements aren't cut off.
- Tip: Make three separate images for the front, spine, and back, and overlay them later to ensure precision.
Upload and Test on KDP
- Download Final Design from Canva: Save it in high resolution, preferably in PNG format for quality.
- Upload to KDP: Follow KDP's instructions to upload and review the cover.

Step 5: Print and Review
Having designed your cover, it's time to print and review!
Options for Printing:
- KDP: Use KDP's printing service.
- IngramSpark: Another popular option for authors.
- Barnes & Noble Press: A good alternative for quality prints.
Review Your Proof Copy
Print a proof copy to review:
- Check for Errors: Look for any spelling mistakes, alignment issues, or colors that don't print correctly.
- Make Adjustments: Return to Canva to tweak your design if necessary.
Customization Tips for DIY Book Covers
Making a DIY book cover is not just about protecting your book; it's an opportunity to express your creativity and give your book a personal touch. Here are some tips to help you customize your book covers:
- Choose a Theme: Start by selecting a theme that resonates with the content of the book or your personal interests. It could be vintage, modern, minimalist, or colorful.
- Personal Artwork: If you're artistically inclined, consider drawing or painting directly on the cover. Use stencils or stamps for a more uniform design if freehand isn't your style.
- Fabric Covers: For a tactile feel, use fabric scraps to make a cover. Fabrics like cotton, linen, or even old clothing can be repurposed for this.
- Add Textures: Introduce different textures using materials like lace, buttons, or ribbons. These can add depth and interest to your book cover.
- Photo Collage: Make a collage with personal photos or images that inspire you. Print them out and arrange them on your cover, securing them with clear adhesive.
- Decoupage Technique: Use the decoupage method to apply paper cut-outs from magazines, wrapping paper, or printed patterns onto your cover with glue.
- Embossing and Debossing: Add a professional touch with embossing or debossing, making raised or recessed designs on the cover.
- Protective Layer: Consider adding a clear protective layer, like contact paper, over your cover to ensure durability and longevity.
- Reuse and Recycle: Look for materials around your home that can be upcycled into unique book covers. Old maps, posters, or even wallpaper samples can be great options.
- Keep It Simple: Sometimes, less is more. A simple design can be just as effective and elegant as a complex one.
The key to a great DIY book cover is making it your own. Have fun with the process, and don't be afraid to experiment with different materials and techniques.

Troubleshooting Common Issues in DIY Book Covers
When crafting your own book covers, you might encounter a few hiccups along the way. Here's a guide to overcoming some common issues with practical solutions:
Wrinkles or Bubbles Under the Cover
- Solution: If you're using adhesive paper or fabric and notice wrinkles or bubbles, gently peel back the material to the nearest edge. Use a flat tool, like a ruler or a credit card, to smooth out the material as you reapply it.
Cover Not Staying On
- Solution: Ensure you're using the right kind of glue for your materials. For paper, a glue stick or PVA glue works well. For fabric, consider fabric glue or double-sided tape. If the cover still won't stick, try adding more adhesive or using binder clips to hold the cover in place while the glue dries.
Fading Colors
- Solution: If you've added artwork or photos to your cover, they may fade over time. To prevent this, use UV-resistant clear spray or a laminate to protect against sunlight and wear.
Misaligned Design
- Solution: Before committing to your design, measure your book and make a template. Use light pencil marks to guide your placement. If you make a mistake, most adhesives will allow some repositioning if corrected quickly.
Material Fraying
- Solution: If you're using fabric or paper that frays, seal the edges with clear nail polish or a thin layer of glue. For fabric, you can also sew a simple stitch around the edge for a finished look.
Too Thick or Rigid
- Solution: Some materials may make the cover too thick or rigid, making it hard to open the book. Opt for thinner materials, or consider only covering a portion of the book for ease of use.
Design Doesn't Look Professional
- Solution: Use tools like rulers, compasses, and templates to ensure straight lines and symmetrical patterns. Take your time with each step, and don't rush the process.
Difficulty in Choosing Materials
- Solution: Test small samples of materials on a dummy book or a piece of cardboard. This will help you see how the material handles and looks when applied as a cover.
By anticipating these issues and knowing how to handle them, you'll be better prepared to make beautiful, durable DIY book covers.
FAQs About DIY Book Covers
Learn everything about DIY book covers with our comprehensive FAQs. Discover tips and answers for your perfect homemade book cover project!
First, measure the height of your book and add a few centimeters to allow for folding over the top and bottom edges. Then, measure the width of the front and back covers, plus the spine, adding extra width for the flaps that tuck into the covers. Cut out the rectangle based on these measurements.
Yes! You can use the dust jacket that comes with many hardcover books. Simply remove it, turn it inside out if the interior is white or a color that suits your decor, and place it back on the book. This method requires no cutting or gluing and gives your books a clean, uniform look.
Certainly! If you’re using paper, you can age it by lightly staining it with tea or coffee for an antique effect. Be creative with materials—old newspapers or music sheets can also give a vintage vibe. Remember, the goal is to reflect your personal style.
Personalization can be as simple as hand-lettering the book titles on the spine or making custom labels. If you're artistically inclined, you can draw or paint on the covers. Stamps, stickers, or printed images can also add a unique touch to your book covers.
To ensure your DIY book covers last longer, consider:
Laminating: If you're using paper, laminating the covers can protect them from spills and tears.
Contact Paper: Clear adhesive contact paper is an alternative to lamination and provides a durable protective layer.
Reinforcement: Use clear tape to reinforce the corners and edges of the book cover, which are prone to wear.
Quality Materials: Choose thicker, high-quality paper or fabric that can withstand frequent handling.
Final Thoughts
Making a DIY book cover is an iterative process that involves creativity and patience. It's rewarding and offers you complete control over your book's appearance. Remember, practice makes perfect. If you're planning to do this regularly, investing in professional tools or even hiring a cover designer might be worthwhile.


