Pop filters are essential accessories for recording studios, podcasters, and anyone interested in capturing clear and professional audio. They serve a simple yet vital purpose: to filter out unwanted sounds known as ‘plosives.' These are the harsh sounds that occur when pronouncing letters like ‘P' and ‘B.' Without a pop filter, these sounds can build a popping effect that distorts the audio quality.
Why Use a Pop Filter?
A pop filter is placed between the microphone and the speaker to catch the blast of air that comes from pronouncing plosive sounds. This blast can overload the microphone's diaphragm, causing a pop in the recording. By using a pop filter, you can significantly reduce or eliminate these unwanted noises, resulting in a cleaner and more professional recording.
The Simple Science Behind It
When you speak, certain consonants produce a burst of air. This is especially true for plosive sounds, where the mouth builds up air pressure and releases it quickly. A pop filter acts as a barrier that disperses the air pressure, allowing only the sound waves to pass through to the microphone.
Choosing the Right Pop Filter
There are various types of pop filters available, from metal to nylon mesh. Each has its own characteristics, but all aim to achieve the same goal. When selecting a pop filter, consider the following:
- Durability: A sturdy frame and robust material will ensure your pop filter lasts through many recording sessions.
- Flexibility: An adjustable arm or gooseneck will help you position the filter perfectly in front of the microphone.
- Filtering Quality: Look for a filter that effectively disperses air without altering the sound of your voice.
DIY Pop Filters
For those on a budget or looking for a custom solution, making a DIY pop filter is a practical option. With some basic materials like pantyhose and a wire hanger, you can construct a functional pop filter. The key is to ensure it's securely mounted and positioned correctly to protect your recordings from plosives.
Using a pop filter in your recording setup greatly improves audio quality. Whether professional or homemade, it helps capture clear sound without plosive distortion. Understanding their importance aids in achieving pristine recordings.
Materials Needed and Their Importance
- Plastic Container: Acts as the frame for the pop filter. I used an old food container.
- Cutter Knife & Scissors: For cutting the plastic and trimming.
- Hot Glue Gun: To secure the parts together.
- Roll of Chicken Wire: Provides a structure to attach the filtering material.
- Aquarium Tubing: Used for attaching the filter to the microphone stand.
- Spandex or Women's Stockings: Acts as the actual filtering material.
- Superglue: For additional reinforcement.
- Spray Paint (Optional): To give the filter a professional, finished look.
Each material plays a pivotal role in the construction and functionality of the pop filter, from providing structure to ensuring the filter material stays taut.
Step by Step Instructions
Learn how to make a DIY pop filter with our step-by-step guide. Perfect for improving your audio quality, from frame prep to final touches.
Preparing the Frame
I started by taking the plastic container and carefully cutting out the circular surface of the lid with a cutter knife. This step required patience to make it look professional. Any rough edges left from cutting were smoothed out with a file.
Painting the Frame
To give my pop filter a sleek finish, I decided to spray paint the frame black. I secured it with tape to prevent it from moving while I applied the paint evenly. After letting it dry under the sun, I had a professional-looking frame ready for assembly.
Attaching the Filtering Material
Next came the most challenging part: attaching the spandex. This is where the women's stockings came into play. Stretching the material over the frame to ensure it was wrinkle-free was tricky, but I managed by creatively using my hands and feet. After snapping the two plastic pieces together, I secured them with super glue and waited for it to bond.
Setting up the Structure
For added stability and shape, I cut a small piece of chicken wire, shaped it to match the curve of my plastic frame, and inserted it between the two plastic pieces. A generous amount of hot glue ensured it stayed in place.
Final Touches
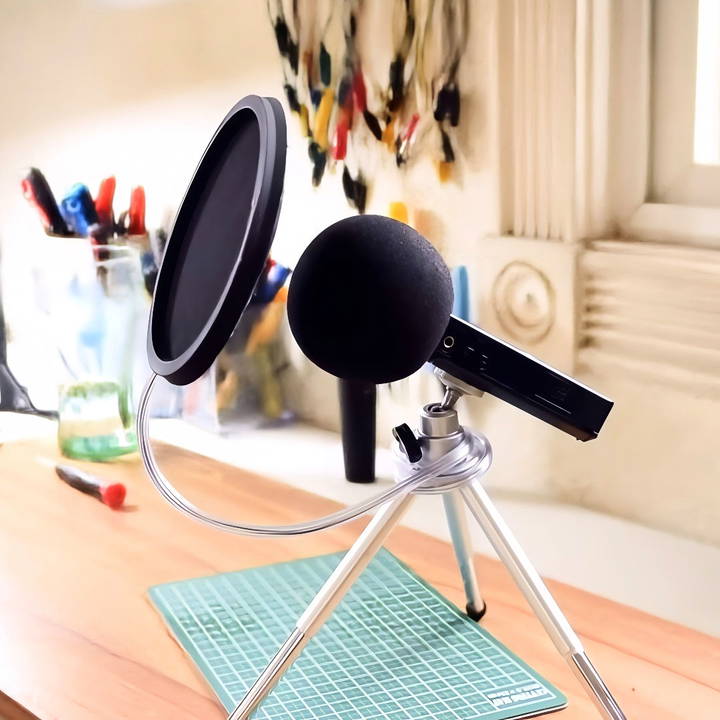
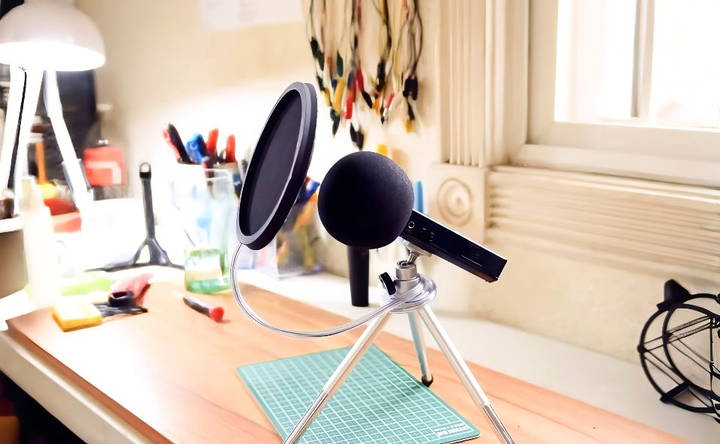
Aquarium tubing was used to build a flexible arm for attaching the filter to the microphone stand. Cutting one end of the tubing and fitting it over the chicken wire gave me the perfect setup to easily adjust my pop filter as needed.
The Results
After wrapping the aquarium tubing around my microphone's tripod, my DIY pop filter was complete. The difference in audio quality was night and day. No more popping sounds when pronouncing plosives, just crisp, clear audio.
This project not only saved me money but also gave me a sense of accomplishment. It's amazing what you can achieve with a bit of creativity and some household items.
Comparison of DIY Pop Filters vs. Professional Pop Filters
Pop filters are crucial for clear audio by eliminating plosive 'pop' sounds. Choosing between DIY and professional filters might be tough. Let's compare them.
DIY Pop Filters: The Creative Solution
DIY pop filters are a testament to ingenuity and resourcefulness. They are typically made from materials you can find around the house, such as pantyhose stretched over a wire hanger or a piece of foam. The advantages of DIY pop filters include:
- Cost-Effectiveness: They are much cheaper than professional pop filters, often costing next to nothing.
- Customizability: You can build a pop filter that fits your specific needs and preferences.
- Satisfaction: There's a sense of accomplishment in making something functional with your own hands.
However, DIY pop filters also have their drawbacks
- Variable Quality: The effectiveness can vary greatly depending on how they are made.
- Durability: They may not last as long as a professionally made filter.
- Aesthetics: They might not look as sleek or professional as store-bought options.
Professional Pop Filters: The Reliable Choice
Professional pop filters are designed with performance and durability in mind. They are made from high-quality materials and are built to last. The benefits of professional pop filters include:
- Consistent Quality: They are designed to provide reliable and effective plosive filtering.
- Longevity: Made with durable materials, they are likely to last through many recording sessions.
- Professional Look: They can give your recording setup a more polished appearance.
On the flip side, professional pop filters can be
- More Expensive: They are an investment compared to the minimal cost of a DIY version.
- Less Flexible: You're limited to the designs available on the market.
Making the Right Choice
The decision between a DIY or professional pop filter comes down to your needs, budget, and preferences. If you're just starting out or need a quick solution, a DIY pop filter can be a great choice. For those looking for a long-term solution with consistent performance, a professional pop filter might be the way to go.
DIY and professional pop filters each have their role in audio recording. Evaluate the pros and cons to pick the best option for clear, professional sound.
Innovative DIY Pop Filter Designs
Building a DIY pop filter can be a fun and rewarding project. Not only does it save you money, but it also allows you to tailor the filter to your specific needs. Here are some innovative designs that you can try at home using simple materials that are easy to find.
The Embroidery Hoop Silk Pop Filter
Materials: Embroidery hoop, silk or thin fabric, rubber band.
- Stretch the silk or thin fabric tightly across the embroidery hoop.
- Secure the fabric in place by tightening the hoop.
- Attach the hoop to your mic stand with a rubber band for easy adjustment.
The Metal Mesh Strainer Filter
Materials: Metal mesh strainer, handle, tape or clamp.
- Remove the handle from the metal strainer.
- Place the strainer in front of your microphone.
- Use tape or a clamp to attach it securely to the mic stand.
The Foam Windscreen Pop Filter
Materials: Foam ball, knife, elastic band.
- Cut a hole in the foam ball just big enough to fit your microphone.
- Slip the foam ball over the microphone.
- Use an elastic band to secure it if necessary.
The Sock Pop Filter
Materials: A clean sock, wire hanger, tape.
- Bend the wire hanger into a circle.
- Stretch the sock over the wire circle.
- Tape the sock-covered wire to your mic stand.
The Pantyhose Pop Filter
Materials: Pantyhose, wire hanger, tape.
- Cut a section of pantyhose to cover the wire hanger frame.
- Stretch the pantyhose over the frame and tape it to secure.
- Attach the frame to your mic stand with tape or a clamp.
Tips for DIY Pop Filter Success
- Test Different Materials: Some materials may work better than others for your specific setup.
- Ensure Tightness: The material should be stretched tight for the best sound quality.
- Position Correctly: Place the pop filter a few inches from the microphone for optimal performance.
Experiment with materials and shapes to find the best DIY pop filter design. Aim to reduce plosives and maintain voice clarity. Get professional audio without spending much.
Troubleshooting Common DIY Pop Filter Issues
When you embark on the journey of making a DIY pop filter, you might encounter a few hiccups along the way. Here's a guide to help you troubleshoot common issues, ensuring that your pop filter performs at its best.
Ineffective Plosive Sound Reduction
If your pop filter isn't reducing plosive sounds as expected, consider the following:
- Check the Material: Ensure the fabric is tightly stretched and dense enough to diffuse the air from plosives.
- Adjust the Distance: The pop filter should be about 2-3 inches away from the microphone for optimal performance.
Pop Filter Keeps Falling Off
A pop filter that won't stay in place can be frustrating. To fix this:
- Secure the Attachment: Use stronger clamps or more durable tape to attach the pop filter to the mic stand.
- Reinforce the Frame: If you're using a wire frame, make sure it's bent into a sturdy shape that can support the fabric's tension.
Muffled Sound Quality
Sometimes, a DIY pop filter can cause the sound to become muffled. If this happens:
- Examine the Fabric: Use a thinner or more acoustically transparent material that doesn't dampen high frequencies.
- Reposition the Filter: Move the pop filter slightly further from the mic to allow a clearer sound path.
Pop Filter Resonance
An unwanted resonance or vibration can occur with some DIY designs. To address this:
- Stabilize the Structure: Ensure all parts of the pop filter are tightly secured to prevent vibrations.
- Add Dampening: Attach small pieces of foam or rubber where the pop filter connects to the stand to absorb vibrations.
Aesthetic Concerns
While function is crucial, you might also want your pop filter to look good. For a more professional appearance:
- Neaten the Design: Trim any excess material and use neat, even lines when cutting and attaching your fabric.
- Choose Appealing Materials: Select fabrics and frames that not only work well but also have a pleasing texture or color.
Make a DIY pop filter easily with these tips to ensure it works well and fits into your setup. Aim for clear audio without plosives; a bit of tweaking will help.
Maintaining and Cleaning Your DIY Pop Filter
A DIY pop filter is a great addition to your recording setup, but like any equipment, it requires regular maintenance to function effectively. Here's how you can keep your pop filter in top condition, ensuring it continues to provide clear sound without any hygiene concerns.
Routine Maintenance
- Inspect Regularly: Before and after each use, check your pop filter for any signs of wear or damage. Look for holes in the fabric or loose parts that may need repair.
- Gentle Cleaning: Use a soft, dry brush or cloth to remove any dust or particles from the surface of your pop filter. Avoid using water or cleaning solutions unless the material is waterproof and can be dried completely.
Deep Cleaning
- Fabric Pop Filters: If your pop filter is made from fabric, such as pantyhose or a sock, it can be carefully hand-washed with mild soap and warm water. Rinse thoroughly and allow it to air dry completely before using it again.
- Metal or Plastic Pop Filters: For pop filters made from non-fabric materials, use a slightly damp cloth with a bit of soap to wipe down the surface. Be sure to dry it fully to prevent any moisture damage.
Storage
- Proper Storage: When not in use, store your pop filter in a clean, dry place. If possible, keep it in a case or bag to protect it from dust.
- Avoid Sunlight: Direct sunlight can degrade some materials over time. Store your pop filter away from windows or areas where it would be exposed to direct sunlight.
Handling
- Careful Handling: Always handle your pop filter with care. Avoid stretching the fabric or bending the frame unnecessarily.
- Adjustments: When adjusting the position of your pop filter, be gentle. Forcing it into position can cause damage to both the pop filter and the microphone stand.
Replacement
- Material Fatigue: Over time, materials like fabric can stretch out or become less effective at stopping plosives. If you notice a decline in performance, it might be time to replace the fabric or the entire pop filter.
- Upgrades: As you continue to use and maintain your DIY pop filter, you might find ways to improve its design. Don't hesitate to make upgrades that could enhance its functionality or durability.
Maintain your DIY pop filter regularly to ensure it stays reliable and extends its life, keeping your audio quality high. A clean pop filter is essential for capturing the best sound.
FAQs About DIY Pop Filter
Discover the most common FAQs about DIY pop filter, including materials, construction steps, and usage tips to improve your recording quality.
A pop filter is a screen that you place between your microphone and your mouth when recording audio. It helps to reduce or eliminate ‘popping’ sounds caused by the fast-moving air from plosives, like the sounds of ‘P’ and ‘B’. This makes your recording clearer and more professional.
Yes, homemade pop filters can be quite effective. While they may not have the same durability as professional ones, they can still significantly reduce unwanted noises in your recordings. Just make sure the material is stretched tightly and positioned correctly in front of the mic.
There are several ways to attach your DIY pop filter. You can use clamps, tape, or even build a hook with the wire hanger to hang it from the stand. The goal is to have the pop filter stable and positioned about an inch or two from the microphone.
To prevent your homemade pop filter from muffling the sound, choose a material that is thin and acoustically transparent. Make sure it’s stretched tightly across the frame without any wrinkles. Test the filter by recording and listening to the playback to ensure your voice sounds clear and natural.
Common mistakes include using material that's too thick, not securing the filter firmly to the stand, or placing it too close or too far from the microphone. Ensure the material is thin enough to allow sound through clearly, secure the filter so it doesn't move, and position it about 2 inches from the mic for the best results.
Final Thoughts
In conclusion, making a DIY pop filter is a simple and effective way to enhance your audio recordings. With just a few materials and easy steps, you can significantly reduce unwanted popping sounds. Enjoy your newfound audio clarity!


