Building a DIY picture ledge is a great way to showcase your favorite photos and artwork while adding style to your space. This step-by-step guide will walk you through the materials and tools you need to build a sturdy and attractive ledge. You'll find helpful tips along the way to ensure your project is both enjoyable and successful. Let's get started on how to make a picture ledge that reflects your personal taste.

In this guide, we'll cover everything from selecting the right wood to the best methods for installation. Detailed instructions will make it easy for you to follow along, even if you're new to crafting. By the end, you'll have a beautiful display of your cherished memories. Continue reading to learn how to make your own DIY picture ledge and enhance your home decor.
Step by Step Instructions
Learn how to build shelves with our step-by-step instructions. From gathering materials to installation and styling, follow these easy DIY steps.
Step 1: Gather Your Materials
Learn why each material is needed when you gather your materials for your project. Step-by-step guidance for success.
Why Each Material is Needed:
- Poplar Wood: Chosen for its smooth grain and sturdy nature, poplar wood serves as the backbone of our picture ledges.
- Wood Glue & Nail Gun: Essential for assembling the shelves securely.
- Stain and Spar Urethane: To give the shelves a finished look and protect them from wear and tear.
- Wood Putty: To seamlessly fill in the nail holes for a smooth finish.
- Saw & Sandpaper: For cutting the wood to size and smoothing out any rough edges.
Step 2: Measure and Cut
I began by measuring the wall space to determine the length of the shelves. I decided on a 60-inch length, providing ample room for a variety of frames but cut my initial pieces to 61 inches to ensure precision in the final dimensions. Using a table saw, I cut the poplar board into three pieces per shelf: two inches, three inches, and four and a half inches in width.
Step 3: Assemble the Shelves
Assembly was straightforward. I first glued and nailed the three-inch and four-and-a-half-inch boards together, ensuring they were flush and secure. The two-inch piece was then attached to the front, making the ledge. This process was repeated for each shelf, highlighting the simplicity of the design while promising sturdy support for our treasured memories.
Step 4: Sanding and Staining
Patience was key during the sanding and staining process. After filling any nail holes with wood putty and ensuring a smooth surface, I chose an Early American stain for its warmth and versatility. The spar urethane coating followed, providing a durable finish that would protect the wood for years to come.
Step 5: Installation
Ensuring the shelves were securely fastened to the wall was paramount, especially since they would hold precious family memories. Locating the wall studs, I secured each shelf, confident in their ability to withstand the weight of the frames.
Step 6: Styling the Shelves
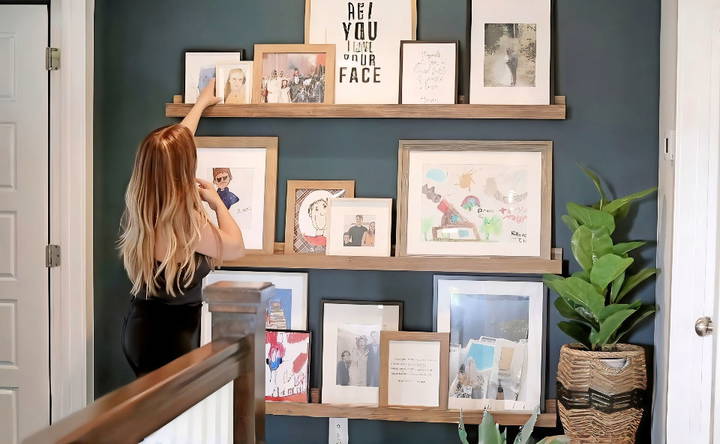
The final and most enjoyable step was styling the shelves. With a plethora of family photos, children's artwork, and meaningful trinkets at our disposal, my partner and I took to arranging—and rearranging—until we found the perfect composition. The beauty of picture ledges became evident; their versatility allowed for an ever-evolving display reflective of our family's growth and change.
The Result: A Wall of Memories
Standing back and admiring our handiwork, the transformation was remarkable. What was once a bare wall had become a vibrant canvas showcasing our family's journey. Beyond the aesthetic appeal, the project brought a sense of accomplishment, personalization, and financial savings—building the shelves ourselves significantly cut costs, allowing for a Pottery Barn look without the hefty price tag.
Customization Ideas for Your DIY Picture Ledge
Building a picture ledge is a fantastic way to display your favorite photos, artwork, and mementos. To make your picture ledge truly unique, consider these customization ideas:
1. Color and Finish:
- Stain or Paint: Customize the wood by staining it in various shades or painting it to match your home decor. Dark stains can build an elegant, timeless look, while lighter colors add a modern touch.
- Distressing: If you love rustic or vintage aesthetics, distress the wood by sanding the edges or using a hammer to build small dents. This adds character and charm.
2. Edge Details:
- Decorative Molding: Enhance the appearance of your picture ledge by adding decorative molding or trim to the front edge. Crown molding, beadboard, or routed edges can elevate the design.
- Rounded or Beveled Edges: Experiment with different edge profiles. Rounded edges build a softer look, while beveled edges add a contemporary feel.
3. Length and Depth:
- Vary the Length: Instead of sticking to a standard length, customize your ledge to fit your space. Longer ledges can accommodate more frames, while shorter ones work well in cozy corners.
- Adjust Depth: Consider how deep you want the ledge to be. A deeper ledge allows for layering frames or displaying small decor items alongside photos.
4. Hardware and Mounting:
- Hidden Brackets: For a clean, floating appearance, use hidden brackets or cleats to secure the ledge to the wall. This minimalist approach emphasizes the display rather than the hardware.
- Visible Supports: Alternatively, embrace visible brackets or decorative metal supports. These can become part of the design, especially if you choose ornate or industrial-style brackets.
5. Personal Touches:
- Quotes or Sayings: Engrave or stencil meaningful quotes, family names, or special dates onto the ledge. It adds a personal touch and makes the ledge more than just a display surface.
- Photo Backdrops: Attach fabric, wallpaper, or patterned paper to the back of the ledge. When frames are spaced apart, the backdrop becomes a subtle accent.
6. Seasonal Themes:
- Switch It Up: Change the decor on your ledge with the seasons. During spring, display floral prints or pastel artwork. In fall, showcase autumnal colors and leaf motifs.
- Holiday Displays: Swap out frames for holiday-themed items during festive times. Halloween photos, Christmas cards, or Valentine's Day art can add warmth and cheer.
The beauty of a DIY picture ledge lies in its versatility. Feel free to experiment, adapt, and make it uniquely yours!
Floating vs. Traditional Picture Ledges: Which Is Right for You?
When it comes to displaying your cherished photos and artwork, picture ledges offer a versatile and stylish solution. But should you go for a floating design or stick with the traditional approach? Let's explore the differences and help you decide:
1. Floating Picture Ledges: Sleek and Minimalist
Discover sleek and minimalist floating picture ledges. Learn the advantages and key considerations for perfect wall displays.
What Are Floating Picture Ledges?
- Floating ledges are designed to appear as if they're magically suspended on the wall without visible brackets or supports.
- The hardware is hidden, making a clean, streamlined look.
Advantages:
- Aesthetic Appeal: Floating ledges emphasize the display itself, allowing your frames and art to take center stage.
- Space-Saving: Since there are no visible brackets, they occupy less visual space and work well in small rooms.
- Modern Vibes: Floating ledges suit contemporary and minimalist interiors.
Considerations:
- Installation: Proper installation is crucial. Hidden brackets or cleats must be securely attached to the wall.
- Weight Limit: Floating ledges can hold a decent amount of weight, but consider the load carefully.
2. Traditional Picture Ledges: Classic and Sturdy
Find classic and sturdy traditional picture ledges, ideal for showcasing your favorite photos with timeless elegance. A perfect blend of style and durability.
What Are Traditional Picture Ledges?
- Traditional ledges use visible brackets or supports to hold the shelf in place.
- These brackets can be decorative or functional, adding to the overall design.
Advantages:
- Robust Support: Traditional ledges can handle heavier loads, making them suitable for larger frames or multiple items.
- Versatility: You can find a wide variety of decorative brackets to match your style.
- Easy Installation: Mounting traditional ledges is straightforward.
Considerations:
- Bracket Visibility: Some people appreciate the decorative aspect of visible brackets, while others find them distracting.
- Visual Impact: Traditional ledges may appear bulkier due to the brackets.
Which Should You Choose?
- Floating Ledges: Opt for floating ledges if you love a clean, modern look and want your frames to appear as if they're magically floating on the wall. Ensure proper installation for stability.
- Traditional Ledges: Choose traditional ledges if you prioritize sturdiness, have heavier frames or decor items, and don't mind visible brackets. They offer a classic touch.
Both styles have charm. Consider your taste, frame weight, and space aesthetic. Either choice adds character and warmth to your home!
Seasonal Decor Swaps for Your Picture Ledge
Refreshing your home decor with the changing seasons can bring new energy and joy into your space. Your DIY picture ledge is the perfect place to start. Here's how you can swap out decorations to reflect the beauty of each season:
Spring Refresh:
- Floral Frames: Replace images with photos of blooming flowers or pastel-colored artwork.
- Nature's Touch: Incorporate small vases with fresh spring flowers or faux greenery.
Summer Vibes:
- Beachy Scenes: Display pictures from beach vacations or ocean-inspired art.
- Bright Colors: Add items in vibrant colors like turquoise, coral, or sunny yellow.
Autumn Warmth:
- Fall Foliage: Showcase photos with autumn leaves or artwork featuring warm, earthy tones.
- Pumpkin Spice: Introduce small decorative pumpkins or cinnamon stick bundles.
Winter Wonderland:
- Cozy Moments: Use images of cozy indoor scenes, snow landscapes, or winter activities.
- Holiday Cheer: Rotate in holiday cards, festive ornaments, or string lights for a twinkling effect.
Tips for Easy Swaps:
- Keep It Simple: Use frames that make it easy to change photos without much hassle.
- Versatile Backdrops: Choose neutral-colored walls behind the ledge so any seasonal decor fits right in.
- Storage Solutions: Have a dedicated space to store off-season items neatly until their time comes around again.
By following these ideas, you can keep your picture ledge looking fresh and timely all year round.
FAQs About DIY Picture Ledge
Discover answers to common questions about DIY picture ledges, including materials, tools, and installation tips to enhance your decor skills.
First, decide the length of your picture ledge. Measure and mark your 1 x 4-inch board to the desired length. Cut two pieces for the base and back of the ledge. Then, cut a 1 x 2-inch board to the same length for the front lip. Sand all pieces smoothly.
Glue the 1 x 2-inch piece to the front edge of the 1 x 4-inch base to build a lip. Clamp and let the glue set. Then, glue the second 1 x 4-inch piece to the back of the base to build a taller back piece. Clamp, let it set, and secure with nails or screws.
Yes, you can paint or stain your picture ledge to match your decor. Apply primer if you're painting, and then apply two to three coats of paint or stain, allowing adequate drying time between coats.
Locate the wall studs where you want to hang your ledge. Mark the stud locations on the back panel of the ledge. Drill pilot holes at these spots. Use a level to ensure the ledge is even, then screw the ledge into the studs using long screws.
To hang your picture ledge securely, follow these steps:
Locate Wall Studs: Use a stud finder to locate the wall studs where you want to hang your ledge. Mark the stud locations on the back panel of the ledge.
Drill Pilot Holes: Drill pilot holes at the marked spots on the back panel. Make sure the holes align with the stud positions.
Level the Ledge: Place the ledge against the wall and use a level to ensure it is straight. Adjust as needed.
Secure with Screws: Insert long screws through the pilot holes and into the studs. Tighten them securely to anchor the ledge to the wall.
Final Thoughts
In conclusion, making a DIY picture ledge is a rewarding project that enhances your space with personalized decor. Follow the steps outlined in our guide to build your own beautiful ledge and showcase your favorite memories. Start your project today and enjoy the satisfaction of your handiwork!


