Building a hand-crank generator is both a fascinating and practical project that combines engineering, electronics, and a bit of hands-on creativity. I recently dove into this project with the goal of making a simple electric generator that could charge a phone, power small electronics, or even be used for more intensive applications. My journey was filled with learning curves, unexpected insights, and rewarding moments of success.
Let's dive into the step-by-step process of building a hand-crank generator, emphasizing practical tips and lessons I've learned along the way.
Understanding the Basics of a Hand-Crank Generator
Before jumping into the construction, it's crucial to understand how a hand-crank generator works. At its core, this type of generator converts mechanical energy—maked by turning a crank—into electrical energy using principles of electromagnetism. The key components are the rotor (a spinning disc with magnets), the stator (stationary coils of wire), and a few electronic components that help manage the generated electricity.
My Initial Challenges with Ready-Made Generators
I've tested several commercially available hand-crank generators, but they all shared a common problem: inefficiency. Most of these use brushed electric motors that require a high rotation speed (RPM) to generate a usable voltage. Since the speed at which a human can turn a hand crank is relatively low, these devices often require large and cumbersome gear ratios. This got me thinking—what if I could build my own generator, tailored for efficiency and high output at low RPMs?
Step by Step Instructions
Learn how to build your own DIY electric generator with our step-by-step guide. From designing the alternator to testing, get detailed instructions here!
Step 1: Designing the Alternator
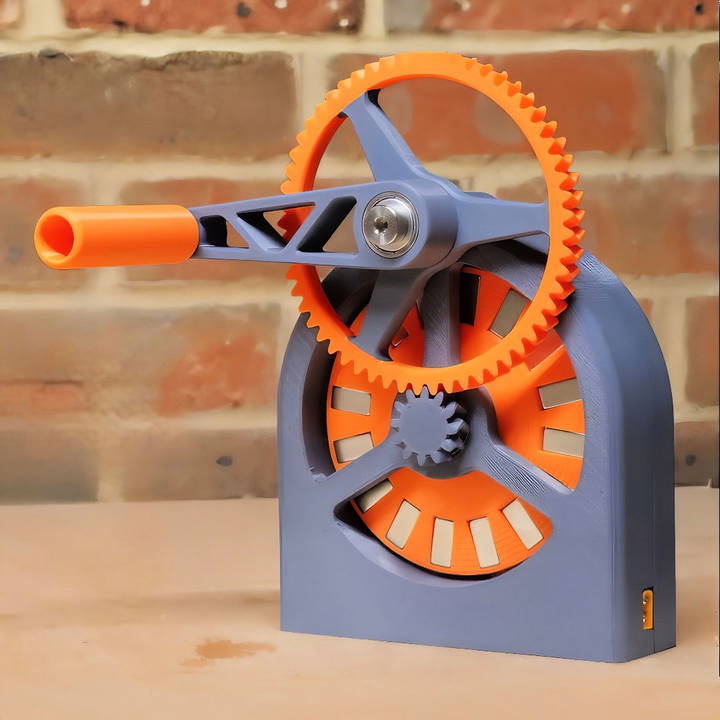
The heart of my generator is an alternator that I designed using 3D printing. Unlike traditional generators that might use brushed motors, I chose to go with an axial flux alternator design. This type of alternator uses two rotors with magnets on either side of a stationary set of coils (the stator).
Printing the Rotor
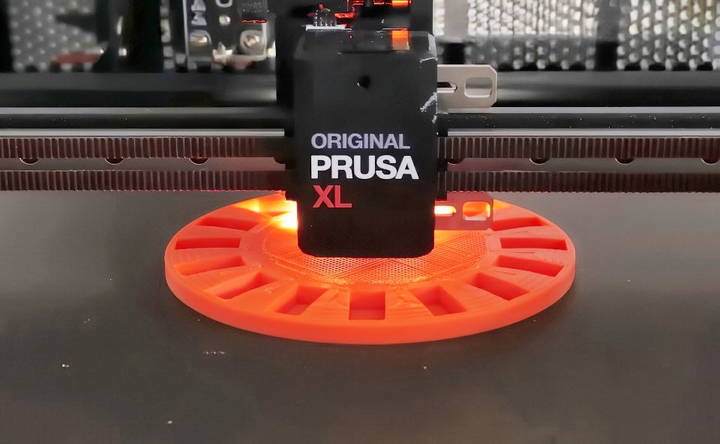
For the rotor, I printed a circular plate using PLA plastic. PLA is cheap, non-conductive, and easy to work with, making it perfect for this application. The key here was to ensure the rotor was durable enough to hold strong magnets and spin smoothly without distorting or flexing.
- Materials Needed: PLA filament, 3D printer.
- Tips: Ensure that the print is perfectly flat to avoid wobbling when spinning. A flat print ensures smooth and balanced rotation, which is crucial for generating consistent electricity.
Adding High-Quality Magnets
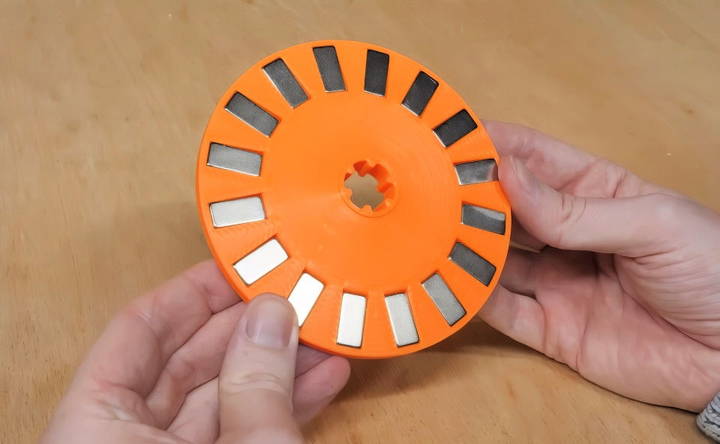
I used N52 grade neodymium magnets for the rotor because they are among the strongest magnets available. I pressed these magnets into the rotor in an alternating polarity pattern—north, south, north, and so on around the circumference. This alternating pattern is crucial for making a changing magnetic field as the rotor spins, which induces current in the coils of the stator.
- Materials Needed: N52 grade neodymium magnets.
- Tips: Be cautious when handling these strong magnets; they can easily snap together and break or even cause injury.
Step 2: Building the Stator
The stator holds the copper coils that generate electricity when the magnetic field from the rotor changes as it spins. I initially tried using thicker 8mm copper wire for the coils but quickly realized that it did not allow enough turns of wire, resulting in a disappointingly low output voltage.
Rewinding the Coils with Thinner Wire
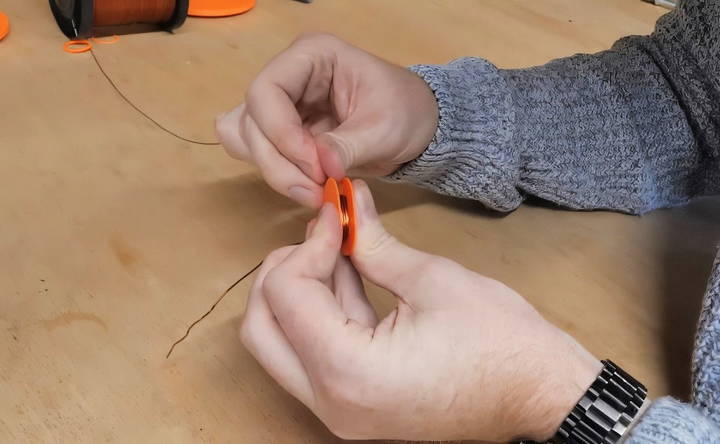
Switching to much thinner wire allowed me to wind more turns per coil, which significantly increased the output voltage. The number of turns in each coil is directly proportional to the voltage generated, so this was a game-changer in the design.
- Materials Needed: Thin copper wire (e.g., 0.5mm to 1mm diameter).
- Tips: When winding the coils, make sure to keep the loops tight and uniform to maximize efficiency and minimize resistance.
Configuring the Coils
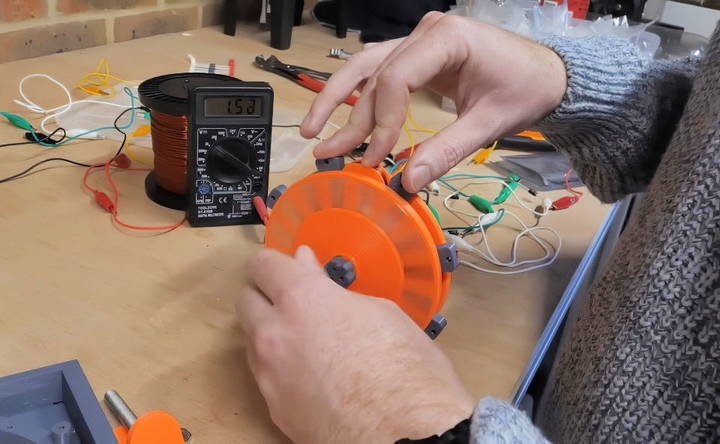
I made eight coils in total, each with about 350 turns of wire. To optimize the generator's performance, I configured these coils in a combination of series and parallel connections—two sets in series to boost voltage and four sets in parallel to handle higher current loads. This balanced configuration was essential to ensure that the generator could produce around 15 to 20 volts, suitable for most small electronics, without overheating.
- Materials Needed: Soldering kit, wire cutters.
- Tips: Use a multimeter to check the resistance and continuity of your coil connections to avoid any open circuits or shorts, which could damage the generator.
Step 3: Assembling the Generator
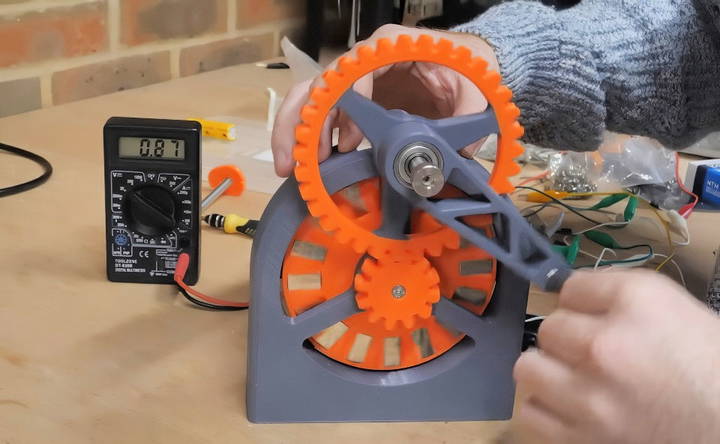
Once both the rotor and stator were ready, I moved on to assembling the generator. I designed and 3D printed a housing to hold the rotor and stator securely in place. The shaft of the rotor is keyed to ensure both rotors spin in perfect synchronization, which is crucial for maintaining a consistent magnetic field.
Adding a Gear Ratio to Boost Output
To further increase the voltage output, I incorporated a simple 3D-printed gear ratio mechanism. This allowed me to crank the handle at a comfortable speed while spinning the rotors at a much higher speed, significantly boosting the voltage generated.
- Materials Needed: 3D-printed gears, bearings, shaft.
- Tips: Ensure that the gear teeth mesh smoothly to avoid friction losses, which can reduce the efficiency of the generator.
Step 4: Converting AC to DC
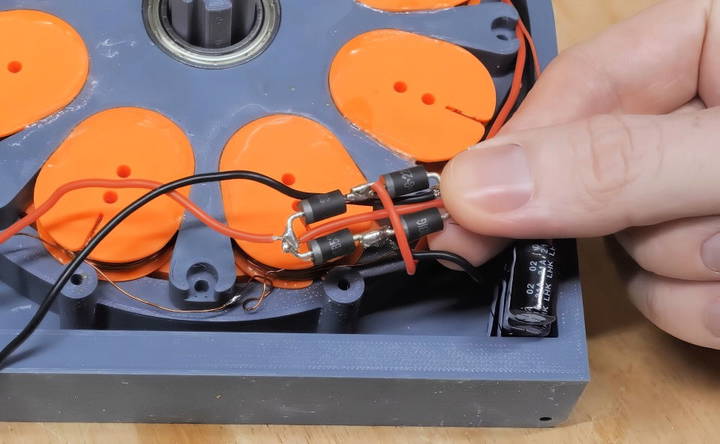
The electricity generated by the spinning magnets is alternating current (AC), which isn't suitable for most electronics that require direct current (DC). To solve this, I added a full bridge rectifier made from four diodes. This component converts the AC generated in the coils to DC by allowing current to flow in only one direction.
Smoothing the Output Voltage
To smooth out the DC voltage and make it more stable, I also added a few small capacitors. These capacitors help absorb voltage spikes and provide a more consistent output, which is especially important when charging sensitive devices like smartphones.
- Materials Needed: Diodes, capacitors, soldering tools.
- Tips: Test your rectifier circuit with a voltmeter before connecting any expensive electronics to ensure that the output voltage is stable and within a safe range.
Step 5: Adding the Finishing Touches
With all the components in place, I glued an XT60 connector to the frame of the generator to serve as the output connection. This connector is widely used in electronics projects and can easily connect to a variety of devices.
Installing the Crank Handle
Finally, I added a crank handle to the generator. This was a straightforward step, but I ensured the handle was comfortable and robust enough for extended use.
- Materials Needed: XT60 connector, crank handle.
- Tips: Make sure the crank is securely attached to avoid any wobbling, which could affect the efficiency and lifespan of your generator.
Testing the Generator
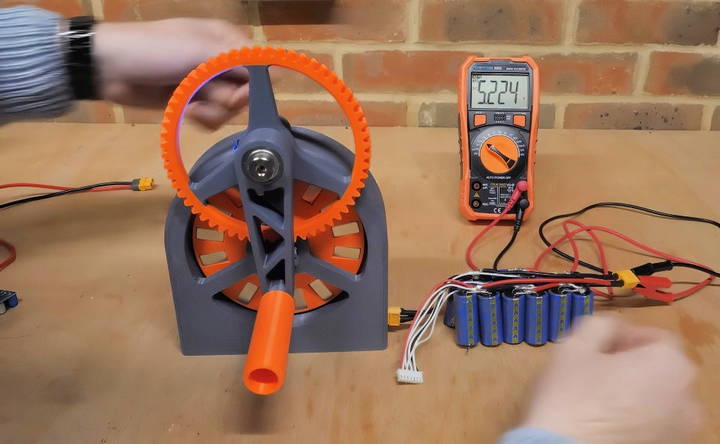
The most exciting part of this project was testing the generator with different loads. I used a small cable with an XT60 connector and crocodile clips to connect various devices. Here's what I discovered:
Powering a Small DC Motor
Connecting the generator to a small brushed DC motor worked surprisingly well. The resistance increased noticeably when the motor was running, indicating that the generator was producing a decent amount of power. This was a great initial test to see how the generator handled a real load.
Charging a Bank of Supercapacitors
Next, I tried charging a bank of supercapacitors from an old project. The voltage climbed faster than I anticipated, showing that the generator could efficiently transfer power to a capacitive load. It also demonstrated the benefit of having a gear ratio to increase the RPM and, consequently, the output voltage.
Charging a Smartphone
For the ultimate test, I connected my smartphone to the generator using a 5V regulator to step down the voltage and provide a stable current. To my delight, the phone started charging immediately. However, I realized that continuously cranking for an hour or more to fully charge a phone would be quite tiring—still, it's an excellent backup solution for emergencies.
Advanced Modifications
Enhancing your DIY electric generator can significantly improve its efficiency and functionality. Here are some advanced modifications you can consider:
Upgrades and Enhancements
Upgrade your system with these enhancements: improve efficiency, add a voltage regulator, and incorporate a battery storage system.
1. Improving Efficiency
- Use High-Efficiency Components: Replace standard components with high-efficiency ones. For example, use a more efficient alternator or motor to reduce energy loss.
- Optimize the Design: Streamline the design to minimize friction and resistance. This can involve using better bearings or more aerodynamic parts.
2. Adding a Voltage Regulator
- Why It's Important: A voltage regulator ensures that the output voltage remains stable, protecting your devices from voltage spikes.
- How to Install: Connect the voltage regulator between the generator and the output terminals. Follow the manufacturer's instructions for wiring and setup.
3. Incorporating a Battery Storage System
- Benefits: Storing excess energy in batteries allows you to use the generator's power even when it's not running.
- Setup: Connect a battery bank to the generator using a charge controller. This prevents overcharging and extends battery life.
Integration with Renewable Energy Sources
Discover the benefits of integrating renewable energy sources like solar panels and wind turbines to make a sustainable future.
1. Solar Panels
- Combining Solar and Generator Power: Integrate solar panels to charge the batteries during the day and use the generator at night or during cloudy weather.
- Installation Tips: Mount the solar panels in a sunny location and connect them to the battery bank through a solar charge controller.
2. Wind Turbines
- Harnessing Wind Energy: Add a wind turbine to generate power when the wind is strong. This can complement the generator and solar panels.
- Setup: Install the wind turbine in an open area with good wind exposure. Connect it to the battery bank using a wind charge controller.
Safety and Monitoring
Ensure home safety with top-notch safety features and advanced monitoring systems. Expert installation and reliable monitoring for peace of mind.
1. Installing Safety Features
- Circuit Breakers: Add circuit breakers to protect against electrical overloads and short circuits.
- Fuses: Use fuses as an additional safety measure to prevent damage to the generator and connected devices.
2. Monitoring Systems
- Power Meters: Install power meters to monitor the output and efficiency of your generator.
- Remote Monitoring: Use a remote monitoring system to keep track of the generator's performance from a distance. This can be especially useful for off-grid setups.
Practical Tips
- Regular Maintenance: Keep your generator in top condition by performing regular maintenance. Check for wear and tear, and replace parts as needed.
- Documentation: Keep a log of all modifications and maintenance activities. This helps in troubleshooting and ensures the generator runs smoothly.
Enhance your DIY generator's performance and reliability with these upgrades for better efficiency, flexibility, and safety.
Common Issues and Troubleshooting
When building and using a DIY electric generator, you might encounter some common issues. Here's a guide to help you troubleshoot and resolve these problems effectively.
1. Generator Not Starting
Troubleshooting your generator not starting? Discover possible causes and effective solutions to get it running smoothly again.
Possible Causes:
- Fuel Issues: Check if there is enough fuel and if it is fresh. Stale fuel can cause starting problems.
- Battery Problems: Ensure the battery is charged and the connections are secure.
- Spark Plug Issues: Inspect the spark plug for wear and tear. Clean or replace it if necessary.
Solutions:
- Refuel: Add fresh fuel to the generator.
- Charge or Replace Battery: If the battery is dead, charge it or replace it with a new one.
- Clean or Replace Spark Plug: Remove the spark plug, clean it, and check the gap. Replace it if it's damaged.
2. Low Power Output
Learn the possible causes and effective solutions for low power output in your devices. Maximize efficiency and improve performance quickly.
Possible Causes:
- Overloading: The generator might be overloaded with too many devices.
- Dirty Air Filter: A clogged air filter can reduce the generator's efficiency.
- Worn-out Components: Parts like the alternator or brushes might be worn out.
Solutions:
- Reduce Load: Disconnect some devices to reduce the load on the generator.
- Clean or Replace Air Filter: Check the air filter and clean or replace it if it's dirty.
- Inspect and Replace Components: Check the alternator and brushes. Replace them if they are worn out.
3. Overheating
Realize the possible causes of overheating and explore effective solutions to keep your systems cool and running smoothly.
Possible Causes:
- Poor Ventilation: The generator might not have enough airflow.
- Low Oil Levels: Insufficient oil can cause the generator to overheat.
- Continuous Operation: Running the generator for too long without breaks.
Solutions:
- Improve Ventilation: Ensure the generator is placed in a well-ventilated area.
- Check Oil Levels: Regularly check and maintain the oil levels. Add oil if necessary.
- Take Breaks: Allow the generator to cool down by taking breaks during extended use.
4. Unstable Voltage Output
Discover the causes and solutions for unstable voltage output in electrical systems. Ensure consistent power with our expert tips on voltage stability.
Possible Causes:
- Faulty Voltage Regulator: The voltage regulator might be malfunctioning.
- Loose Connections: Loose or corroded connections can cause voltage fluctuations.
- Worn-out Brushes: Brushes that are worn out can lead to unstable voltage.
Solutions:
- Replace Voltage Regulator: If the voltage regulator is faulty, replace it.
- Tighten Connections: Inspect all connections and tighten any that are loose. Clean any corroded terminals.
- Replace Brushes: Check the brushes and replace them if they are worn out.
5. Noisy Operation
Discover the common causes and effective solutions for a noisy operation. Improve performance and reduce noise with these expert tips.
Possible Causes:
- Loose Parts: Loose components can cause excessive noise.
- Worn Bearings: Bearings that are worn out can make the generator noisy.
- Improper Mounting: The generator might not be mounted securely.
Solutions:
- Tighten Loose Parts: Inspect the generator for any loose parts and tighten them.
- Replace Bearings: Check the bearings and replace them if they are worn out.
- Secure Mounting: Ensure the generator is mounted securely to reduce vibrations and noise.
Maintenance Tips
- Regular Inspections: Perform regular inspections to catch issues early.
- Clean Components: Keep the generator clean and free of debris.
- Follow Manufacturer's Guidelines: Always follow the manufacturer's maintenance guidelines for best results.
Troubleshoot common issues and perform maintenance regularly to keep your DIY electric generator efficient and long-lasting.
FAQs About DIY Electric Generators
Discover answers to FAQs about DIY electric generators. Learn how they work, safety tips, and the benefits of building your own generator today!
A DIY electric generator is a device you can build yourself to generate electricity. It can be powered by various sources like wind, solar, or mechanical energy. Building one can help you save on energy costs, reduce your carbon footprint, and provide power in remote areas or during emergencies.
Safety is crucial when working with electricity. Here are some tips:
Wear protective gear: Use gloves and safety glasses.
Avoid water: Keep your work area dry to prevent electrical shocks.
Follow instructions: Carefully follow the building instructions.
Check connections: Ensure all connections are secure and insulated.
Test safely: Use a multimeter to test your generator before connecting it to any devices.
A DIY generator can power small appliances and devices, but powering an entire home requires a more complex system. For home use, you might need multiple generators or a combination of solar panels and wind turbines. It’s also essential to have a proper battery storage system and an inverter to manage the power supply.
Maintaining your DIY electric generator is crucial for its longevity and efficiency. Here are some tips:
Regular inspections: Check for any loose connections, worn-out parts, or corrosion.
Clean components: Keep the generator and its components clean and free from dust and debris.
Lubricate moving parts: Ensure that all moving parts are well-lubricated to reduce wear and tear.
Test the system: Regularly test your generator to ensure it is functioning correctly.
Replace parts as needed: If any part shows signs of damage or wear, replace it promptly to avoid further issues.
Here are some common issues and troubleshooting tips:
Generator not producing power: Check all connections and ensure the power source is functioning. Test the generator with a multimeter.
Overheating: Ensure proper ventilation and check for any obstructions. Clean the generator to remove dust and debris.
Battery not charging: Verify the connections between the generator and the battery. Check the battery's health and replace it if necessary.
Inconsistent power output: Inspect the wiring and connectors for any loose or damaged parts. Ensure the generator is running at a consistent speed.
Final Thoughts and Recommendations
Building a hand-crank generator from scratch was a fantastic project that taught me a lot about the principles of electromagnetism, the challenges of efficient design, and the joy of making something functional with my own hands. Here are a few lessons and recommendations based on my experience:
- Experiment with Different Coil Configurations: The output voltage and current depend heavily on how you wire your coils. Don't be afraid to experiment with different series and parallel combinations to find what works best for your needs.
- Use High-Quality Magnets: The strength and quality of your magnets will directly impact the generator's efficiency. Investing in high-grade neodymium magnets will yield the best results.
- Consider Adding a Flywheel: If you plan on using the generator for extended periods, adding a flywheel could help maintain a smoother and more consistent output.
- Safety First: Always be cautious when working with strong magnets, spinning parts, and electronic components. A slight mistake can cause injury or damage your equipment.
For anyone interested in building their own hand-crank generator, I highly encourage you to dive in. With a bit of patience, creativity, and persistence, you can make a functional and fascinating device that can come in handy in various situations. Whether for education, emergency preparedness, or just for fun, this project is well worth the effort.


