Starting with candle tunneling can save your favorite candles from going to waste. Once, I noticed my candle burning strangely, making a deep tunnel in the wax. It was frustrating not knowing how to fix it. After some research and trial and error, I discovered simple tricks that brought my candles back to life.
One effective way is to use foil wrapping. By wrapping aluminum foil around the edges of the candle and leaving an opening at the top, the heat evens out the wax pool. Another trick is to use a hairdryer to melt the edges, making the wax level again. These methods really helped me, and I'm sure they will help you too. Give them a try and enjoy your perfectly burning candles again!
Want your candles to burn evenly? These easy tips and tricks will make a huge difference. Learning how to fix candle tunneling is simpler than you might think.
Understanding Candle Tunneling
Candle tunneling is a common issue that candle lovers may encounter. It occurs when a candle burns down the center, leaving a ring of unmelted wax around the edges. This not only looks unsightly but also wastes wax and reduces the candle's lifespan. Let's break down the concept in simple terms and understand why it happens.
What Causes Candle Tunneling?
The main cause of candle tunneling is an uneven burn. This usually happens when the candle is not allowed to burn long enough for the entire top layer of wax to melt during the initial use. The wick burns down into the candle, making a tunnel-like effect. Other factors contributing to tunneling include:
- Incorrect Wick Size: If the wick is too small for the candle's size, it won't generate enough heat to melt the wax evenly.
- Drafts and Temperature: Air currents or cold temperatures can affect how the candle burns, leading to tunneling.
- Frequent Short Burns: Lighting a candle for short periods repeatedly can prevent the wax from melting to the edges.
The Impact of Tunneling
When a candle tunnels, it can significantly shorten its life. The wax on the sides remains unused, and over time, the wick becomes harder to light as it sinks deeper into the wax. This can also affect the candle's scent throw, making it less fragrant.
How to Identify Tunneling
You'll know your candle is tunneling if you see a rim of hard wax along the container's sides while the center around the wick has melted down. It's like a little wax cliff surrounding a wax valley where the wick lies.
Preventing Tunneling
The best way to deal with candle tunneling is to prevent it from happening in the first place. Here are some tips:
- First Burn is Key: Ensure the first burn lasts until the entire surface has melted to the edges.
- Trim the Wick: Keep the wick trimmed to about 1/4 inch to ensure a clean, even burn.
- Avoid Drafts: Burn your candle in a place free from drafts to prevent uneven burning.
Understanding candle tunneling and its causes can help you prevent it. The first burn is key; initially, let the candle form a full melt pool.
Why Tunneling Happens
Before diving into the fixes, it's important to understand why tunneling occurs. It usually happens when candles aren't burned long enough for the entire top layer of wax to melt during the initial burn. This mistake can doom the candle to tunnel with every subsequent light.
Materials Needed:
- Tin Foil: To make a heat-trapping dome that encourages even melting.
- Hairdryer: To evenly distribute heat directly on the wax.
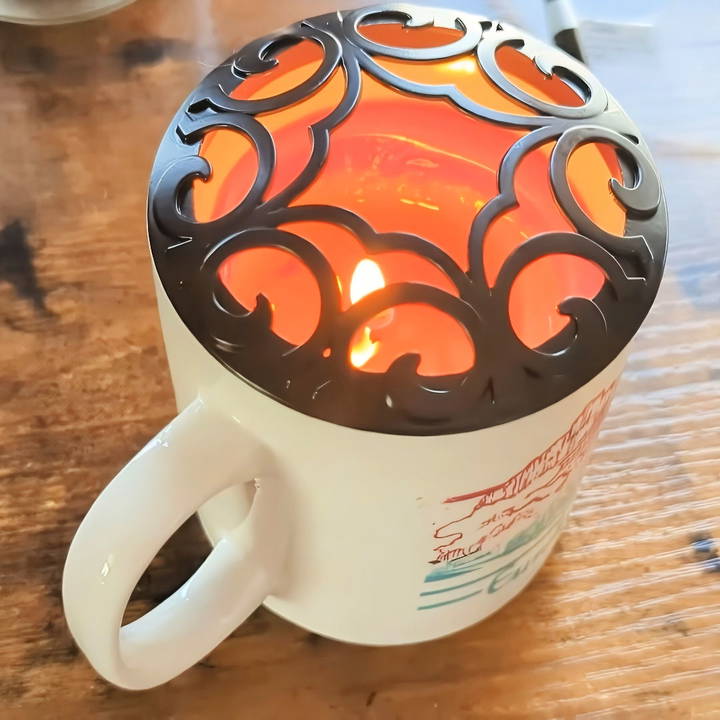
- Candle Topper: To concentrate the candle's heat, allowing for a more uniform melt.
Each material serves to enhance the heat around the candle, ensuring a more even burn and melting away the dreaded tunnel.
Step by Step Instructions
Learn how to fix candle tunneling with step-by-step instructions using methods like the candle topper, tin foil technique, and hairdryer hack.
Method 1: The Candle Topper Approach
I started with a candle that was large enough to accommodate a candle topper. The theory behind this method is simple. The topper traps heat above the candle, increasing the temperature inside the jar and encouraging the wax to melt evenly.
Steps:
- Trim the Wick: Always start by trimming the wick to about * ¼ inch. This ensures a clean burn.
- Position the Topper: Place the candle topper atop your candle.
- Light and Wait: Light the candle and let it burn. Patience is key.
Despite my high hopes, this method showed little progress in the first few hours. However, I remained patient, knowing that some fixes require time.
Method 2: The Tin Foil Technique
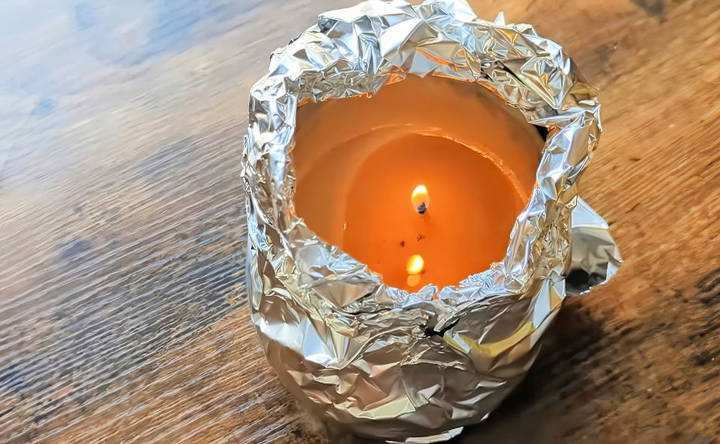
With my second candle, a smaller, more heavily tunneled one, I turned to the tin foil method. This technique involved wrapping the top part of the candle in foil, making a dome that redirects the heat inward.
Steps:
- Prepare the Foil: Shape a piece of tin foil into a loose dome that covers the candle's top, ensuring there's a small opening at the top.
- Light the Candle: With the foil in place, light the wick and allow the candle to burn.
This method initially proved challenging due to the candle's deeply tunneled wicks, which struggled to stay lit. Despite my best efforts to keep them aflame, I concluded that the tin foil technique might not be suitable for severely tunneled candles.
Method 3: The Hairdryer Hack
My final attempt involved a plain beeswax candle that had moderately tunneled. I utilized a hairdryer to directly apply heat to the wax's surface.
Steps:
- Heat With Hairdryer: Keep the hairdryer on a medium setting and direct the heat evenly around the tunneled area.
- Monitor the Melt: As the wax starts to melt, move the hairdryer around to distribute the heat evenly.
- Let it Cool: Once the sides have sufficiently melted down, turn off the hairdryer and let the wax cool and settle.
To my surprise, this method yielded the best results. The direct and even application of heat quickly melted the tunneled sides, leveling out the wax more efficiently than I anticipated.
Advanced Techniques for Fixing Candle Tunneling
When it comes to fixing candle tunneling, there are several advanced techniques that can help you save your candles from this common problem. These methods go beyond the basic fixes and offer solutions for even the most stubborn tunneling issues.
The Oven Method
One effective technique is the oven method. This involves carefully placing your candle in a warm oven to melt the top layer of wax evenly. Here's how to do it:
- Preheat your oven to a low temperature, around 175°F (79°C).
- Place your candle on a baking sheet to catch any drips.
- Heat the candle for about 5 minutes. Keep an eye on it to prevent overheating.
- Remove the candle carefully using oven mitts and allow it to cool.
This method can help level out the wax surface and eliminate tunneling.
The Hair Dryer Technique
Another advanced technique is using a hair dryer:
- Set your hair dryer to the highest heat setting.
- Hold it about 6 inches away from the candle.
- Move the hair dryer back and forth across the surface until the wax melts evenly.
The hair dryer technique is quick and effective, especially for minor tunneling.
The Foil Tent Method
The foil tent method is a popular fix that involves making a heat trap to melt the edges of the candle:
- Light your candle and let it burn for a few minutes.
- Wrap a piece of aluminum foil around the top of the candle, leaving a small hole in the center of the flame.
- Allow the candle to burn like this for about an hour or until the wax has melted evenly across the surface.
This method helps concentrate the heat around the edges of the candle, encouraging an even melt.
Repurposing Leftover Wax
If you have leftover wax after fixing tunneling, don't throw it away. Here's what you can do:
- Collect the leftover wax and melt it down in a double boiler.
- Pour the melted wax into a new container with a fresh wick.
- Let it cool and harden to make a new candle.
Use these advanced techniques to fix candle tunneling and maximize wax usage. Ensure your candles burn beautifully and last longer.
Candle Care and Maintenance
Proper care and maintenance of your candles can greatly enhance their performance and longevity. Here's a straightforward guide to keeping your candles burning brightly and safely.
Storing Your Candles
Store your candles in a cool, dark place to prevent warping and discoloration. Avoid leaving them in direct sunlight or near heat sources, as this can cause them to melt or lose their fragrance prematurely.
The First Burn
The initial burn is crucial for setting the stage for an even burn throughout the life of your candle. Allow the wax to melt across the entire surface to the edges of the container, which can take about 1-3 hours, depending on the size of the candle.
Trimming the Wick
Before each burn, trim the wick to about 1/4 inch. This helps prevent soot buildup and ensures a cleaner burn. A properly trimmed wick also prevents the flame from becoming too large and producing excess smoke.
Burn Duration
Ideally, candles should not be burned for more than 3-4 hours at a time. Extinguishing the candle after this period allows it to cool and the wax to solidify evenly. This prevents the formation of a well around the wick.
Avoiding Drafts
Place your candle in an area free from drafts to prevent uneven burning. Drafts can cause the flame to flicker and lead to an uneven wax pool, which can diminish the candle's lifespan.
Cleaning Your Candle
Keep the wax pool clear of wick trimmings and debris, as these can act as secondary wicks and affect how the candle burns. Gently wipe the surface of the candle with a clean, dry cloth if it collects dust.
Candle Extinguishing
Use a snuffer or gently blow out the candle to minimize smoke and prevent hot wax from splattering. Avoid using water to extinguish the flame, as it can cause the hot wax to splatter and may break the container.
When to Retire a Candle
Stop using the candle when about 1/2 inch of wax remains at the bottom. Continuing to burn a candle past this point can be a fire hazard, as the container may become too hot.
By following these simple candle care and maintenance tips, you'll ensure that your candles burn evenly, last longer, and remain a safe and beautiful addition to your home.
FAQs About How to Fix Candle Tunneling
Explore effective solutions to fix candle tunneling with our comprehensive FAQs. Get tips and tricks for even candle burning.
Candle tunneling occurs when only the wax near the wick melts and burns down, making a tunnel-like hole, while the rest of the wax remains intact. This can lead to wasted wax and a shorter candle life.
Tunneling usually happens if the candle isn't burned long enough for the entire top layer of wax to melt during the initial burn. It can also be caused by drafts, a wick that's too small, or using a candle in a room that's too large.
Here are a few methods to fix tunneling:
Foil Method: Wrap foil around the top edge of the candle, leaving an opening above the wick. This traps heat and helps melt the surrounding wax.
Hair Dryer: Use a hair dryer on high heat to evenly melt the top layer of wax.
Oven Method: Place your candle in the oven at 175°F (79°C) for about 5 minutes to melt the wax evenly.
Absolutely! To prevent tunneling:
Ensure the first burn lasts until the entire top layer of wax melts.
Avoid drafts and use candles in appropriately sized rooms.
Trim the wick before each use to ensure an even burn.
If your candle continues to tunnel despite your efforts, consider:
Melting the wax in a wax warmer to use it up.
Cutting away excess wax from the sides to help the heat reach the remaining wax.
Final Thoughts
In conclusion, learning how to fix candle tunneling is a game-changer for enjoying your favorite candles to the fullest. These easy tips and tricks will help you get an even burn and maximize the candle's lifespan. By following these steps, you can ensure that your candles last longer, look better, and provide a consistent fragrance. So, next time you notice tunneling, use these methods to restore your candle's optimal performance. Happy candle burning!


