Making a DIY dog ramp is an excellent way to help your furry friend easily climb onto beds or couches. By building a dog ramp yourself, you not only save money but also customize it to better fit your home and pet's needs. This task is manageable with basic materials and tools, making it an accessible project for many.
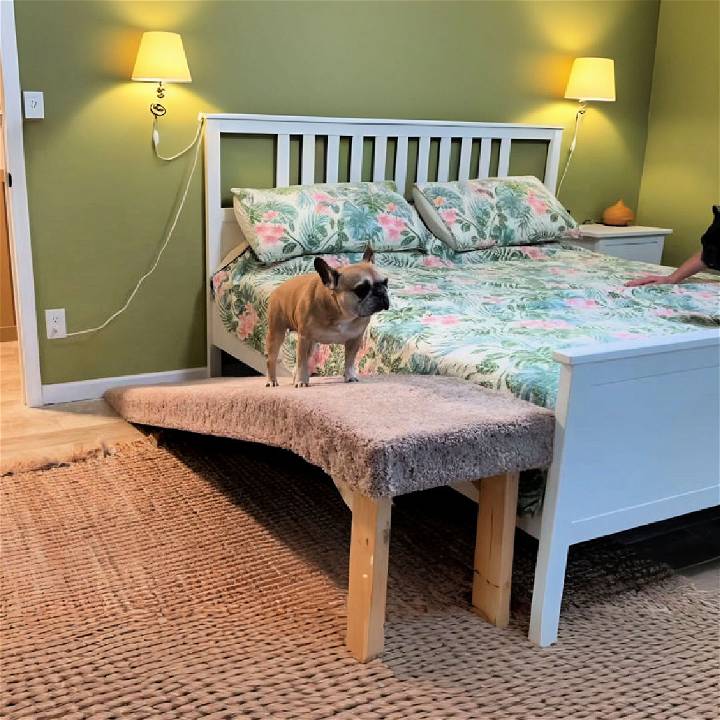
In this guide, you'll learn step-by-step instructions on crafting a sturdy DIY dog ramp for bed use. The process involves selecting the right materials, measuring accurately, and assembling the parts securely.
By following these tips, you can ensure your pet's safety and comfort. Keep reading to dive into the detailed steps and get started on your project!
Understanding Your Pet’s Needs
When making a DIY pet ramp, it’s essential to consider the unique needs of your furry friend. This ensures the ramp is not only functional but also safe and comfortable for them to use. Here’s how to tailor the ramp to your pet’s requirements:
- Assess Mobility and Health Start by evaluating your pet’s mobility. Older pets, those with joint issues like arthritis, or pets recovering from surgery may need a ramp with a gentler incline. Measure how easily your pet can move and how high they can step to determine the slope of the ramp.
- Consider Size and Weight: The size and weight of your pet will influence the ramp’s width and strength. A larger dog will need a wider and sturdier ramp than a small dog or cat. Ensure the ramp can comfortably support your pet’s weight without bending or wobbling.
- Look at Breed-Specific Needs Some breeds have specific needs due to their body structure. For example, Dachshunds and Basset Hounds have long bodies and short legs, making them more prone to back problems. They would benefit from a ramp that helps them avoid jumping or climbing stairs.
- Factor in Confidence Levels Not all pets are confident climbers. If your pet is hesitant or fearful, consider a ramp with side rails for added security. The presence of rails can provide a sense of safety and encourage them to use the ramp.
- Choose the Right Surface The ramp’s surface should be non-slip to prevent your pet from sliding. Materials like carpet or rubber matting can provide good traction. If your pet has sensitive paws, opt for a softer surface to ensure comfort.
- Adjustability is Key An adjustable ramp can be modified as your pet’s needs change. Whether it’s due to aging or different vehicles and furniture heights, having a ramp that can adapt will extend its usefulness.
Consider these factors to build a pet ramp that enhances your pet’s life, making daily activities safer and more comfortable. Prioritize their needs in your design.
Materials Needed
1. Plywood and 2x4s: They form the base and frame of the ramp. Plywood is sturdy and easy to work with, while 2x4s provide the necessary support.
2. Screws and Nails: To assemble the pieces securely.
3. Carpet: Offers traction for your pet, preventing slips.
4. Staples and Stapler: For attaching the carpet to the ramp.
5. Measuring Tape, Saw, and Drill: Essential tools for measuring, cutting, and assembling.
Each material was chosen for its role in making a solid, stable, and safe ramp.
Step by Step Instructions
Learn to build a DIY dog ramp with easy step-by-step instructions on measuring, cutting, building the frame, attaching plywood, and more.
Measuring and Cutting
The first step was measuring the intended area. This ensured the ramp would fit perfectly, providing a gentle slope for my pet. After transferring these measurements to the plywood and 2x4s, I cut them accordingly. Precision here is key to ensuring stability and a smooth slope.
Building the Frame
Using 2x4s, I constructed a sturdy frame. This frame is the skeleton of the ramp, so ensuring it's well-assembled is crucial. It’s important to keep the bottom part flat on the floor for stability. Screwing the pieces together buildd a durable base.
Attaching Plywood
The plywood was then attached to the frame with screws. I added a middle 2x4 support within the frame for extra stability. It’s vital to ensure the plywood is securely attached to avoid any wobbling.
Constructing the Ramp Slope
The top part, or the slope, was the trickiest. It needed to be angled correctly for easy pet access. After cutting the top piece, I connected it to the main frame using nails. Ensuring the slope is gentle enough for your pet but not too steep is essential.
Adding Legs and Supports
Measuring the distance from the top of the ramp to the floor allowed me to cut my legs to the correct length. These were then attached with screws, and additional support pieces secured the structure. Stability is paramount, so double-checking these connections was a step I didn’t rush.
Choosing and Installing the Carpet
Selecting a carpet was more about functionality than aesthetics. The carpet needed to offer enough grip for my pet. After purchasing a suitable one, I cut it to size, allowing extra inches for a snug fit. The installation began at one side, stretching and stapling the carpet carefully to avoid any loose areas.
Final Touches
Inspecting the ramp for any sharp edges, loose screws, or staples was the final step. Ensuring everything was smooth and secure meant my pet could use the ramp safely.
Customization Tips
Building a DIY pet ramp that perfectly suits your pet and home requires a bit of creativity and customization. Here are some tips to help you tailor your pet ramp to your specific needs:
- Adjustable Height Design your ramp with adjustable legs or supports. This allows you to change the height for different uses, like reaching the bed or the car. Simple mechanisms like folding legs or telescopic supports can make this possible.
- Foldable for Storage: If space is a concern, build a foldable ramp. Hinges can be added to the middle of the ramp, allowing it to fold in half. Ensure it locks securely when in use and folds neatly for easy storage.
- Personalized Touches: Add a personal touch to the ramp by painting it in colors that match your home decor or using fabrics that your pet loves. This not only makes the ramp more attractive but also encourages your pet to use it.
- Non-slip surface Safety is paramount, so ensure the walking surface is non-slip. You can use materials like sandpaper, rubber mats, or outdoor carpeting. This provides traction and helps prevent slips and falls.
- Side Rails For pets that need extra security add side rails to the ramp. They can be made from the same materials as the ramp or softer materials like foam to prevent injury if your pet bumps into them.
- Replaceable Parts Consider making parts of the ramp easily replaceable. For example, the surface material will wear out over time, so design it in a way that it can be easily removed and replaced.
- Lightweight Materials Choose lightweight yet durable materials. This makes the ramp easy to move around and set up wherever it’s needed without compromising on strength.
Use these tips to make a pet ramp that's functional and blends into your home. Focus on your pet’s comfort and safety while ensuring it’s convenient and looks good for you.
Maintenance and Care
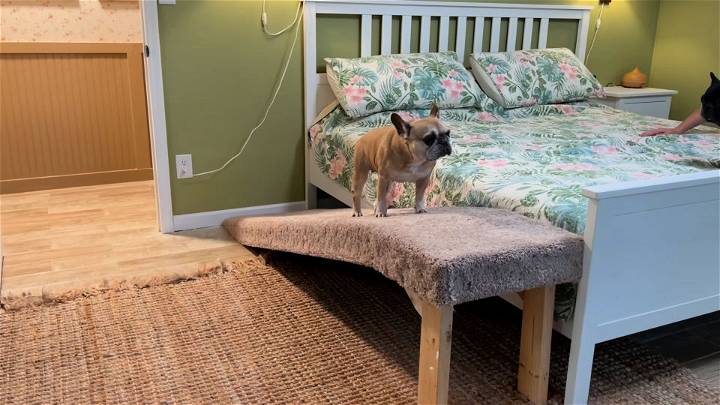
Proper maintenance and care are crucial for ensuring that your DIY pet ramp remains safe and effective for your pet’s use over time. Here’s a straightforward guide to keeping your ramp in top condition:
- Regular Cleaning: Wipe the ramp down regularly to keep it clean. If you’ve used carpet or fabric on the surface for traction, vacuum it to remove pet hair and dirt. For outdoor ramps, a hose can be used for a quick rinse.
- Check for Wear and Tear Inspect the ramp periodically for any signs of wear and tear, especially on the walking surface and joints. Look for loose screws, worn-out materials, or any damage that could affect the ramp’s stability.
- Non-Slip Surface Maintenance The non-slip surface is vital for your pet’s safety. If it starts to wear down, replace it promptly. Materials like grip tape or rubber matting are easy to replace and keep the ramp safe for use.
- Weatherproofing If the ramp is used outdoors, it must be weatherproofed to withstand the elements. Use sealants or weather-resistant paints to protect wooden parts from rain or sun damage.
- Storage When not in use, store the ramp in a dry, sheltered area to prevent warping or rusting. If the ramp is foldable, ensure it’s secured in a closed position to avoid accidental unfolding.
- Pet Safety Checks: Before each use, do a quick safety check to ensure the ramp is stable and secure. This is particularly important if the ramp is adjustable or has moving parts.
- Replacement Parts Keep a small stock of replacement parts, such as screws, nuts, and surface materials. This makes it easier to perform repairs quickly, ensuring the ramp is always ready for use.
Maintain your DIY pet ramp to extend its life and ensure it's safe and reliable for your pet. Proper care leads to a durable ramp.
Safety Features
Ensuring the safety of your pet is the most important aspect when designing a DIY pet ramp. Here are some key features to include that will help keep your pet secure and prevent accidents:
- Sturdy Construction: Make sure the ramp is built with strong materials that can support your pet’s weight without bending or shaking. Use screws and brackets to reinforce joints, making the ramp stable and durable.
- Gentle Incline Design the ramp with a gentle incline that makes it easy for your pet to walk up and down. A steep ramp can be challenging for pets, especially those with mobility issues.
- Non-Slip Surface Cover the ramp with a non-slip material such as rubber matting, carpet, or anti-slip tape. This provides traction and helps prevent your pet from slipping.
- Raised Edges Include raised edges along the sides of the ramp. This acts as a guide for your pet and prevents them from stepping off the sides accidentally.
- Soft Landing Area At the bottom of the ramp, build a soft landing area to cushion your pet’s paws. This can be a small mat or a patch of grass, depending on where the ramp is used.
- Regular Inspections Regularly inspect the ramp for any potential hazards like loose screws, splinters, or worn-out materials. Address these issues promptly to maintain the ramp’s safety.
- Visibility: If the ramp will be used in low-light conditions, consider adding reflective tape or paint to make it more visible to both you and your pet.
Add these safety features to ensure your pet's well-being and comfort when using the ramp. Prioritize safety in your design.
FAQs About DIY Pet Ramp
Discover answers to faqs about DIY pet ramps, including materials, safety tips, and building steps for a convenient and secure pet ramp.
To ensure safety, make sure the ramp is stable and strong enough to support your pet’s weight. The surface should be covered with carpet or a non-slip material to prevent slipping. Additionally, the ramp should have side rails to prevent your pet from falling off the sides.
Yes, some DIY pet ramp designs are adjustable. You can create a ramp with hinges or a dowel rod that allows you to change the height to match your bed, couch, or car. This makes the ramp versatile for various uses around the home.
The time it takes to build a DIY pet ramp can vary. Simple designs may take an hour or two, while more complex, adjustable ramps could take half a day. If you’re new to DIY projects, allow extra time to follow instructions carefully.
The size of your pet ramp should be based on the height of the object it will be used with (like a bed or couch) and the size of your pet. A good rule of thumb is to make the ramp long enough to build a gentle slope that your pet can climb comfortably. For small pets, a width of 12 inches is usually sufficient, while larger pets might need a ramp that’s 24 inches wide.
The best way to make your ramp slip-resistant is to cover the walking surface with a non-slip material such as carpet or rubber matting. You can also use adhesive grip tape designed for outdoor steps or ramps. This will provide your pet with the traction they need to use the ramp safely.
Conclusion
In conclusion, building a DIY dog ramp is a practical and rewarding project for both you and your four-legged friend. By following this guide on how to build a DIY dog ramp, you'll ensure your pet's safety and comfort, especially with a DIY dog ramp for bed. Start your project today and enjoy the benefits of a well-crafted ramp for your beloved pet.


