I first discovered DIY diamond painting when I was looking for a new hobby. The idea of making something beautiful with small, sparkling beads fascinated me. I learned that it was not as difficult as it looked. All I needed was a kit, some patience, and a little bit of time.
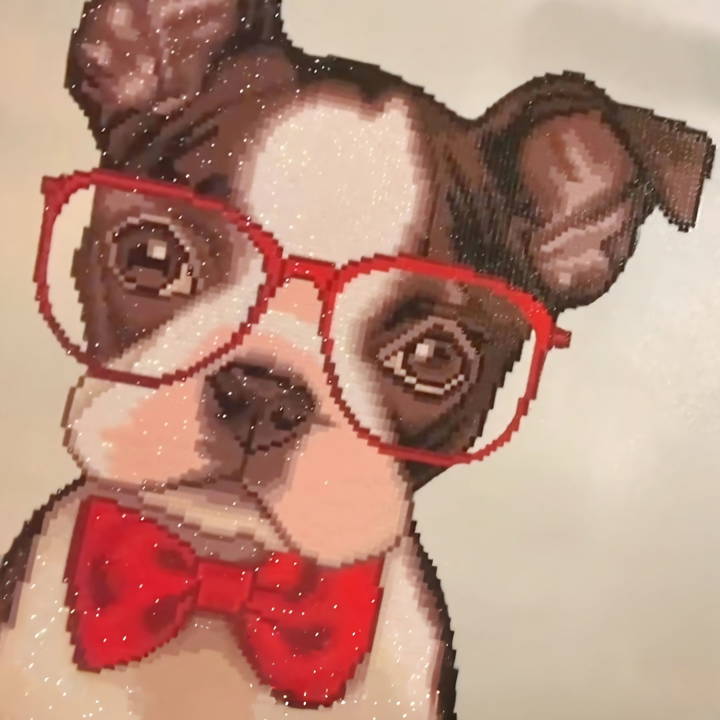
Starting with basic designs, I found that the process was calming and satisfying. Watching my diamond painting come to life was a rewarding experience. Now, I'm confident these simple steps will help you. Make your own diamond painting and see how enjoyable it can be.
I'm excited to share my experience and the knowledge I've gained. These guiding steps will help you start your diamond painting journey.
Unboxing the Kit
Upon opening my Diamond Art Club kit, I found several items: the canvas, vibrant diamonds, and a tool kit. Each component played a critical role in the completion of my project.
- The Canvas: The base of your artwork. Upon unrolling it, I noticed it wanted to curl back up. A trick here is to gently roll it in the opposite direction to help it lay flat.
- The Diamonds: These tiny, colorful pieces bring the canvas to life. The kit included round diamonds and a special AB (Aurora Borealis) diamond, which added an extra sparkle to the artwork.
- The Tool Kit: It comprised a pen-like applicator, a tray, a piece of wax, and some plastic baggies for storing opened diamonds.
Step by Step Instructions
Discover the ultimate DIY diamond painting for beginners: a comprehensive guide. Learn tips, tricks, and techniques for dazzling creations.
Setting Up
My first task was to understand the symbols on the canvas and match them with the diamond colors provided. This step was crucial for organizing my workspace and ensuring that each diamond found its correct place on the canvas.
Tips for Beginners:
- Organize Your Diamonds: I cut open the packets of diamonds and sorted them into labeled plastic baggies. This made it easier to find the diamonds I needed as I worked.
- Prep Your Pen: Dipping the tip of the applicator pen into the wax allows it to pick up diamonds. A firm yet gentle touch is all it takes.
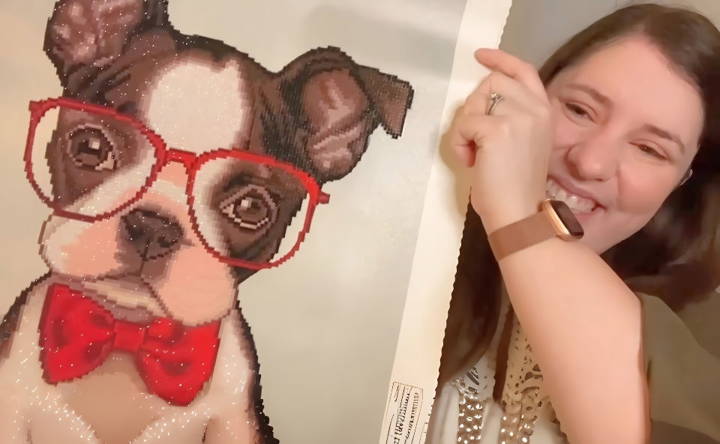
- Start Simple: Choose a section of the canvas where symbols are clear and start there. I began at the bottom, where the cute terrier's paws were.
The Diamond Painting Process
The actual diamond painting process is both simple and meditative. Here's a guide to placing your first diamonds:
- Peel Back the Protective Film: Only reveal the section you're working on to prevent dust or debris from sticking to the sticky canvas.
- Pour Diamonds into the Tray: A gentle shake helps to flip them right side up, making it easier to pick them up with the pen.
- Pick and Place: Gently press the tip of your pen against a diamond to pick it up, then place it on its corresponding symbol on the canvas. Repeat!
My biggest takeaway was to enjoy the process and not rush. The act of picking up each diamond and finding its place on the canvas felt incredibly calming and satisfying.
Finishing Touches
Before I knew it, the final piece was staring back at me, sparkling under the light. The sense of completion was genuinely fulfilling.
What to do after completing your kit:
- Storage: Store excess diamonds in labeled baggies. They can be useful for future projects or in case of missing pieces.
- Displaying Your Art: While not every piece may find a place on your walls, making an artwork portfolio is a great way to preserve and occasionally admire your works.
Personalization Ideas for Diamond Painting
Personalizing your diamond painting can transform a standard kit into a unique piece of art that holds special meaning for you. Here are some ideas to inspire your creativity:
- Incorporate Names or Dates: Add a personal touch by including names, significant dates, or important quotes within your painting. Use the diamond drills to form letters and numbers in a contrasting color to make them stand out.
- Make a Thematic Border: Frame your artwork with a border that reflects a personal theme, such as your favorite colors, patterns that represent a hobby, or symbols that have personal significance.
- Mix and Match Drill Shapes: Most kits come with round or square drills, but you can order different shapes like hearts or stars to add an element of surprise and uniqueness to your painting.
- Custom Background: If you're feeling adventurous, make a custom background by using a blank canvas and plotting out a design. This could be a gradient, a skyline, or anything else that resonates with you.
- Add Special Effects: Some drills come with special effects, like glow-in-the-dark or iridescent finishes. Incorporate these into strategic parts of your painting for a stunning effect.
- Combine Multiple Kits: For a truly one-of-a-kind piece, combine elements from different kits. You can merge landscapes, splice together different images, or make a collage of your favorite themes.
- Memorialize a Photo: Convert a cherished photograph into a diamond painting. There are services that can make a custom kit for you based on your photo, allowing you to remake memories in sparkling detail.
- Seasonal Themes: Reflect on the changing seasons in your artwork. Add autumn leaves, spring flowers, summer sunsets, or winter snowflakes to your painting to give it a seasonal flair.
- Interactive Elements: Attach hooks or small pockets to your finished painting to make it interactive. Hang charms, notes, or tiny photos that you can change out as you wish.
- Gift Customizations: If you're gifting a diamond painting, tailor it to the recipient's tastes. Consider their favorite colors, animals, or hobbies, and incorporate those elements into the design.
The key to personalization is to make it meaningful to you. Whether it's a small addition or a complete overhaul, your diamond painting should reflect your individuality and creativity.
Advanced Techniques for Diamond Painting
Enhancing your diamond painting skills can lead to more intricate and impressive artwork. Here are some advanced techniques to help you make masterpieces:
- Layering Drills for Texture: Add depth to your painting by layering drills. Place smaller drills on top of larger ones to make a textured effect that brings your artwork to life.
- Color Blending: Instead of sticking to the colors provided, blend different shades by placing drills of similar hues next to each other. This technique can make a gradient or ombre effect.
- Drill Placement Precision: Use a ruler or a specially designed diamond painting tool to ensure your drills are perfectly aligned. This will give your painting a cleaner, more professional look.
- Custom Patterns: Don't be afraid to deviate from the pattern provided. Use your imagination to alter the design or add new elements that reflect your personal style.
- Mixing Drill Types: Combine different types of drills, such as opaque, translucent, and metallic, to add variety and interest to your painting.
- Making Shadows and Highlights: Use lighter and darker drills to make shadows and highlights, giving your painting a three-dimensional appearance.
- Incorporating Different Textures: Experiment with drills that have different textures, like glitter or matte finishes, to add diversity to your artwork.
- Using a Light Pad: A light pad can help you see the symbols on the canvas more clearly, making it easier to place your drills accurately.
- Sealing Techniques: Learn different sealing methods to protect your finished painting. Some sealants can enhance the shine of your drills, while others provide a matte finish.
- Speed and Efficiency: Develop a system for sorting and placing drills quickly. This can include using multi-drill applicators or organizing your drills in a way that speeds up the process.
Master these advanced techniques to elevate your diamond painting and make stunning art. Practice makes perfect, so be patient.
Troubleshooting Common Issues in Diamond Painting
When engaging in diamond painting, you might encounter a few common issues. Here's a guide to help you solve them easily:
Drills Not Sticking
- Solution: If your drills aren't sticking, the canvas might not be sticky enough. Try using a small roller to press down the drills firmly. If the problem persists, a thin layer of craft glue can help.
Misaligned Drills
- Solution: Use a straightener tool or a credit card edge to gently nudge misaligned drills into place. Working in smaller sections can also prevent misalignment.
Static Cling
- Solution: Static electricity can cause drills to stick together. A dryer sheet lightly rubbed over the drills can reduce static. Alternatively, keeping a damp cloth nearby to touch occasionally can help.
Canvas Creases
- Solution: To remove creases from the canvas, lay it flat under a heavy object for a few hours. You can also gently iron the backside of the canvas using a low heat setting.
Running Out of Drills
- Solution: It's frustrating to run out of drills before completing your painting. Contact the manufacturer for replacements or purchase similar drills from a craft store.
Difficulty Picking Up Drills
- Solution: If you're having trouble picking up drills, ensure the tip of your applicator tool is sticky enough. If it's not, dip it in wax or replace the tip.
Losing Track of Progress
- Solution: Mark completed sections with a washable marker or use a grid system to keep track of your progress. This can prevent you from losing your place.
Eye Strain
- Solution: Good lighting is crucial. Use a desk lamp or a light pad to illuminate your workspace and reduce eye strain.
Drill Spillage
- Solution: To prevent spilling drills, use a tray with a funnel to pour them back into their containers. Work over a clean, flat surface to make it easier to collect any that do escape.
Dull Drills
- Solution: Some drills may look dull after placement. A coat of sealant or Mod Podge can bring back the shine and secure them in place.
By addressing these common issues, you can ensure a smoother diamond painting experience.
FAQs About DIY Diamond Painting
Discover the ultimate guide to faqs about DIY diamond painting, from tools and techniques to tips for making stunning artwork.
DIY Diamond Painting is a craft hobby that involves placing tiny, shiny resins or “diamonds” onto a sticky canvas to create a mosaic-like picture. It’s similar to paint-by-numbers but with diamonds.
The difference lies in the facets of the diamonds. 3D diamonds have three facets on each side, while 5D diamonds have five. More facets mean more sparkle and a more detailed, vibrant result.
Yes, you can make your own pattern using any image as long as it doesn't infringe on copyright laws. There are online platforms and software that can help you convert your photo into a pattern suitable for diamond painting.
The size of the canvas affects the level of detail in the finished artwork. Larger canvases will have more room for details, making the final image clearer and more intricate. If you’re a beginner, you might want to start with a smaller canvas to get the hang of the process before moving on to larger, more detailed projects.
Once you've finished your Diamond Painting, you can frame it to preserve and display it. Choose a frame that fits the size of your canvas. If the canvas is not a standard size, you may need to have a custom frame made. Before framing, make sure the painting is flat, and all diamonds are securely attached. You can seal the painting with a sealant spray to add an extra layer of protection before placing it in the frame.
Conclusion:
In conclusion, this DIY diamond painting is an enjoyable and rewarding hobby for anyone. Make your own diamond painting with this comprehensive guide to enhance your creative skills.


