Navigating through the process of making homemade dentures seemed like an ambitious project at first. As someone who loves diving into DIY tasks, the idea of crafting a set of full uppers and lowers was both exciting and nerve-wracking. To my aid came the Denturi Complete DIY Denture Kit, which promised an easy and enjoyable experience. Let me walk you through my journey, hoping to shed light on how you too can achieve this with patience and a little bit of craftsmanship.
Getting Started: What You'll Need
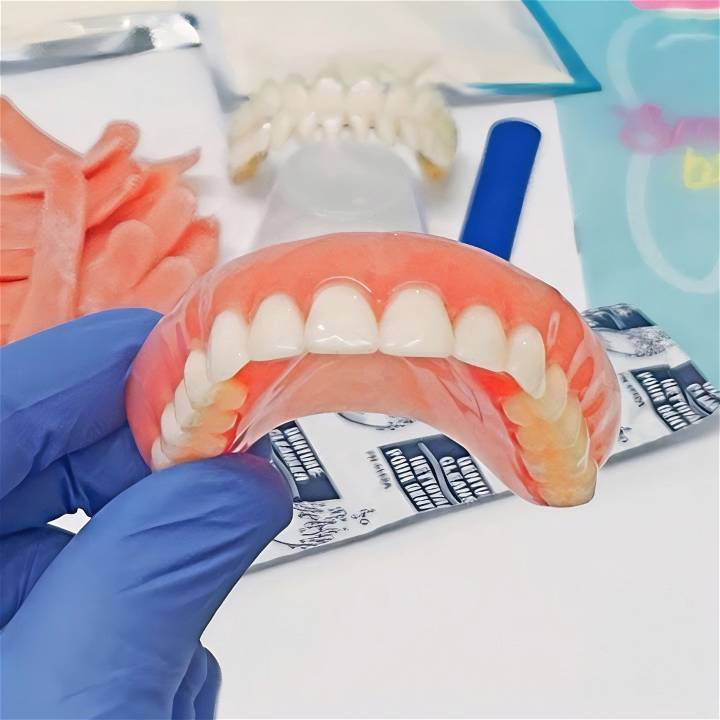
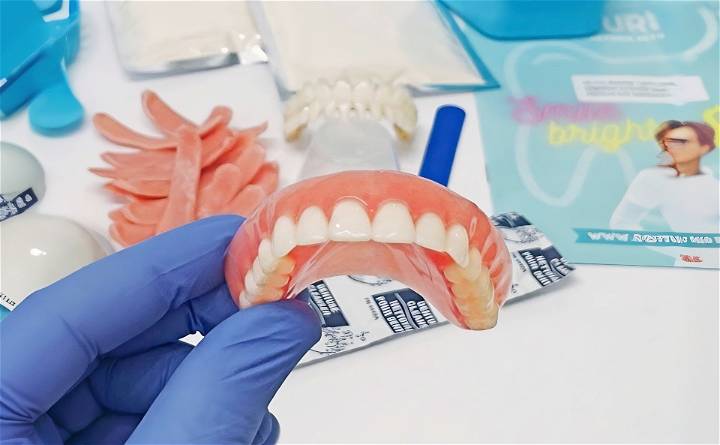
The Denturi Kit arrived neatly packaged, containing everything needed for the process:
- Two Impression Trays: For accurate dental impressions.
- Four Capsules of Putty: Key for making precise impressions of your gums.
- Two Bags of Plaster: This will form the base of your dentures.
- One Bag of Pink Gum Material: To mimic the natural gum.
- Crafting Teeth and Accessories: To give you that natural smile.
Each item in the kit serves a distinct purpose, with the ultimate goal of creating a lifelike set of dentures. The impression trays and putty capture the unique contours of your mouth, essential for comfortable and functional dentures. The plaster provides a solid foundation, while the pink gum material and teeth bring the aesthetics to life.
Step by Step Instructions
Learn how to make a lifelike dental plaster model with these step-by-step instructions. From making impressions to finishing touches, master the craft easily.
Step 1: Making Impressions
The initial step is critical. I tested the trays for a proper fit, ensuring they comfortably covered my entire gum line. Mixing the putty—speed is of the essence here—resulted in a homogenous blend, which I then rolled and pressed into the first tray. With brisk but careful movements, I placed it in my mouth, pressing firmly to get a detailed impression. After holding it for three minutes, I repeated the process for the second tray. The anticipation during these moments was palpable.
Step 2: Preparing the Plaster
With the impressions set aside, I mixed the plaster with water until it reached a creamy consistency. This step felt almost therapeutic, with no rush allowing for precision. Pouring the plaster into the impressions required a steady hand, ensuring it was as thick and high as possible to avoid breaks later on.
Step 3: Crafting the Gums
After letting the plaster set, I turned my attention to the pink gum material. Heating it in water until it was malleable, I shaped and applied it to the molds. This part was like sculpting, where the artistry comes in—manipulating the material into the natural arches of the gums and inserting the teeth while keeping the material warm and pliable.
Step 4: Finishing Touches
I meticulously positioned the teeth, ensuring they were neither too forward nor too backward. The pink material was shaped around each tooth, careful not to obscure their fronts. This required patience and a bit of skill, as I wanted to achieve the most natural look possible. The crafting stick became my best friend here, helping me refine the gum shapes to perfection.
Cooling and Unmolding
After applying the finishing touches, the dentures needed to cool and set in the fridge. The moment of truth came when I carefully removed the plaster molds. The result was astonishing—a set of dentures that looked incredibly natural and felt uniquely mine.
The Takeaway
This journey wasn't just about creating something practical; it was a profound lesson in patience, detail, and creativity. While not a replacement for professional dental work, this project provided a sense of accomplishment and a deeper appreciation for the intricacies of dental appliances.
To those embarking on this DIY adventure, take your time, follow the steps closely, and don't hesitate to reach out to the Denturi team for support. The process might seem daunting, but the result is truly rewarding. Remember, it's about the journey as much as the destination.
Common Challenges and Solutions
Address common challenges faced with dentures, such as ill-fitting, eating, speech challenges, hygiene, and odor. Discover effective solutions here.
1. Ill-Fitting Dentures: A Common Dilemma
Problem: Many individuals encounter discomfort due to poorly fitting dentures. Ill-fitting dentures can lead to sore spots, difficulty speaking, and even embarrassment.
Solution:
- Regular Assessment: Schedule regular check-ups with a dentist or prosthodontist. They can evaluate the fit of your dentures and make necessary adjustments.
- DIY Adjustments: Minor adjustments can be done at home. For instance:
- Pressure Points: Identify pressure points by paying attention to sore areas. Use a soft pencil to mark these spots on the denture base.
- Sanding: Gently sand down the marked areas using fine-grit sandpaper. Test the fit frequently during this process.
- Adhesives: Consider denture adhesives for added stability.
- Relining: Over time, the shape of your jawbone changes. Professional relining ensures a snug fit. It involves adding a new layer of material to the denture base.
- New Impressions: If your dentures persistently cause discomfort, consider getting new impressions taken. This ensures a customized fit.
2. Difficulty Eating with Dentures
Problem: Chewing comfortably can be challenging with dentures, especially during the initial adjustment period.
Solution:
- Start Slow: Begin with soft foods and gradually introduce harder textures. Cut food into smaller pieces.
- Chew Evenly: Distribute food evenly on both sides of your mouth. This prevents dentures from shifting.
- Practice: Chew deliberately and mindfully. Practice improves coordination and confidence.
- Avoid Sticky Foods: Sticky or hard-to-chew foods (like caramel or tough meats) can dislodge dentures. Be cautious.
- Denture-Friendly Diet: Opt for foods that are easier to manage, such as cooked vegetables, yogurt, and fish.
3. Speech Challenges
Problem: New dentures can affect speech clarity. Some sounds may be harder to pronounce.
Solution:
- Practice Pronunciation: Read aloud or practice tongue twisters. Focus on problem sounds.
- Slow Down: Speaking too quickly can lead to slurred speech. Take your time.
- Muscle Adaptation: Your tongue and facial muscles need time to adjust. Be patient.
- Denture Adhesives: Adhesives enhance stability, reducing speech-related issues.
4. Denture Hygiene and Odor
Problem: Maintaining clean dentures is crucial for oral health and overall well-being.
Solution:
- Daily Cleaning: Rinse dentures after meals. Brush them gently with a soft denture brush and mild soap.
- Avoid Hot Water: Hot water can warp dentures. Use lukewarm water for cleaning.
- Soak Overnight: Soak dentures in a denture-cleaning solution overnight.
- Oral Rinse: Rinse your mouth thoroughly after removing dentures.
- Odor Control: To combat odor, brush your gums, tongue, and palate daily.
Remember, patience and persistence are key. If you encounter persistent issues, seek professional advice promptly. Your smile deserves the best care!
Denture Hygiene and Odor
Maintain fresh dentures with daily cleaning to prevent odor and stains. Learn essential denture hygiene tips for a sparkling smile.
1. Daily Cleaning for Fresh Dentures
Problem: Keeping dentures clean is essential for oral health and overall comfort. Neglecting hygiene can lead to bad breath and discomfort.
Solution:
- Rinse After Meals: After eating, remove your dentures and rinse them thoroughly under lukewarm water. This helps remove food particles and debris.
- Gentle Brushing: Use a soft denture brush or a toothbrush specifically designed for dentures. Brush all surfaces, including the teeth, base, and clasps.
- Mild Soap or Denture Cleaner: Apply a small amount of mild soap or denture cleaner to the brush. Avoid using regular toothpaste, as it can be abrasive.
- Avoid Hot Water: Hot water can warp dentures. Stick to lukewarm or cool water for cleaning.
- Soak Overnight: Soaking dentures overnight in a denture-cleaning solution helps remove stains and bacteria. Follow the manufacturer's instructions.
- Oral Rinse: After removing dentures, rinse your mouth thoroughly with water or an alcohol-free mouthwash.
2. Preventing Odor and Stains
Problem: Dentures can develop unpleasant odors and stains over time.
Solution:
- Brush Your Gums and Tongue: Even without dentures, oral hygiene matters. Brush your gums, tongue, and palate daily to prevent odor.
- Avoid Smoking and Strong Flavors: Smoking and certain foods (like garlic and onions) can contribute to denture odor. Limit their consumption.
- Regular Check-Ups: Visit your dentist regularly. They can professionally clean your dentures and assess their condition.
- Avoid Bleach and Harsh Chemicals: While cleaning, avoid using bleach or harsh chemicals. Stick to denture-specific products.
- Remove Dentures at Night: Let your gums rest by removing dentures at night. Soak them in water or a denture-cleaning solution.
Remember, maintaining fresh dentures not only ensures comfort but also promotes confidence in your smile.
FAQs About DIY Dentures
Get all your questions answered about DIY Dentures in this comprehensive FAQ guide. Learn how to make your own dentures at home safely and effectively.
1. Where Do I Start?
Starting your DIY denture project can feel overwhelming, but fear not! Begin by researching and understanding the process. Our kits come with clear instructions, so take your time to read through them and gather the necessary materials.
2. What Types of Dentures Are There?
There are two main types of dentures:
- Complete Dentures: These replace all teeth in either the upper or lower jaw.
- Partial Dentures: Designed for individuals with some natural teeth remaining. They fill gaps and provide support.
3. What Is the Average Cost of Dentures?
Traditional dentures can be expensive. DIY denture kits offer a cost-effective alternative. Our kits start at a fraction of the price, allowing you to save significantly.
4. How Do I Care for My Dentures?
Proper denture care ensures longevity and comfort:
- Daily Cleaning: Rinse your dentures after meals and brush them gently with a soft denture brush.
- Avoid Hot Water: Hot water can warp dentures, so use lukewarm water for cleaning.
- Soak Overnight: Soak dentures in a denture-cleaning solution overnight to remove stains and bacteria.
- Oral Rinse: Rinse your mouth thoroughly after removing dentures.
5. Can I Sleep in My Dentures?
While it's possible, it's best to give your gums a break. Remove your dentures at night to allow proper circulation and prevent discomfort.
6. How Much Pain Is Involved with Getting Dentures?
The process of getting dentures involves some adjustments, but it shouldn't be painful. Initially, you may experience sore spots or mild discomfort. Regular check-ups with a dentist can address any issues.
Conclusion:
In conclusion, making your own DIY dentures can be a cost-effective and rewarding option. With some basic materials and a little creativity, you can make personalized dentures that fit comfortably and look natural. Happy crafting!


