Making a DIY audio guestbook can be a unique, interactive way to capture memories from your special day. Imagine your guests leaving heartfelt messages or humorous notes that you can listen to for years to come. This guide will walk you through making your own audio guestbook using an old-fashioned telephone, some basic electronic components, and a little bit of coding.
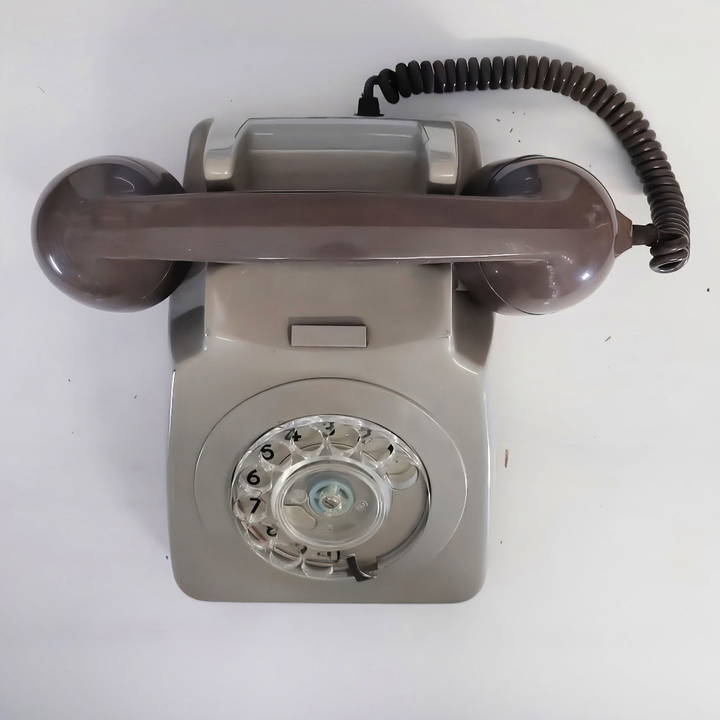
I’ve gone through this process myself, experimenting with different parts and approaches to ensure that the setup is straightforward and effective. By the end, you’ll have a functioning audio guestbook that can be personalized to suit the aesthetic of your wedding or event.
Materials Needed for the Project
Before we dive into the steps, let's go over what you'll need. Each material plays a crucial role in the project, so understanding its purpose will make the process smoother.
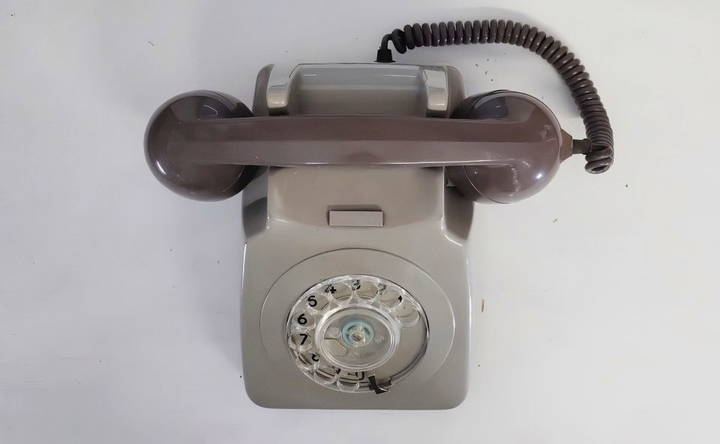
- Old Telephone Handset: I chose a GPO model 746 from eBay, a popular UK model from the 1970s and 1980s. These are sturdy, iconic, and add a vintage feel to the guestbook. You can use any model that matches your theme.
- Microcontroller (Teensy 4.0 Board): Teensy boards are known for their efficiency in processing audio signals. They maintain a steady sample rate necessary for CD-quality audio recordings.
- Audio Adapter Board (Teensy Audio Shield): This board connects the Teensy to the microphone and speaker in the telephone handset, making it easier to handle audio input and output.
- SD Card: You’ll need this to save the audio recordings. Ensure you use a fast, reliable SD card to avoid any data loss or slow recording issues.
- Basic Electronic Tools: A multimeter, jumper wires, soldering iron, breadboard, and screwdrivers will come in handy for connecting and testing various components.
These components are easily accessible online or at your local electronics store. Now, let’s dive into how to put everything together.
Step by Step Instructions
Learn how to make a DIY audio guest book with our detailed step-by-step instructions. From handset setup to final assembly and audio retrieval.
Step 1: Understanding Your Telephone Handset
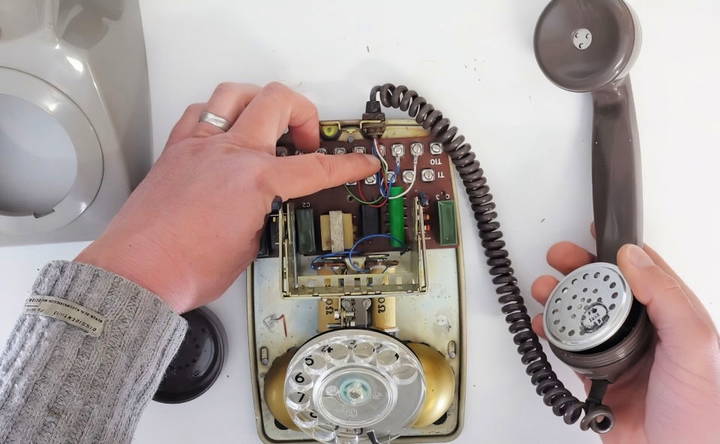
To start, you need to understand the internal wiring of your chosen telephone handset. Most vintage telephones have similar setups:
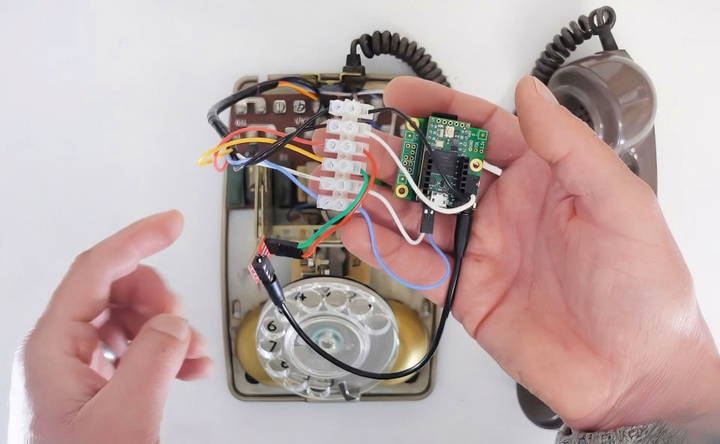
- Speaker and Microphone Wires: Open the handset to identify the wires connected to the speaker and microphone. Typically, you’ll find pairs of colored wires (e.g., red and green for the speaker, white and blue for the microphone). These will connect to the Teensy board later.
- Hook Switch: This switch detects whether the handset is on the base or lifted. When the handset is lifted, it closes a circuit, which triggers the start of the recording. Use a multimeter to find out which terminals correspond to this switch.
Tip: Not all phones will have the same wiring colors, but the process of identifying the wires is the same. Once identified, note down these connections for reference.
Step 2: Preparing the Electronics
Now that you’ve identified the important wires, it’s time to set up the electronics:
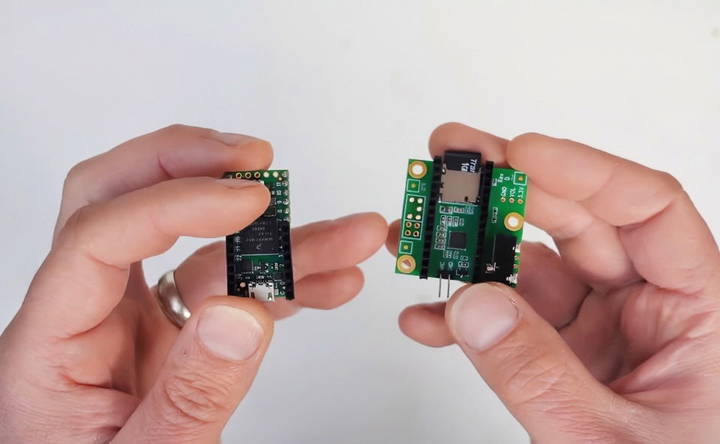
- Connecting the Teensy Board: The Teensy board will serve as the brain of the project. It will handle the recording logic and control when audio is saved to the SD card.
- Installing the Audio Shield: Plug the Teensy board into the Teensy Audio Shield. I used double-height headers to keep access to the Teensy’s GPIO pins open. This is crucial for connecting the hook switch and any playback buttons.
- Wiring to the Audio Shield: Connect the speaker and microphone wires from the telephone handset to the appropriate terminals on the audio shield. The hook switch wires go to ground and a designated GPIO pin on the Teensy board.
Tip: For a more non-destructive wiring method, use a breakout board or terminal block connectors to join wires. This setup makes it easier to replace components or make adjustments.
Step 3: Setting Up the Code Environment
Coding is the heart of this project, as it controls how the audio guestbook functions:
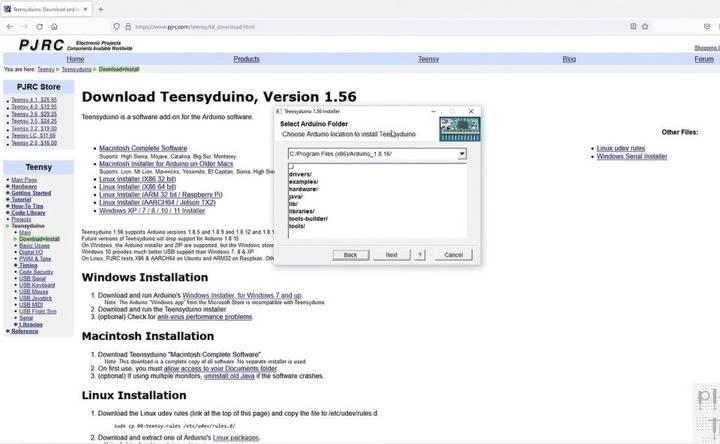
- Install Teensyduino: This software integrates with the Arduino IDE and allows you to write code for Teensy boards. Download it from the official Teensy website and follow the installation instructions.
- Include the Necessary Libraries: When setting up Teensyduino, ensure you include the Audio, Bounce, and Time libraries. These libraries will help manage the audio recording, button debouncing, and timestamping functions.
- Configure the Code: The code needs to be adjusted for your specific telephone model and desired functionalities. I’ve provided some tips and tricks throughout the tutorial to help you tweak the code based on the behavior of your telephone’s hook switch or other unique characteristics.
Tip: Use Teensy’s graphical user interface to visualize and drag-and-drop audio components like mixers, inputs, and outputs, then export the code for easier customization.
Step 4: Writing and Uploading the Code
Now it's time to dive into the code and get the guestbook running:
- Initialize Serial Communication and Configure Inputs: Define the microphone input, speaker output, and hook switch detection. Set up any GPIO pins connected to buttons or switches.
- Manage Audio Recording: Write functions to handle starting, stopping, and saving audio recordings. Ensure that your code checks for the hook switch's state—if it’s lifted, start recording; if placed back, stop recording and save the file to the SD card.
- Playback Functionality: Add a playback button to review messages. Write a function to play back all recorded messages through the handset's earpiece.
- Debugging: Include serial print statements to monitor the code's status in real-time through the Arduino IDE's serial monitor.
- Upload the Code: Connect the Teensy board to your computer and upload the code using the Arduino IDE.
Tip: Make sure to keep the audio output volume and microphone gain at appropriate levels to avoid distortion.
Step 5: Final Assembly and Testing
Once your code is ready and uploaded, it’s time to assemble everything:
- Arrange the Electronics: Secure the Teensy, audio shield, and SD card inside or near the telephone. Use a separate box if needed.
- Test the Hook Switch and Recording: Pick up the handset to ensure the recording starts, and place it back to stop recording. Verify that the audio files are saved correctly on the SD card.
- Playback Messages: Use the playback button to test if recorded messages play back correctly through the earpiece.
Tip: Test with multiple recordings to ensure that the SD card can handle the audio files properly and without delays.
Step 6: Retrieve and Convert Audio Files
After your event, you’ll want to listen to the messages your guests left:
- Remove the SD Card: Insert it into your computer.
- Convert Raw Audio Files: Use software like Audacity to import and convert raw audio files to WAV or MP3. Alternatively, use command-line tools like SoX for batch conversion.
Tip: Keep the original raw files as backups in case you need to convert them again or use different software later.
Creative Ideas for Personalization
Personalizing your audio guest book can make it a memorable and unique part of your event. Here are some creative ideas to help you add a personal touch:
Custom Greetings
Start with a warm, personalized greeting. Record a message from the hosts welcoming guests and explaining how to use the audio guest book. This sets the tone and makes guests feel special.
Themed Decorations
Match the recording station to your event’s theme. For a wedding, you could use elegant flowers and soft lighting. For a birthday party, consider colorful balloons and fun props. The decorations can make the recording area inviting and encourage guests to participate.
Personalized Prompts
Provide guests with prompts to help them leave meaningful messages. Here are some examples:
- “Share your favorite memory with us.”
- “What advice do you have for the future?”
- “Tell us a funny story about the host.”
These prompts can be displayed on cards or a sign near the recording station.
Custom Backdrops
Make a backdrop that reflects the event’s theme. This could be a simple curtain, a decorated wall, or even a photo booth setup. A nice backdrop can make guests feel more comfortable and excited to leave a message.
Guest Instructions
Make sure guests know how to use the audio guest book. Provide clear instructions, either written or recorded. You can also have a friend or family member nearby to assist.
Interactive Elements
Add interactive elements to make the experience more engaging. For example, you could include a photo booth where guests can take pictures before or after recording their message. This adds an extra layer of fun and makes more memories.
Personalized Thank You Messages
After the event, send personalized thank you messages to guests who left recordings. You can include a snippet of their message as a reminder of their contribution. This shows appreciation and makes the experience more memorable for them.
Custom Audio Filters
If you have the technical know-how, consider adding custom audio filters to the recordings. This can enhance the sound quality and add a unique touch to each message.
Memory Book
Make a physical memory book to accompany the audio guest book. Include photos from the event, written messages, and QR codes that link to the audio recordings. This provides a tangible keepsake that complements the digital recordings.
Event-Specific Themes
Tailor the audio guest book to the specific event. For example, at a wedding, you could have guests share their best marriage advice. At a birthday party, they could share their favorite memories with the birthday person. This makes the messages more relevant and meaningful.
Use these ideas to make your audio guest book a memorable part of your event, capturing voices and showcasing your celebration's unique theme.
Troubleshooting Common Issues
Creating an audio guest book can be a fun and memorable experience, but sometimes things don’t go as planned. Here are some common issues you might encounter and how to solve them:
Poor Audio Quality
Issue: The recordings are unclear or have background noise.
Solution:
- Use a Quality Microphone: Invest in a good microphone to capture clear audio.
- Quiet Environment: Set up the recording station in a quiet area away from loud music or chatter.
- Test Beforehand: Do a few test recordings to check the sound quality and make adjustments as needed.
Technical Difficulties
Issue: The recording device isn’t working properly.
Solution:
- Check Connections: Ensure all cables and connections are secure.
- Charge Devices: Make sure your recording device is fully charged or plugged in.
- Backup Plan: Have a backup device ready in case the primary one fails.
Guests Are Unsure What to Say
Issue: Guests hesitate or don’t know what to say in their recordings.
Solution:
- Provide Prompts: Display prompts or questions to guide guests. For example, “Share a favorite memory” or “Give some advice.”
- Example Recordings: Play a few example recordings to give guests an idea of what to say.
- Encourage Participation: Have a friend or family member encourage guests to participate and make them feel comfortable.
Limited Participation
Issue: Not many guests are using the audio guest book.
Solution:
- Prominent Placement: Place the recording station in a high-traffic area where guests can easily see it.
- Announcements: Make periodic announcements to remind guests to leave a message.
- Interactive Elements: Combine the audio guest book with other interactive elements like a photo booth to draw more attention.
File Management
Issue: Managing and organizing the audio files after the event.
Solution:
- Label Files: Label each recording with the guest’s name or a brief description.
- Organize Files: Make folders to organize the recordings by date or event.
- Backup Files: Save copies of the recordings on multiple devices or cloud storage to prevent data loss.
Shy or Nervous Guests
Issue: Some guests may feel shy or nervous about recording a message.
Solution:
- Private Space: Provide a bit of privacy for the recording area to make guests feel more comfortable.
- Encouragement: Offer gentle encouragement and let guests know their messages are appreciated.
- Short Messages: Assure guests that short and sweet messages are perfectly fine.
Equipment Malfunctions
Issue: Equipment stops working during the event.
Solution:
- Regular Checks: Periodically check the equipment to ensure it’s functioning properly.
- Spare Parts: Keep spare batteries, cables, and other essential parts on hand.
- Technical Support: Have someone knowledgeable about the equipment available to troubleshoot issues.
By anticipating these common issues and having solutions ready, you can ensure your audio guest book runs smoothly and captures wonderful memories from your event.
FAQs About DIY Audio Guest Books
Explore FAQs about DIY audio guest books. Learn about materials, setup, and tips for making unique audio keepsakes at your events.
An audio guest book is a modern twist on the traditional guest book. Instead of writing messages, guests record their voices. This makes a unique and personal keepsake of your event. Guests can share memories, well-wishes, or advice, making it a fun and interactive experience.
An audio guest book offers several benefits:
Personal touch: Voice recordings capture emotions and personality.
Interactive: Guests enjoy the novelty and engagement.
Memorable keepsake: You can listen to the messages for years to come.
Versatile: Suitable for weddings, birthdays, and other events.
To encourage participation:
Place the station in a high-traffic area: Near the entrance or main event space.
Make it fun: Decorate the area and provide props.
Use a host: Have someone invite guests to leave a message.
Provide prompts: Give guests ideas on what to say.
After the event, you can:
Transfer recordings: Save them to a computer or cloud storage.
Edit and compile: Use audio editing software to enhance and compile messages.
Share with guests: Make digital files, USB drives, or even vinyl records as keepsakes.
An audio guest book is versatile and can be used for various events, including:
Weddings: Capture heartfelt messages from guests on your special day.
Birthdays: Record birthday wishes and memories from friends and family.
Anniversaries: Collect stories and well-wishes to celebrate milestones.
Retirement parties: Gather messages of appreciation and fond memories.
Corporate events: Record feedback, testimonials, or messages from attendees.
Conclusion
Building your own DIY audio guestbook is a rewarding project that combines electronics, coding, and a bit of creativity. Not only does it offer a personalized touch to your wedding or event, but it also provides a way to capture unique memories that can be cherished forever.
Feel free to adjust the design to match your theme, whether it's vintage, modern, or something entirely unique. This project is just a starting point—your imagination is the limit!


