Starting a DIY leaf vacuum project was a great decision. Fall leaves were accumulating in my yard, and I needed an easy solution. So, I decided to make a homemade leaf vacuum using items I already had. This project wasn't just cost-effective; it also helped me learn something new and useful.

Making my own leaf vacuum turned out to be quite simple and satisfying. I gathered a few materials, like a vacuum motor, a hose, and a collection bag. Assembling them was straightforward, and soon, I had a functional machine ready to clear my yard. If I can do it, you surely can too! Trying this will help you manage fall leaves effectively.
Materials You'll Need and Why
- Half-inch Plywood: Forms the base of the collector, chosen for its durability and affordability.
- 2x2 Lumber: Used to prop up the back end. Its sturdy nature ensures stability.
- Metal Brackets & L-Brackets: To secure corners and provide structural support.
- Deer Netting: A lightweight, yet strong fabric that encloses the leaves while allowing air to escape.
- Wooden Slats & Brad Nails: For securing loose ends of the netting to the frame.
- Door Hinges & Slide Bolt: These are used to build a door for easy leaf disposal.
- 8-inch Round Ducting (Optional): If you don't have a bagger system, this conducts leaves into the collector.
- Coat Hanger Wires: Added stability to prevent the box from rocking.
Step by Step Instructions
Learn how to make your own DIY leaf vacuum with our step-by-step guide. From preparing the base to the final touches, make yard work easier and more efficient!
Preparing the Base
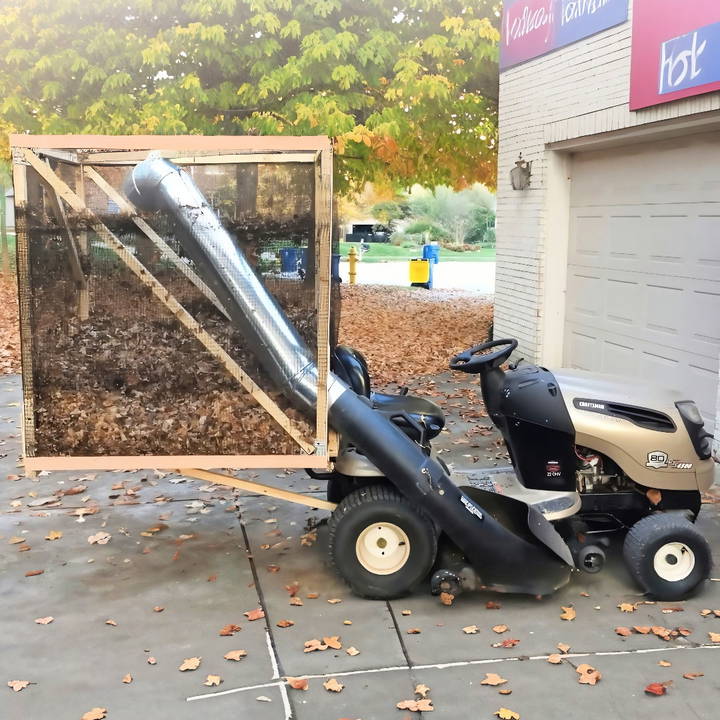
I started by cutting the half-inch plywood to match the width of my mower, making it 4 feet long for ample collection space. Then, I drilled a couple of 1-inch holes at one end and set it on my mower to ensure a snug fit.
Assembling the Frame
Using the 2x2 lumber, I constructed a back edge and propped up the van with it, securing it with screws. I then built two 4-foot squares for the sides, using metal and L-brackets for the corners, and added angular braces to prevent tipping.
Securing the Netting
Wrapping the frame with deer netting was next. I chose this material for its durability and airflow. After draping the net, I secured its edges with wooden slats, ensuring no leaves could escape.
Crafting the Door
For easy leaf disposal, I installed a door on one side using hinges and a slide bolt for closing. Cutting the netting under the door ensured leaves could be easily removed without tangling.
Connecting the Leaf Input
Since I had an existing bagger system, I adapted it to funnel leaves into the collector. If you're starting from scratch, 8-inch round ducting is perfect for this. Install a support board to hold the ducting in place.
Final Touches for Stability
Initially, the collector rocked a bit during use. To remedy this, I attached two coat hanger wires on each side, providing additional stability.
Using Your DIY Leaf Vacuum
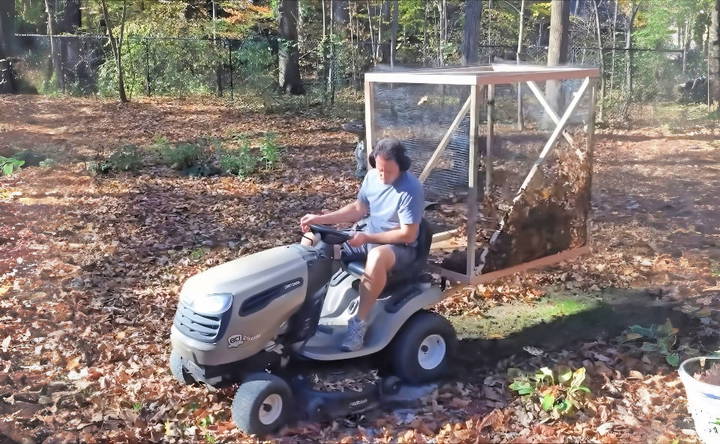
To test it out, I attached the collector to my lawn mower and started collecting leaves. A minor hiccup occurred when leaves clogged the input pipe. Adding a longer piece solved this, allowing leaves to drop smoothly into the collector. Emptying the collector was straightforward, thanks to the built-in door.
Key Insights and Tips
- Stability is Crucial: Ensure your collector is well-supported to handle the weight of the leaves.
- Optimize Airflow: Make sure there's enough ventilation through the netting to prevent overheating.
- Regular Checks: Periodically stop to check for clogs in the input duct. Adjustments may be necessary depending on the volume and type of leaves.
Customization Ideas for Your DIY Leaf Vacuum
Building a DIY leaf vacuum offers the flexibility to tailor it to your specific needs. Here are some customization ideas that can enhance the functionality and efficiency of your leaf vacuum:
Adjustable Suction Power
- Why It's Useful: Different types of debris may require different suction strengths. Being able to adjust the suction power can make your leaf vacuum more versatile.
- How to Implement: Add a variable speed controller to the motor. This allows you to change the suction power based on the task at hand.
Interchangeable Nozzles
- Why It's Useful: Different nozzle shapes can be better suited for various tasks, such as narrow nozzles for tight spaces or wide nozzles for open areas.
- How to Implement: Design a simple latch or screw mechanism to easily switch between nozzles.
Ergonomic Handle Design
- Why It's Useful: A comfortable handle reduces strain on your arms and back, making the leaf vacuum easier to use for extended periods.
- How to Implement: Use foam padding or ergonomic grips that conform to the shape of your hands.
Battery Life Indicator
- Why It's Useful: Knowing how much battery life remains can help you manage your cleaning sessions more effectively.
- How to Implement: Integrate a simple LED indicator that shows the battery level.
Leaf Shredding Feature
- Why It's Useful: Shredding leaves can reduce their volume, making disposal more efficient.
- How to Implement: Incorporate a metal impeller with shredding blades within the vacuum's airflow path.
Detachable Collection Bag
- Why It's Useful: A detachable bag makes it easier to empty the vacuum without spilling debris.
- How to Implement: Use a clip-on or Velcro system to secure the bag, allowing for quick removal and attachment.
Noise Reduction System
- Why It's Useful: Loud equipment can be disruptive. A quieter leaf vacuum is more pleasant for both the user and the surrounding environment.
- How to Implement: Add mufflers or use materials that dampen sound within the construction of the vacuum.
Start simple with DIY projects and add features as you get comfortable. Always prioritize safety and test your customizations thoroughly.

Maintenance and Troubleshooting for Your DIY Leaf Vacuum
Keeping your DIY leaf vacuum in top condition is crucial for its longevity and performance. Here's a straightforward guide to maintaining your device and solving common issues:
Regular Maintenance Checklist
- Clean the Air Filter: After each use, remove and tap the filter clean. Replace it if it's worn out.
- Inspect the Suction Hose: Look for any blockages or damage. Clear any debris and patch up small holes.
- Check the Motor: Ensure it's free of dust and the vents are not blocked.
- Tighten Loose Parts: Screws and bolts can loosen over time. Tighten them regularly.
Troubleshooting Common Problems
Troubleshooting Common Problems: Fix loss of suction, motor not starting, unusual noises, and overheating issues efficiently to keep your device running smoothly.
Loss of Suction
- Possible Causes: Clogged filter, full collection bag, or a leak in the hose.
- Fix: Clean or replace the filter, empty the bag, and seal any leaks with duct tape or hose repair tape.
Motor Not Starting
- Possible Causes: Dead battery, faulty power switch, or motor burnout.
- Fix: Recharge or replace the battery, check the power switch for continuity, and inspect the motor for signs of damage.
Unusual Noises
- Possible Causes: Loose parts, debris inside the mechanism, or a damaged impeller.
- Fix: Tighten all connections, clear out debris, and replace the impeller if necessary.
Overheating
- Possible Causes: Blocked air vents, overuse, or a malfunctioning motor.
- Fix: Clean the vents, let the vacuum cool down before reusing, and check the motor for wear and tear.
The best way to avoid problems is to perform regular maintenance. If you encounter an issue that you can't fix, don't hesitate to seek help from a professional.
FAQs About DIY Leaf Vacuum
Discover answers to common questions about DIY leaf vacuum projects. Find tips, tools, and techniques for effective leaf cleanup.
A DIY leaf vacuum is a homemade device that can suck up leaves from your yard, similar to a regular vacuum cleaner but designed for outdoor use. It typically involves attaching a collection system, like a box or bag, to a lawn mower or leaf blower that has been modified to have suction power. The leaves are then drawn into the collection system for easy disposal or composting.
The main benefits of a DIY leaf vacuum are cost savings and customization. Commercial leaf vacuums can be expensive, so building your own can be a more affordable option. Additionally, you can customize the size and features of your leaf vacuum to suit your specific needs and the size of your yard.
When making a leaf vacuum, it’s important to avoid mistakes such as not securing the collection system properly, which can lead to leaves escaping or the system detaching from the mower or blower. Also, ensure that the suction is strong enough to pick up leaves efficiently and that the vacuum is easy to maneuver around your yard.
Yes, many leaf blowers can be converted into vacuums with the right attachments. You’ll need a special kit that typically includes a nozzle for suction and a bag for collecting leaves. Follow the manufacturer’s instructions carefully to ensure that the conversion is done safely and effectively.
Maintaining your DIY leaf vacuum involves regular cleaning of the collection bag or box, checking for any clogs in the suction path, and ensuring all connections are secure. It's also important to inspect the blades or impellers for wear and tear if your vacuum includes a shredding function. Lubricating moving parts and storing the vacuum in a dry place can also help extend its lifespan. Remember to consult the manual or guide you followed to build your vacuum for specific maintenance tips related to your model.
Conclusion
I'm very confident that building your DIY leaf vacuum will make your fall yard clean-up easier. With a little effort, you can have a useful tool to tackle those leaves. Give it a try and see the difference it makes!


